The homepage acts as your digital storefront. Its clarity, visual appeal, and strategic organization will directly impact the conversions and brand trust. A well-designed homepage balances aesthetics, usability, and conversion-driven elements. The aim is to guide shoppers seamlessly from discovery to purchase.
From intuitive navigation to persuasive visuals, every detail matters. So this blog will take you through the top eCommerce homepage design tips to boost conversions and enhance UX. Let’s begin.
Key Elements of a Good eCommerce Homepage Design
A high-quality eCommerce homepage does more than look good–—it builds trust, guides decisions, and drives sales. The best designs follow a strategic balance of clarity, speed, and persuasive elements to keep visitors engaged.
Clear Value Proposition
Your homepage has seconds to answer one critical question: Why should customers choose you? A strong value proposition cuts through the noise with concise messaging.
You need to highlight the discounts, free shipping, or unique selling points. Use bold headlines, benefit-driven copy, and supporting visuals to instantly communicate what sets your brand apart.
Intuitive Navigation
A confused visitor is a lost sale. Streamline navigation with a clean menu, logical categories, and a search bar that anticipates user intent. Dropdown menus, breadcrumbs, and sticky headers help shoppers find products effortlessly.
The easier it is to browse, the longer they stay—and the more likely they are to convert.
Strategic Call-to-Action (CTA)
A weak CTA is a missed opportunity. High-converting CTAs use action-driven language (“Shop Now,” “Get 20% Off”) and stand out with contrasting colors. Place them above the fold, near high-interest content, and limit choice overload.
You need to guide users toward one primary action at a time.
Trust Signals
Shoppers hesitate without proof of credibility. Reinforce trust with customer reviews, security badges, payment logos, and guarantees (e.g., “Free Returns”). Displaying trust signals near CTAs can reduce cart abandonment.
When buyers feel secure, they’re more likely to complete a purchase.
Mobile Optimization
Over half of eCommerce traffic comes from mobile—yet many sites still frustrate users with tiny buttons and slow load times. A mobile-friendly homepage needs thumb-friendly navigation, responsive images, and fast performance.
Google prioritizes mobile-first indexing, so lagging here hurts both UX and SEO.
Visual Hierarchy
Guide eyes where they matter most. Use size, color, and spacing to prioritize key elements: hero banners for promotions, product grids for bestsellers, and CTAs that pop. A well-structured layout ensures visitors see what you want them to see—without feeling overwhelmed.
Personalization
Generic homepages miss engagement opportunities. Dynamic content—like location-based offers, recently viewed items, or “Recommended for You” sections—makes shoppers feel understood.
Tools like AI-driven product recommendations can boost conversions by tailoring the experience in real time.
Fast Load Speed
Every second of delay costs conversions. Compress images, leverage browser caching, and minimize redirects to keep load times under 2-3 seconds. Speed isn’t just a ranking factor—it’s a make-or-break element for keeping impatient shoppers engaged.
Each of these elements plays a critical role in turning casual browsers into loyal customers. So hire eCommerce developers with us and have these elements incorporated on your eStore homepage. We’ll help optimize them consistently, so your homepage becomes a conversion powerhouse.
Top eCommerce Homepage Design Tips & Practices
Your homepage is the digital storefront of your online business—it needs to captivate, guide, and convert visitors within seconds. A well-optimized eCommerce homepage blends aesthetics with functionality. That ensures navigation while driving sales.
Create a Product-focused Hero Section
The hero section is prime homepage real estate. Feature high-quality visuals of your best-selling or seasonal product with a clear CTA. A compelling hero image with minimal text grabs attention instantly and sets the tone for the shopping experience.
What to Do?
- Use high-quality images or videos of your best-selling/most appealing product.
- Keep text minimal—highlight only the key benefit or offer.
- Include a strong, action-driven CTA (e.g., “Shop Now” or “Get 50% Off”).
- Ensure the hero section loads quickly and is mobile-responsive.
- Test different hero banners (A/B test) to see which performs best.
Show Clear Value Proposition
Tell visitors why they should buy from you in seconds. Highlight free shipping, discounts, or unique benefits upfront. A strong value proposition builds trust and reduces bounce rates.
What to Do?
- State your unique selling point (USP) in a short, bold headline.
- Support it with a brief subheading or bullet points if needed.
- Place it above the fold—visitors should see it immediately.
- Use icons or visuals to reinforce trust (e.g., free shipping, easy returns).
- Avoid jargon—keep messaging simple and customer-focused.
Include Primary Call-to-Actions (CTAs)
Strong CTAs guide users toward conversion. Use action-driven phrases like “Shop Now” or “Get 50% Off” in contrasting colors. Place them strategically to maximize clicks.
What to Do?
- Use contrasting colors to make CTAs stand out.
- Keep CTA text action-oriented (“Buy Now,” “Claim Offer”).
- Place primary CTAs near high-value content (hero section, product grids).
- Limit choices—one main CTA per section to avoid decision fatigue.
- Test different CTA placements and wording for better conversions.
Show Highly-recommended Products First
Display bestsellers or trending items first—social proof drives sales. Customers trust popular choices, increasing the likelihood of a purchase.
What to Do?
- Display bestsellers, top-rated, or trending products at the top.
- Use labels like “Customer Favorites” or “Bestsellers” to build trust.
- Include quick-view options or “Add to Cart” buttons for faster decisions.
- Update this section regularly based on sales data.
- Ensure mobile users can easily scroll and tap these products.
Feature the New Arrivals & Seasonal Items
Fresh inventory excites shoppers. Highlight new or seasonal products to create urgency and keep your store looking updated.
What to Do?
- Create a dedicated “New Arrivals” section near the top.
- Use urgency cues like “Just Launched” or “Limited Stock.”
- Rotate seasonal items (e.g., holiday collections) for relevance.
- Link these products to related categories for easy exploration.
- Highlight exclusivity (e.g., “Only Available Here”).
Highlight the Offers Clearly
Discounts and deals should be unmissable. Use bold banners, countdown timers, or badges to draw attention and boost conversions.
What to Do?
- Use bold, eye-catching banners for discounts (e.g., “50% Off Today Only”).
- Place offers near the top or in sticky headers for visibility.
- Add countdown timers for time-sensitive deals.
- Ensure promo codes (if any) are easy to apply at checkout.
- Avoid overwhelming users—keep offers relevant and uncluttered.
Add a Competent Search Box With Autocomplete
A smart search bar speeds up product discovery. Autocomplete and filters help users find what they need faster, improving UX.
What to Do?
- Place the search bar prominently (top center or top right).
- Enable autocomplete with product suggestions.
- Include filters (e.g., by category, price) in search results.
- Optimize for typos and synonyms (e.g., “sneakers” vs. “running shoes”).
- Track search queries to identify popular/unavailable products.
Add Social Proof Elements
Customer reviews, ratings, and testimonials build credibility. Display them prominently to reassure hesitant buyers and increase trust.
What to Do?
- Show customer reviews/ratings on product thumbnails.
- Display trust badges (e.g., “10,000+ Happy Customers”).
- Feature testimonials or user-generated content (UGC).
- Highlight press mentions or influencer endorsements if applicable.
- Keep social proof near CTAs to reduce hesitation.
Create Well-structured Navigation Menu
Simplify browsing with a clean, organized menu. Use dropdowns for categories and ensure mobile responsiveness for seamless navigation.
What to Do?
- Use clear, concise category names (e.g., “Men’s Shoes,” not “Footwear”).
- Limit top-level menu items to 5-7 for simplicity.
- Include dropdowns for subcategories (e.g., “Running → Trail Shoes”).
- Add a “Sale” or “Deals” link for bargain hunters.
- Test menu usability on mobile (hamburger menu should be easy to use).
Prioritize Clarity Over Creativity
Aesthetic design matters, but usability comes first. Prioritize clean layouts, readable fonts, and straightforward messaging. Confusing designs drive users away—clarity keeps them shopping.
What to Do?
- Avoid overly artistic designs that confuse users.
- Use readable fonts (sans-serif for web) and sufficient contrast.
- Keep product images clean with white backgrounds when possible.
- Ensure buttons look clickable (shadows, rounded corners).
- Follow conventional eCommerce layouts for familiarity.
Build FOMO (Fear Of Missing Out)
Scarcity drives action. Use phrases like “Limited Stock” or “Selling Fast” to create urgency. Countdown timers for flash sales also push hesitant buyers to act quickly.
What to Do?
- Show stock levels (“Only 3 Left!”) for high-demand items.
- Use countdown timers for flash sales.
- Highlight recent purchases (“20 bought in the last hour”).
- Offer limited-time discounts (“Ends Tonight”).
- Use urgency colors (red/orange) for low-stock warnings.
Show the Trust Factors
Security badges, payment logos, and return policies reassure shoppers. Display these near checkout buttons to reduce cart abandonment and build confidence in your brand.
What to Do?
- Display secure payment icons (Visa, PayPal, SSL badges).
- Mention return policies (“Free 30-Day Returns”).
- Show shipping info (“Free Delivery Over $50”).
- Add contact info (live chat, phone number) for reassurance.
- Feature certifications (e.g., “Eco-Friendly Certified”).
Optimize for a Mobile-first Experience
Most shopping happens on phones. Ensure fast load times, thumb-friendly buttons, and responsive design. A smooth mobile experience improves rankings and conversions.
What to Do?
- Use large, tappable buttons (minimum 48×48 pixels).
- Simplify forms (autofill, fewer fields).
- Compress images to reduce load times.
- Test on multiple devices (iOS, Android, different screens).
- Avoid pop-ups that block mobile navigation.
Prioritize Performance & Security
Slow or unsafe sites lose customers. Optimize images, enable HTTPS, and minimize plugins. Speed and security impact both user trust and SEO rankings.
What to Do?
- Optimize images (WebP format, lazy loading).
- Enable HTTPS and display security badges.
- Minimize redirects and unnecessary scripts.
- Use a fast, reliable hosting provider.
- Regularly test speed (Google PageSpeed Insights).
A homepage built with taking these practices into account will work hard to turn visitors into customers. So implement them carefully to boost engagement, improve UX, and drive more sales.
And for the most successful results with these practices, get our eCommerce website design services.
FAQs on eCommerce Homepage Design Tips
How many CTAs should I include on the homepage?
Focus on one primary CTA (like “Shop Now”) above the fold, with secondary CTAs (e.g., “Learn More”) placed strategically. Too many options can overwhelm users.
What’s the best way to display social proof on the homepage?
Show customer reviews, ratings, trust badges, or real-time purchase notifications near high-value sections (like product grids or CTAs) to build credibility quickly.
How can I improve mobile usability for my eCommerce homepage?
Use thumb-friendly buttons, compress images, simplify navigation (like a sticky menu). Also, ensure fast load times—Google prioritizes mobile-friendly sites in rankings.
How often should I update my homepage content?
Refresh seasonal promotions, new arrivals, and bestsellers regularly. Test different layouts and CTAs monthly to optimize for conversions.
What’s the best placement for the search bar?
Top-center or top-right, with autocomplete and filters. Ensure it’s visible on all devices—30% of eCommerce visitors use search immediately.
Let’s Wrap It Up
Your homepage is more than just a landing page. It’s like a digital handshake that welcomes visitors and sets the tone for their shopping experience. A well-designed homepage blends clarity, speed, and persuasion, guiding users seamlessly from discovery to purchase.
Remember, the best eCommerce homepages prioritize user needs over flashy design. Test, refine, and keep optimizing based on real data. That ensures your homepage stays aligned with customer expectations and industry trends. So, want to design and build the best eCommerce homepage? Then connect with us today!
]]>But a poorly executed switch risks search rankings, customer experience, and sales. So how do you go about the BigCommerce to WooCommerce migration? There are both automated as well as manual methods.
This blog will cover everything from planning, data transfer, and design consistency to post-move optimizations. So let’s begin.
Why Migrate From BigCommerce to WooCommerce?
Both BigCommerce and WooCommerce are two of the outstanding platforms building eStores. But of course, one would be more suitable than the other. Let’s look at a few reasons to shift from BigCommerce to WooCommerce.
Cost-efficiency & Transparent Pricing
Unlike BigCommerce’s tiered plans with hidden transaction fees, WooCommerce is free and open-source—you only pay for hosting and extensions you need. No surprise charges when scaling, and you control every cost.
Unmatched WordPress Integration
WooCommerce seamlessly merges with WordPress, letting you manage blogs, memberships, and eCommerce in one place. Leverage around 58K+ WordPress plugins for content marketing, SEO, and lead generation without workarounds.
Superior Customization Options
Break free from BigCommerce’s template restrictions. WooCommerce offers full code access, unlimited design tweaks, and compatibility with page builders like Elementor. You get truly unique storefronts—no “cookie-cutter” limitations.
Ownership & Data Control
With WooCommerce, you own your data—no vendor lock-in. Host it anywhere, switch providers freely, and avoid BigCommerce’s platform-dependent rules. Your store, your terms.
Scalability on Your Terms
BigCommerce forces upgrades for advanced features. WooCommerce scales affordably—optimize hosting for your exact traffic needs without mandatory premium plans. Grow big or stay lean without artificial limits.
WooCommerce becomes particularly valuable as stores scale and need more specialized functionality. Our eCommerce migration services will help ensure the flexibility, cost structure, and a seamless integration.
Before the BigCommerce to WooCommerce Migration
Migrating from BigCommerce to WooCommerce isn’t just about moving data—it’s about ensuring business continuity. You need careful preparation to avoid data loss, downtime, or SEO-related setbacks. So before we proceed to migrating the platform, there are a few steps to take care of.
Backup Your Existing BigCommerce Store
Before making any changes, create a full backup of your BigCommerce store, including:
- Product data (SKUs, descriptions, variants)
- Customer details (orders, accounts, shipping info)
- Store design (theme files, custom CSS, JavaScript)
- SEO elements (URLs, meta titles, descriptions)
Step 1: Go to BigCommerce Dashboard and navigate to Products > Export.
You’ll be taken to a dedicated Export screen.
Step 2: Choose ‘Bulk Edit’. It’ll open a Products popup.
Step 3: Select ‘Export my Products to a CSV file’. That will ready a downloadable export file.
Step 4: Click ‘Download my Product File’.
That will successfully create a backup for your products and product images.
Step 5: Go to Customer > Export.
Repeat the same steps to back up the customer data.
Step 6: Go to Order > Export.
Repeat the same steps to back up the order data.
Make sure to store backups in multiple locations (cloud, local drive) for redundancy.
Choose a WordPress Hosting Provider
Unlike BigCommerce (a SaaS platform), WooCommerce (along with WordPress) is self-hosted. So your store’s performance, security, and scalability will heavily depend on your hosting provider. It’ll not only give you more control—but also more responsibility in selecting a server that meets your store’s needs.
So here are a few factors to consider when selecting the right hosting for your WooCommerce store:
Hosting Type
Not all hosting is built for WooCommerce. So first off, you need to consider the different types:
- Shared hosting may be budget-friendly but struggles with high traffic.
- VPS (Virtual Private Server) offers better control.
- Managed WooCommerce hosting (like Kinsta or Nexcess) provides optimized performance, automatic updates, and expert support.
- For large stores, dedicated servers ensure maximum resources without sharing.
Performance & Speed
A slow store kills conversions. Look for hosting with:
- SSD storage
- PHP 8+ support
- Built-in caching (Redis, Varnish)
- CDN integration to boost global load times
Check for server response times under 500ms—critical for SEO and user experience.
Security Features
WooCommerce stores handle sensitive data. Ensure your host provides:
- Free SSL certificates (non-negotiable for payments)
- DDoS protection & firewalls
- Malware scanning & automatic backups
- PCI compliance if accepting credit cards directly
WooCommerce-Specific Optimizations
Generic WordPress hosting won’t cut it. Seek hosts with:
- Pre-installed WooCommerce (1-click setups)
- Optimized databases for product queries
- Object caching for cart/checkout performance
- Staging environments to test updates safely
Scalability & Resources
Traffic spikes shouldn’t crash your store. Prioritize hosts with:
- Auto-scaling (extra RAM/CPU during sales)
- Unmetered bandwidth (no surprise overage fees)
- No restrictive limits on products or orders
Support & Migration Help
24/7 expert support is a must. Bonus if they offer:
- Free migration services (no DIY headaches)
- WooCommerce-trained staff (not just generic WordPress help)
- Guaranteed response times (under 30 minutes for critical issues)
Pricing & Value
Cheap hosting often costs more long-term. Compare:
- Renewal rates (intro discounts can spike later)
- Included features (backups, SSL, CDN) vs. add-on costs
- Money-back guarantees (risk-free testing)
Avoid shared hosting for high-traffic stores—prioritize VPS or dedicated servers for better reliability. A few of the top recommended hosting services for WooCommerce are Kinsta, SiteGround WooCommerce, Hostinger, and Cloudways.
Set Up a New WooCommerce Store
A properly configured WooCommerce store ensures a smooth transition from BigCommerce. Follow these steps to build a strong foundation before migrating your data.
Step 1: Download WordPress from the official website or install via your hosting provider’s auto-installer.
Step 2: Install WooCommerce plugin and run the WooCommerce setup wizard to configure basic settings.
Step 3: Select and customize a WooCommerce-compatible theme. Avoid heavy themes as they may slow down the loading speeds and hurt conversions. Also, try to match your BigCommerce design.
Step 4: Install the essential WooCommerce plugins. Here are a few key ones:
- WP Rocket (caching)
- Yoast WooCommerce SEO (SEO optimization)
- Mailchimp for WooCommerce (email marketing)
- Wordfence Security (firewall & malware scans)
- UpdraftPlus (automated backups)
- WooPayments (payments)
- WooCommerce Shipping (Shipping)
Step 5: Before importing data, set up:
- Base location (country/currency).
- Allowed customer roles (guest checkout, account creation).
- Enable PayPal, Stripe, or other preferred methods.
- Test transactions in sandbox mode before going live.
- Define domestic & international shipping costs.
- Set up free shipping thresholds (if applicable).
- Configure automatic tax calculations (or manual rates).
Step 6: Test critical store functions, like:
- Product pages load correctly.
- Cart & checkout process works without errors.
- Payment gateways process test orders.
- Mobile responsiveness (no layout breaks).
Test the basic functionality (checkout, product pages) before migration to catch early issues.
Once these steps are complete, you’re ready to transfer data from BigCommerce to WooCommerce. The next phase involves exporting/importing products, customers, and orders—ensuring no critical data is lost in transit. You can do it through a dedicated extension or follow the manual method.
Setting up the WooCommerce store can be simple, but there might be quite a few nuances involved. So for the best results, you can hire our WooCommerce developers.
How to Migrate From BigCommerce to WooCommerce? (Through LitExtension)
Migrating your store from BigCommerce to WooCommerce can be complex, but tools like LitExtension simplifies it. It offers an automated, secure, and accurate data transfer.
Here’s the process to follow.
Step 1: Log into the LitExtension account. You can also opt for a social login through Google or Facebook account.
Step 2: After login, you will be taken to the “My Migrations” page. Click on ‘Create New Migration’ to get started.
Step 3: On the setup page, first select the ‘Source Cart Type’ as BigCommerce.
Step 4: Then, enter the BigCommerce API details to set up the source cart.
Step 5: Enter the BigCommerce store URL and API path. (For that, you can log into the BigCommerce dashboard and go to “Advanced Settings”.)
Step 6: Enter the ‘Target Cart Type’ and ‘Target Cart URL’.
Step 7: Download the LitExtension Connection. Extract the .zip file and upload it to your new store’s root folder. Use an FTP client (like FileZilla) for integration.
Step 8: Click ‘Next’ to configure the store migration.
Step 9: At this stage of migration, select the elements to be migrated to the new store. To migrate everything from the store, click on ‘Select All’ option.
Step 10: Select any additional options like “Language Mapping” and “Order Status Mapping”.
Step 11: Go for the “Demo Migration” option to see what elements of the store will be shifted to the new store. (You also have an option to skip this step.)
Step 12: If everything is as per you expected, click “Full Migration” to complete the BigCommerce to WooCommerce migration.
The LitExtension method ensures there is no downtime, no data loss, and 24×7 process support.
But if you want a more customized migration with more control over the results, consult with our WooCommerce development company.
What to Do After the BigCommerce to WooCommerce Migration?
After you are done shifting your store to a new platform, there are a few necessary steps to implement for the best results. Let’s look at them one-by-one.
Audit All Transferred Data
Even automated migrations can have discrepancies. A single misplaced decimal in pricing or missing product variant can lead to lost sales or frustrated customers. Cross-check every product SKU, customer record, and order history—your store’s credibility depends on precision.
What to Do?
- Verify product details (prices, variants, images)
- Check customer accounts & order histories
- Validate coupon codes & gift cards
Set Up 301 Redirects
Broken links = broken trust. Without proper redirects, your hard-earned SEO rankings vanish overnight, and customers hitting old URLs land on error pages. This isn’t just tech hygiene—it’s revenue protection.
What to Do?
- Map old BigCommerce URLs to new WooCommerce paths.
- Use the Redirection plugin for bulk URL management.
- Submit updated sitemap to Google Search Console.
Run End-to-End Testing
Assume nothing works until proven otherwise. A checkout glitch you miss today could mean abandoned carts tomorrow. Test purchases, account logins, and payment processing like a secret shoppe. Your customers won’t tolerate beta-testing your live store.
What to Do?
- Test checkout flow with multiple payment methods.
- Verify shipping calculations & tax rules.
- Confirm automated emails (orders, passwords, notifications).
Reconfigure Integrations
Your CRM, email tools, and inventory systems won’t magically reconnect. A single overlooked integration (like abandoned cart emails) can silently bleed sales. Rebuild these pipelines methodically—they’re your store’s central nervous system.
What to Do?
- Reactivate email marketing (Mailchimp/Klaviyo).
- Reintegrate analytics (Google Tag Manager).
- Set up inventory/ERP syncs if applicable.
Inform Customers of the Shift
Surprise changes alienate users. A clear email explaining why you migrated (better features? faster checkout?) turns potential confusion into goodwill.
What to Do?
- Email customers about the new login process.
- Update social media/website banners.
- Monitor live traffic for 48 hours post-launch.
Here’s a bonus: Include direct support links for anyone struggling with password resets or new workflows.
Monitor Performance
Post-migration quirks often surface days later. Slow-loading product pages or payment timeouts might not appear during testing. So use tools like Google Analytics and Hotjar to catch what you didn’t anticipate.
These steps are like an insurance policy against lost revenue, eroded trust, or technical debt that compounds over time.
FAQs on BigCommerce to WooCommerce
Will my search rankings drop after migration?
Not if done correctly. Proper 301 redirects, preserved URL structures, and meta data transfer maintain SEO value. Use tools like Screaming Frog to audit links pre-and post-migration.
How long does the migration process take?
For small stores (under 100 products), 1-2 days. Medium stores (100-500 products) take 3-5 days. Large stores may require a week or more, especially with order/customer data.
Can I migrate customer passwords?
No, passwords can’t be transferred directly due to encryption differences. WooCommerce will prompt customers to reset passwords on first login. Notify customers in advance.
What happens to my BigCommerce subscription?
Keep it active during migration for testing. Cancel only after verifying WooCommerce works perfectly, including orders, payments, and integrations.
What about my existing apps/integrations during the migration?
Most need reimplementation. Check WooCommerce’s plugin library for equivalents. Some SaaS tools (like Mailchimp) offer direct WooCommerce plugins.
Can I run both stores simultaneously?
Temporarily, yes. Use DNS staging or subdomains to test WooCommerce while BigCommerce remains live. Redirect fully only after successful testing.
Let’s Wrap It Up
Migrating from BigCommerce to WooCommerce can help with greater flexibility, cost efficiency, and deeper, more seamless integration. While the process requires careful planning, the long-term benefits make it worthwhile.
A successful migration hinges on proper preparation, thorough testing, and attention to detail. Once completed, you’ll have full control over your store’s design, functionality, and scalability without restrictive platform fees.
So, ready to make the switch? Then connect with us today!
]]>As for the brands, retailers, and marketers, understanding key trends is critical for staying competitive. That means everything from shifting consumer behaviors to emerging technologies. These factors have taken the fashion eCommerce industry to new levels.
This blog showcases the latest fashion eCommerce statistics, offering actionable insights into market growth fueled by the key factors. So let’s get straight into it.
Global Fashion eCommerce Statistics
The fashion eCommerce industry is undergoing rapid transformation and it’s fueled by shifting consumer habits and technological advancements. So let’s look at the eCommerce industry in numbers.
Fashion eCommerce Market Size
The global fashion eCommerce market continues its rapid expansion, driven by digital adoption and shifting consumer habits.
$780B in 2023, Doubling Soon
The market was valued at over $780B in 2023, with projections suggesting it will more than double in the coming years (Statista). This growth is fueled by increasing internet penetration, mobile shopping, and the rise of direct-to-consumer (DTC) brands.
30% of Total Fashion Retail is eCommerce
eCommerce accounts for over 21% of all fashion retail sales globally. So it is one of the most dominant eCommerce categories—second only to electronics in some regions.
Asia Leads in Fashion eCommerce Sales
Asia is the largest fashion eCommerce market, with sales expected to reach over $520B in sales by 2029. This dominance is attributed to high disposable income, strong logistics networks, and the popularity of fast fashion and luxury brands.
Consumer Behavior Shifts
Fashion shoppers are becoming more selective, influenced by convenience, sustainability, and social media.
73% Tend to Compare & Switch Brands
Over 73% of all modern shoppers browse multiple brands before making a purchase. Price, reviews, and return policies heavily influence decisions.
Good Return Policy Are Non-Negotiable
Over 15% of shoppers abandon carts if the return policy isn’t satisfactory. So retailers like Zara and ASOS have made free returns a standard to reduce cart abandonment.
Mobile Drives 70% of Fashion Sales
Smartphones dominate online purchases, with 70% of transactions occurring on mobile devices (Hootsuite). Apps and mobile-optimized sites are now essential.
Social Commerce are on the Rise
Social media platforms like Instagram, TikTok, Pinterest, and more are expected to bring 1 out of 5 eCommerce sales. Brands leverage influencer marketing and shoppable posts to capitalize on this trend.
Sustainability Matters, But Price Still Wins
While 55% of consumers prefer eco-friendly brands, only a small percentage of them are willing to pay more (Deloitte). This gap pushes brands to balance sustainability with affordability.
Emerging Technology & Personalizations
AI, AR, and chatbots are transforming how consumers shop for fashion online.
AI Recommendations Boost Conversions by 20%
Machine learning algorithms analyze browsing behavior to suggest relevant products, increasing conversion rates by 20%. Brands like Amazon and Stitch Fix use AI to personalize shopping experiences.
Chatbots Handle 65% of Pre-Purchase Queries
AI-powered chatbots resolve 65% of customer questions before human agents are needed. That reduces the response times and improves satisfaction.
AR Try-Ons Cut Returns by 25%
Virtual fitting rooms and AR try-on tools help shoppers visualize products, leading to 25% fewer returns (Retail Dive). Brands like Warby Parker and Gucci use AR to enhance confidence in purchases.
65% of Gen Z Prefers Brands with Virtual Try-Ons
Younger shoppers demand immersive experiences—65% of Gen Z actively choose brands offering AR fitting tools (Retail Dive), making this a key differentiator.
Fashion brands must prioritize mobile optimization, sustainability, and AI-driven personalization to stay competitive in this rapidly evolving market.
If you want to make the best of these statistics and take your eStore to the top, consult with our fashion eCommerce development company.
Best Practices for Fashion eCommerce Stores
To succeed in the competitive fashion eCommerce space, brands must implement a few different practices. They must optimize for user experience, leverage emerging technologies, and align with evolving consumer expectations. Here are the most effective strategies.
Optimize for Mobile-first Shopping
With fashion purchases now happening on smartphones, your mobile store isn’t just an option – it’s the main runway. Winning brands design thumb-friendly navigation, compress images for 3G speeds, and test checkout flows on actual devices.
Remember: If your site takes longer to load than a Zara changing room line, you’re losing sales.
Implement AI & Visual Search for Product Discovery
Gone are the days of ‘blue dress page 3’ searches. Modern shoppers snap and search – Pinterest reports a significant YoY increase in visual searches. Implement AI that understands “90s slip dress vibes” or “outfit like this but cheaper”. The best digital stylists don’t just find products; they decode fashion intent.
AR/VR Sizing Tools for Reducing Returns
A downside of online fashion? A high return rate mostly due to fit issues. Innovative brands now use AR mirrors that adjust for posture and body shape, not just measurements. Bonus: These virtual fitting rooms generate priceless data on how customers actually wear your clothes.
Streamline Checkout for Convenience
Your checkout process should be smoother than a stick of butter. Top performers use: 1) Address auto-complete, 2) Saved payment methods with biometric auth, and 3) Cart recovery that remembers size preferences.
Pro tip: Offer PayPal for customers who’d rather checkout than create yet another password.
Leverage Social Commerce & UGC
Instagram isn’t just your catalog – it’s your dressing room. Brands seeing success turn customer selfies into shoppable galleries, with tags showing exact colors worn in real life. The magic happens when shoppers can browse ‘outfits on actual people’ instead of stiff product shots.
Prioritize Sustainability & Transparency
Modern shoppers investigate your supply chain like a detective. Winners use interactive maps showing fabric journeys, carbon footprint calculators at checkout, and honest labels (‘This jacket took 18L water to make’). Transparency builds trust – even when your impact isn’t perfect.
Use Data-Driven Personalization
Forget ‘customers who bought this…’. Cutting-edge personalization suggests ‘Complete your capsule wardrobe’ bundles based on past purchases, or sends restock alerts when favorite items hit 30% wear in customer photos.
The goal? Make shoppers feel you understand their style better than their best friend.
You can hire our eCommerce developers to audit your store. Check it against these best practices to identify gaps and opportunities.
FAQs on Fashion eCommerce
How important is mobile optimization for fashion stores?
Critical. Most shoppers browse and buy on smartphones, so a seamless mobile experience—fast loading, easy navigation, and one-click checkout—is essential.
What’s the best way to reduce cart abandonment?
Offer guest checkout, multiple payment options, free shipping thresholds, and exit-intent popups with discounts or urgency triggers.
How can AI improve fashion eCommerce?
AI enhances personalized recommendations, chatbots for instant support, visual search for product discovery, and dynamic pricing strategies.
Why should brands invest in AR/VR for fashion?
Augmented reality (AR) lets shoppers “try before they buy,” reducing returns and increasing confidence in purchases—especially for eyewear, makeup, and footwear.
How can small fashion brands compete with giants?
Focus on niche audiences, unique branding, exceptional customer service, and leveraging user-generated content to build authenticity.
Wrapping Up
The fashion eCommerce industry has evolved remarkably over the last few years. It’s driven by mobile shopping, AI personalization, and rising demand for seamless, sustainable experiences.
Virtual try-ons, social commerce, and hyper-targeted recommendations reshape how consumers shop. Brands must adapt through these strategies quickly–or risk falling behind. Success will belong to those who merge data-driven strategies with authentic customer connections. So, want to build the best fashion eCommerce store? Then connect with us today!
]]>You need to know how to design a Shopify store in a way that translates strategy into visuals. And it should effectively guide the visitors from curiosity to checkout. Of course, you can hire the best Shopify developers for your store. But in case you want to DIY, you’ve come to the right place.
So through this blog, we’ll break down the essentials of Shopify store design. That covers layout, branding, product presentation, and performance optimization. Let’s get straight into it.
How to Design a Shopify Store?
A good Shopify store design is a balance of aesthetics, usability, and strategic marketing. A well-structured store guides the visitors (potential customers) towards purchases while reinforcing brand trust. Here’s how you design the store for max impact.
Plan the Design & Branding
This process begins with planning the design and branding. That involves defining your store’s identity and customer journey. Craft a brand strategy that outlines mission, target audience, and value proposition.
Here’s a step-by-step breakdown.
Brand Identity
First and foremost, you need to clarify the brand’s core identity:
- Mission & Values: What does your brand stand for? (E.g., sustainability, affordability, luxury)
- Target Audience: Who are you selling to? (Age, gender, interests, pain points)
- Brand Personality: Is your brand playful, professional, edgy, or minimalist?
- Unique Selling Proposition (USP): What makes you different from competitors?
For example, if you are selling eco-friendly skin and hair care, your brand voice might be nature-inspired, with earthy color tones.
Color Palette & Typography
Colors and fonts influence emotions and purchasing decisions. Follow these best practices:
- Primary & Secondary Colors: Pick 2-3 main colors (use tools like Coolors or Adobe Color).
- Contrast & Readability: Ensure text is legible against backgrounds (e.g., dark text on light backgrounds).
- Font Pairings: Use 1-2 fonts max (e.g., a bold sans-serif for headings + a clean sans-serif for body text).
- Psychology of Colors: Blue = trust, green = eco-friendly, red = urgency (great for sales).
Here’s a pro tip. Shopify’s theme settings let you upload custom fonts (Google Fonts or Adobe Typekit).
Logo & Visual Assets
Your logo is the face of your brand. Key considerations:
- Simplicity: A scalable, recognizable logo (e.g., Nike’s swoosh).
- Versatility: Works on dark/light backgrounds, social media, and packaging.
- File Formats: SVG for web, PNG for transparent backgrounds.
- Product Photography: High-resolution, consistent lighting, and angles.
- Lifestyle Images: Show products in use (e.g., a model wearing your clothing).
Beyond these, there are also icons and graphics to be integrated in a cohesive style.
User Experience (UX)
A well-structured store keeps visitors engaged. Plan:
- Navigation: Clear menu categories (e.g., “Men,” “Women,” “Sale”).
- Homepage Layout: Hero banner, featured collections, testimonials, and CTA buttons.
- Product Pages: High-quality images, bullet-point benefits, sizing charts, and reviews.
- Checkout Flow: Minimal steps, multiple payment options, and trust badges.
Here’s a pro tip. Use tools like Figma or Whimsical to wireframe your store’s layout before building.
Before finalizing any of these brand elements, you need to gather feedback through A/B testing, user testing, and heatmaps. This first step is what will decide on the subsequent process.
Choose the Right Theme
As with any other website builder, the theme dictates the store’s layout, functionality, and the overall UX. That impacts everything from conversion rates to mobile performance.
Industry & Product Type
First, the theme should align with your industrial domain and the product you are going to sell.
- Fashion & Apparel: Look for themes with lookbook features, size charts, and color swatches (e.g., Dawn, Symmetry, or Focal).
- Electronics & Gadgets: Prioritize comparison tables, tech specs, and high-resolution zoom (e.g., Turbo or Prestige).
- Dropshipping & General Stores: Opt for versatile themes with quick-view popups (e.g., Impulse or Streamline).
- Minimalist Brands: Choose clean, content-focused themes (e.g., Minimal or Dawn).
Here’s a pro tip. Browse Shopify’s theme store and filter by industry to see what successful stores in your niche use.
Mobile Responsiveness & Speed
Since over 70% of Shopify traffic comes from mobile, your theme must:
- Load quickly (avoid heavy animations/videos that slow performance).
- Have a streamlined mobile menu (hamburger menus work best).
- Auto-optimize images for smaller screens.
To test the mobile responsiveness, you can use PageSpeed Insights and even preview the theme on your phone before installing.
Customization Flexibility
A rigid theme limits branding. So look for:
- Shopify 2.0 compatibility (allows sections on all pages, not just the homepage).
- Drag-and-drop editors (no coding needed for basic changes).
- Color/font customization (should match your brand guidelines).
- Header & footer options (sticky headers, mega menus).
The bottom line is that you need to be able to customize the Shopify theme with ease. Make sure to avoid the ones that require heavy coding for simple tweaks.
Support & Updates
Free themes often lack support. Consider:
- Paid themes (usually include dedicated support & updates).
- User reviews (check Shopify Theme Store ratings).
- Developer documentation (helpful if you need custom tweaks).
Also, look for themes that allow flexible customization without needing to edit core code. Features like drag-and-drop sections and reusable content blocks make designing your store much easier. If you’re new to these features, check out our guide on Shopify sections and blocks to understand how they work and how to use them effectively.
Add the Brand Elements
Your brand elements are the visual and experiential DNA of your Shopify store. They create recognition, build trust, and differentiate you from competitors. A cohesive brand presentation can increase conversions significantly.
Integrate your visual identity into Shopify’s brand settings:
- In Settings → Brand assets, upload your default and square logos (min. 512 px).
- Primary logo: Display prominently in the header (left-aligned typically performs best).
- Alternative versions: Create white/black variants for different backgrounds.
- Favicon: 32×32 pixel .ico file that appears in browser tabs.
- Define primary and secondary brand colors for buttons, links, and accents.
- Primary palette: Use 1-2 main colors (applied to buttons, accents)
- Secondary palette: 2-3 supporting colors (for backgrounds, text)
- Implementation:
- Set as theme defaults in Settings > Theme Settings
- Apply consistently to CTA buttons, price tags, section backgrounds, etc.
- Upload a cover image (min. 1920×1080 px) for social sharing and hero sections.
- Enter a slogan, short description, and social links to reinforce messaging across channels.
These assets propagate to your theme, email templates, and sales channels, ensuring consistency.
Integrate the Best Shopify Apps
At this point, you need to integrate some key Shopify apps to transform your store from basic to high-performing. Poor choices with the apps can slow down the site and higher the user experience.
Let’s look at some of the key app categories and the top choices.
Operations & Fulfillment
Purpose: Streamline backend processes
Top choices:
- ShipStation (shipping automation)
- AfterShip (delivery tracking)
Connect your fulfillment app with inventory management to prevent overselling.
Customer Retention Suite
Purpose: Increase lifetime value
Top choices:
Set up abandoned cart flows within 1 hour of cart abandonment. Trigger loyalty rewards after 2nd purchase.
Site Performance Boosters
Purpose: Maintain speed despite adding apps
Top choices:
- Avada (image optimization)
- PushOwl/Brevo (browser push notifications)
Each app adds ~50-300ms load time. Try not to exceed 10 apps in total and 3 “heavy” apps (those with complex scripts).
Check out our professional Shopify integration services if you want custom apps for your eStore.
Make Sure Your Site Loads Quickly
A one‐second delay can drop conversions by up to 7 percent. Implement:
- Lightweight theme: Dawn or similar minimal templates.
- Image optimization: Compress to WebP; specify dimensions; use lazy loading.
- Minimize HTTP requests: Combine CSS/JS files; inline critical CSS; defer non-essential scripts.
- App audit: Remove unused apps and limit third-party scripts.
- Browser caching & CDN: Leverage Shopify’s CDN and set cache headers for static assets.
Consider checking with tools like PageSpeed Insights, GTmetrix, etc.
Focus on Curation & Lead Engagement
Effective product curation and engagement can help turn the casual browsers into loyal customers. Here are a few of the top strategies you need to implement.
- Highlight Best Sellers: Feature top products prominently on the homepage.
- Create Bundles: Increase AOV with “Frequently Bought Together” sections through product bundling.
- Seasonal Collections: Rotate featured products based on trends and holidays.
- Personalized Recommendations: Use AI-powered apps (Like Wiser or Bold) to suggest relevant products.
- Exit-Intent Popups: Offer discounts (e.g., “10% OFF if you stay!”) to reduce bounce rates.
- Live Chat & SMS: Tools like Gorgias or Klaviyo SMS help capture leads in real-time.
- Customer Reviews: Display ratings on product pages (use Loox or Judge.me).
More strategies like stock countdowns (Only few units left!), upselling in checkout, and more could also be helpful.
Connect Across the Channels
Deliver a unified brand experience wherever customers engage through omnichannel eCommerce. Here’s all you need to integrate.
- Social media storefronts: Link Instagram Shopping and Facebook Shop directly to your catalog.
- Email and SMS: Sync Klaviyo or Omnisend with your store to trigger behavior-based campaigns.
- Marketplace integrations: Sell on Amazon, eBay, or TikTok Shop via Shopify’s multi-channel sync.
- Offline POS: Use Shopify POS to align in-store and online inventory, promotions, and customer data.
- Consistent branding: Ensure your logo, colors, and tone match across websites, emails, ads, and physical packaging.
If needed, consult with marketing professionals to maximize the visibility and sales.
So, as specified earlier, it takes a balance of aesthetics, functionality, and performance to design a Shopify store. From branding to multichannel integration, the store shouldn’t just look great but also drive consistent sales.
Want the best Shopify store design for high conversion?
Challenges With Shopify Store Design
While the above-showcased process can help design the store, there may be some challenges. So we discuss those and how to solve them.
Mobile Responsiveness Issues
Your store might look perfect on desktop, but if buttons are too small to tap or text gets cut off on mobile, shoppers will leave. A significant portion of traffic comes from phones—test every element on multiple devices.
Solution:
- Use Shopify’s mobile preview tool.
- Test touch targets (minimum 48x48px).
- Simplify mobile menus (hamburger style).
Slow Loading Speed
Every second counts. If your store takes longer than 3 seconds to load, visitors bounce before seeing your products. Heavy images, too many apps, or bloated code could be the culprits.
Solution:
- Compress images to WebP format (under 100KB each).
- Limit apps to under 10 total.
- Use lazy loading for below-fold content.
Poor Navigation Structure
If customers can’t find what they need in three clicks, they’ll find another store. Confusing menus, hidden categories, or broken links create frustration instead of sales.
Solution:
- Implement Shopify mega menus for stores with 50+ products.
- Add predictive search (Searchanise app).
- Keep category depth to 3 levels max.
Weak Product Presentation
Blurry images, missing details, or poorly written descriptions leave shoppers unsure. Great products deserve great visuals—high-res photos, zoom features, and clear benefits sell better.
Solution:
- Use 360° product views for high-ticket items.
- Standardize image dimensions (e.g., 2000x2000px).
- Add zoom functionality on all product shots.
Checkout Friction
Forced account creation, unexpected fees, or a clunky payment process kill conversions. The smoother the checkout, the more completed carts you’ll see.
Solution:
- Enable guest checkout
- Add multiple payment options (Apple/Google Pay)
- Show progress indicators (3-step checkout)
Branding Inconsistency
Mismatched colors, conflicting fonts, or an erratic tone make your store feel untrustworthy. Strong brands look and sound the same everywhere—from product pages to packaging.
Solution:
- Create a style guide document.
- Use theme style presets.
- Audit all pages monthly for consistency.
Search Rankings Underperformance
If Google (or other search engines) can’t understand your store, neither can customers. Missing alt text, duplicate content, or slow speeds keep you buried on page two.
Solution:
- Fix image alt text (include keywords).
- Ensure proper heading hierarchy (H1-H6).
- Avoid duplicate content in product descriptions.
Accessibility Gaps
Over 15% of users have disabilities—low-contrast text, missing keyboard navigation, or unlabeled buttons exclude potential buyers. An inclusive store is a smarter store.
Solution:
- Ensure color contrast ratio ≥4.5:1.
- Add ARIA labels to buttons.
- Enable keyboard navigation testing.
Most design challenges stem from not testing with real users. So always conduct A/B tests before finalizing design changes. And to evade them effectively, consult with our expert Shopify development company.
FAQs on Shopify Store Design
What’s the most important element in store design?
Conversion-focused UX. A beautiful store means nothing if visitors can’t easily find and buy products. Prioritize clear navigation, fast load times, and a frictionless checkout.
What’s the fastest way to improve my Shopify store’s loading speed?
Start by optimizing images (convert to WebP, compress to under 500KB), limit apps to only essentials, and choose a lightweight theme like Dawn. Even a 1-second improvement can boost conversions significantly.
How do I maintain consistent branding across the store?
Create a style guide—define your color palette, fonts, image filters, and tone of voice. Apply these uniformly across your site, packaging, and marketing materials for instant recognition.
What makes product pages more persuasive?
High-quality images (with zoom), concise benefit-driven bullet points, size guides, and real customer reviews. Video demos can increase conversions by up to 30% by showing products in action.
Let’s Summarize
Designing a high-performing Shopify store isn’t just about the aesthetics. You have to create a seamless shopping experience that guides visitors toward purchase. From choosing the right theme to optimizing speed, every detail plays a role in turning clicks into customers.
Remember, the best stores evolve. Test different layouts, monitor user behavior, and refine based on data—not guesswork. Take these strategies, apply them step by step, and watch your store transform. So, want help with the store design? Then connect with us today!
]]>If your checkout feels confusing, slow, or untrustworthy, customers leave. That’s why a clean, simple, and user-friendly checkout page is essential. A good design builds trust. It reduces friction. And it turns more visitors into paying customers.
In this blog, we’ll explore what makes a great eCommerce checkout page. We’ll look at real examples from top brands. And we’ll share best practices for design that our eCommerce experts recommend to improve your store’s performance. So, let’s dive in!
Impact of Good eCommerce Checkout Page Design
Suppose a customer browses your site. They find what they need. They add it to their cart. But just before hitting “Buy Now,” they leave.
It happens more than you think. A good checkout design can make or break that moment. According to a recent study, here’s why most customers abandon their carts:
- 39% leave because of unexpected extra costs like shipping or taxes.
- 19% don’t trust the site with their credit card information.
- 19% drop-off because they’re forced to create an account.
- 14% can’t see the full cost before paying.
- 10% don’t find the payment options they want.
Each of these reasons ties back to the checkout experience. If it feels confusing, unsafe, or too much work, customers bounce. A well-designed checkout page fixes that. It keeps things simple. It builds trust. And it helps shoppers complete their purchase without stress.
This is the power of good design. It’s not just about looking clean. It’s about removing friction. And making the buying process easy from start to finish. If your current site isn’t delivering that experience, it might be time to consider an eCommerce website redesign to better align with user expectations and business goals.
What Makes a Good eCommerce Checkout Page Design?
A good checkout page design makes it look better and helps it function as supposed. It’s the last step before a customer decides to buy or bounce. That means it needs to be fast, clear, and hassle-free.
When people shop online, they want the process to feel simple. They don’t want to think too much. They don’t want to feel like they’re jumping through hoops just to buy something. A well-designed checkout page does exactly that: it removes barriers.
So, let’s break down what makes a good checkout page so you can optimize yours for the best results.
Simple, Clean Layout
Clutter is the enemy of conversion. A good checkout page has one job: help the customer complete their purchase. It should be free of distractions. Avoid unnecessary banners and pop-ups and offer a clear path to buy.
The layout should be easy to follow. The form fields should be well-spaced. Labels should be clear. Everything should feel calm, not overwhelming.
Guest Checkout Option
One of the biggest turn-offs for shoppers? Being forced to create an account. People are in a rush. They don’t always want to sign up for emails or set a password. Allowing guest checkout can significantly improve conversions. You can always ask them to create an account after the purchase is complete.
Transparent Pricing
No one likes surprises at checkout. If shipping, taxes, or fees are added at the last minute, people get frustrated and leave. A good checkout page shows all costs upfront. If you offer free shipping or discounts, make sure that’s visible early in the process.
Multiple Payment Options
People have different preferences. Some use credit cards. Others prefer PayPal, Apple Pay, or buy-now-pay-later options like Afterpay. Offering a few trusted payment methods makes it easier for customers to choose what works for them. It also builds trust. People feel safer when they see familiar logos and secure payment badges.
Auto-Fill and Address Suggestions
Typing everything out manually can be annoying. A smart checkout page uses auto-fill for known fields and suggests addresses as you type. It saves time and reduces errors. It also creates a smoother experience, especially on mobile.
Progress Indicators (for Multi-Step Checkouts)
If your checkout process has more than one step, make it clear. Show customers where they are and what’s coming next. A simple progress bar or step counter works great. It sets expectations and keeps them moving forward.
Mobile-Friendly Design
Over 70% of eCommerce traffic now comes from mobile. If your checkout page isn’t optimized for mobile, you’re losing sales. Buttons should be easy to tap. Text should be readable. Forms should auto-adjust to screen size. A mobile-first design isn’t optional anymore; it’s essential.
Trust Signals
People want to feel safe when entering payment information. Add clear trust signals like secure payment icons, SSL badges, and familiar payment providers. These small details help build confidence.
In short, a good checkout page is more than a pretty screen. It’s a seamless process that makes buying feel effortless. When you remove friction, show transparency, and offer trust, more customers follow through. Great design leads to great results. If you’re aiming to deliver a smoother shopping experience, reach out to our eCommerce development team.
Top eCommerce Checkout Page Design Examples
Let’s look at some of the top examples of eCommerce checkout page designs that popular brands use. We found one thing common in all of them: they were focused on keeping things simple.
Etsy: Smart Checkout Flow with Clear Steps
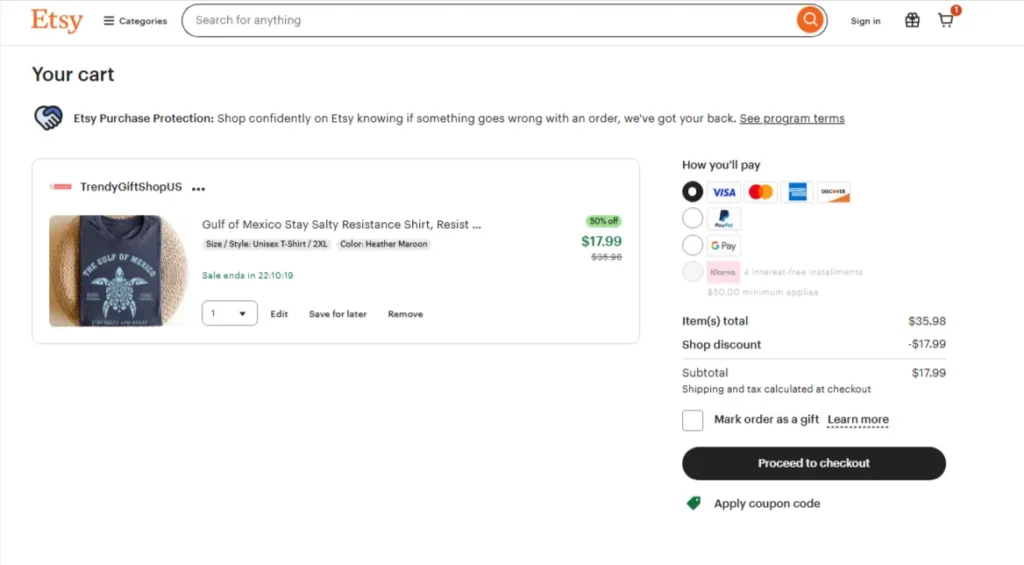
Etsy does a great job of making checkout feel simple. When you add something to your cart, you’re not rushed. The cart works like a “pre-checkout,” giving you time to review and choose how you want to pay. Depending on your choice, like PayPal, Apple Pay, or pay-later options. Etsy sends you through a checkout flow that fits your method.
Once you enter the main checkout process, a few smart design choices stand out:
- A security badge is shown clearly.
- A progress bar at the top tells you what step you’re on.
- Form fields are easy to fill out and clearly labeled.
This helps reduce confusion and keeps the process moving smoothly.
Samsung: Focused, Step-by-Step Checkout
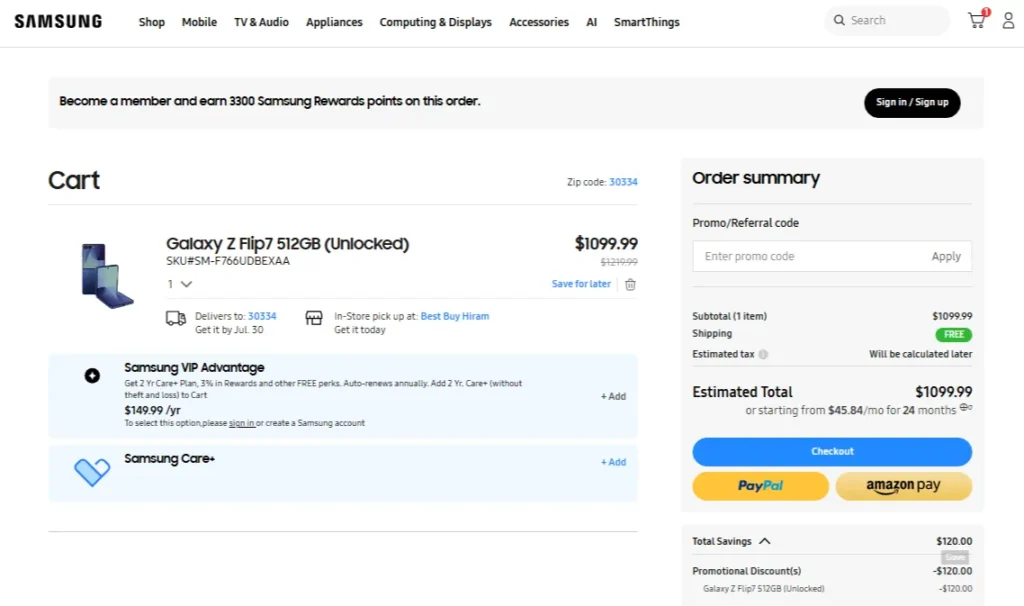
Samsung takes a different approach. Instead of showing you all the fields at once, it only shows what’s needed at the moment.
For example:
- You won’t see billing address fields until you pick a payment method.
- If you choose an express checkout option, many fields disappear completely.
- This keeps the screen clean and focused. You only make one decision at a time.
Samsung also assumes you want to check out as a guest. If you’d like to log in, that option is still there, but it’s not forced. This makes checkout fast and stress-free. Cart details, taxes, and shipping info are all shown clearly. And if you have a question, there’s a “Chat with an expert” button right on the page. That adds trust and support when it’s needed most.
LEGO: Simple and Fast Two-Step Checkout
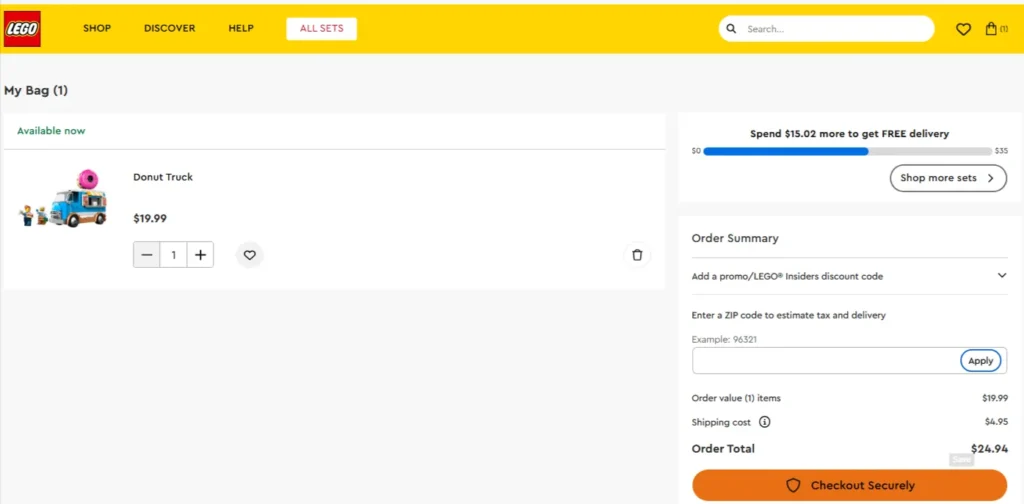
LEGO keeps it super straightforward. After clicking “Checkout Securely,” you’re taken through just two quick steps: shipping and payment. There’s no clutter, and you don’t need to do extra clicks.
LEGO also offers guest checkout, which helps reduce friction. You don’t have to sign up for an account to buy your favorite LEGO set. This design is built for ease. It respects your time and makes the process feel quick and smooth.
Glossier: Clean Design with Smart Navigation

Glossier keeps its checkout process sleek and simple. It uses a multi-page layout, but everything is easy to follow.
Here’s what works well:
- Clear options to log in or check out as a guest.
- A clean, minimal design that avoids distractions.
- Easy links to go back to your cart or continue to shipping.
These little details help you stay in control without losing your place. Plus, Glossier adds a small surprise, a free gift during checkout. This little bonus encourages customers to finish their purchase and adds a feel-good moment to the process.
Allbirds: Clean, Distraction-Free Checkout
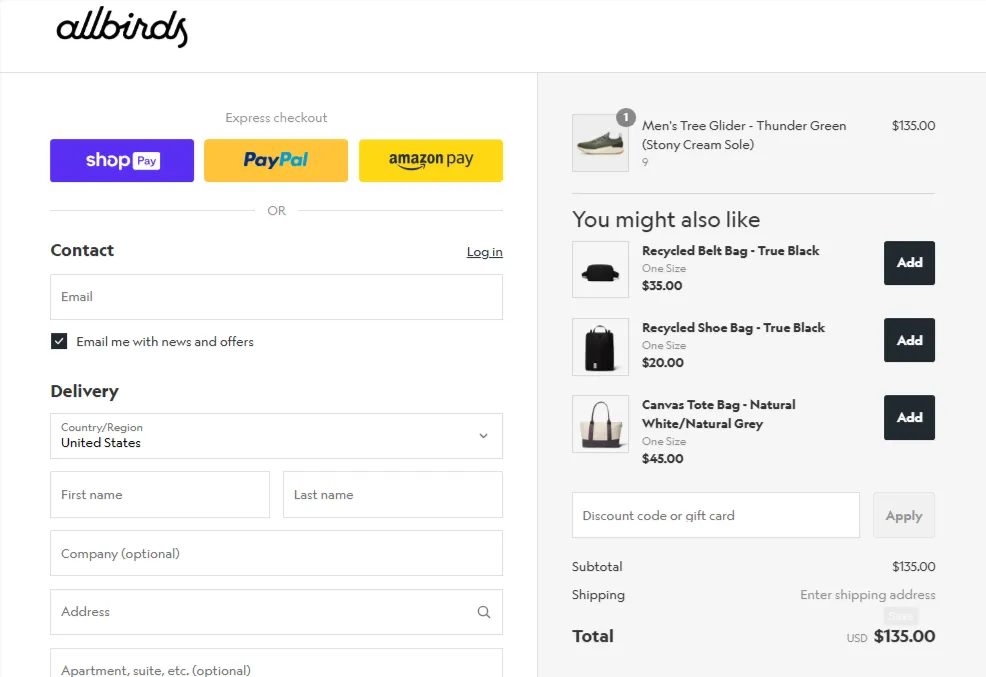
Allbirds uses Shopify’s checkout system, and it’s a great example of how simple can be powerful. The design is stripped down. There’s no menu, header, or footer. Just the checkout form.
Here’s why it works:
- It offers alternative payment options right at the top, like Shop Pay or PayPal.
- The coupon field is greyed out until you type something in. This helps avoid confusion or distraction.
- The whole process feels clean, fast, and modern.
- It’s built to get you from cart to confirmation with as little friction as possible.
In short, top brands like Etsy, Samsung, LEGO, Glossier, and Allbirds show how clean layouts, guest checkout, smart progress tracking, and clear payment options can create a smooth and stress-free checkout experience. Their designs focus on reducing friction, building trust, and guiding users step by step to complete their purchase with ease.
Benefits of Having a Good eCommerce Checkout Page Design
A good checkout page delivers results. When done right, it creates a smooth path for your customer to complete their order. That leads to better conversions, more trust, and fewer lost sales. Here are the key benefits of a well-designed eCommerce checkout page:
- Fewer Abandoned Carts: Many customers leave during checkout because of a poor experience. Hidden fees, confusing layouts, or too many steps can drive them away. A good design fixes that. It keeps things simple and clear, so more people finish what they started.
- Higher Conversion Rates: When checkout feels easy, people are more likely to buy. A clean layout, guest checkout, and clear pricing help remove friction. This results in more completed purchases and more revenue.
- Improved Trust and Confidence: A secure and well-organized checkout builds trust. Features like payment badges, progress bars, and clear forms make customers feel safe. When shoppers trust your site, they feel more comfortable entering payment details.
- Better Mobile Experience: A good checkout design works smoothly on phones too. With more people shopping on mobile, this matters a lot. Large buttons, auto-fill, and simple steps make it easy to buy, even on a small screen.
- Faster Checkout Process: Time matters. A well-designed page helps users check out quickly. It requires less typing and less confusion. Speed keeps customers happy, and they keep coming back.
- Lower Customer Support Load: If the checkout is confusing, people reach out with questions. A clear design means fewer issues and fewer support requests. That saves time for both your team and your customers.
- Stronger Brand Image: Good design reflects well on your brand. A smooth, secure, and easy checkout experience makes your store look professional. It shows that you care about your customers and their time.
In short, a great checkout page helps people buy with confidence. It removes the small barriers that cause big problems. And when you make checkout easy, your business grows.
Best Practices for Designing Checkout Pages in eCommerce
A great design is only the start. To truly improve your checkout experience, you need to think beyond the basics. Here are the best practices smart eCommerce brands follow to make checkout more effective.
- Keep Checkout Distraction-Free: The moment a customer enters the checkout, their focus should be on completing the purchase. Remove anything that takes their attention away, like menus, popups, banners, or unnecessary links. Clean design improves focus and lowers drop-off rates.
- Use Smart Defaults and Predictive Inputs: Good design saves time. Use smart defaults like auto-selecting a customer’s country based on location. Use address lookup tools and auto-fill where possible. The less typing, the better.
- Prioritize Page Speed: Slow checkout pages kill conversions. Compress images, use lightweight code, and avoid loading unnecessary scripts during checkout. Every second counts, especially on mobile.
- Handle Errors Gracefully: Mistakes happen. But they shouldn’t frustrate your customers. Use inline error messages (not popups). Highlight the exact field with the issue and explain clearly how to fix it. Never reset the form when there’s an error. That’s an easy way to lose a sale.
- Use Clear, Action-Oriented CTAs: Your call-to-action buttons (like “Continue to Payment” or “Place Order”) should stand out visually. Use simple, action-based language. Avoid generic terms like “Next.” Be clear about what the button will do.
- Reinforce Value at the Final Step: Remind customers of what they’re getting just before they pay. It could be “Free shipping,” “30-day returns,” or a special offer. A small confidence boost at the right moment can help them complete the purchase.
- Display Contact or Help Options Clearly: Customers might have last-minute questions. Make sure help is easily available, whether that’s live chat, a phone number, or a clear FAQ link. This builds trust and reduces hesitation.
- Use Exit-Intent or Cart Recovery Tactics Wisely: If someone’s about to leave the checkout, consider offering a small incentive, like free shipping or a discount. Just be careful not to annoy them with too many pop-ups. You can also follow up later with cart recovery emails.
- Keep Testing and Optimizing: Your first version is rarely your best. Use A/B testing to see what changes improve conversion rates. Test things like button text, field layouts, or payment method order. Let data guide your design.
- Make the Post-Checkout Experience Just as Smooth: Don’t stop after “Place Order.” Show a clear confirmation page. Send a helpful follow-up email. Keep customers informed about their order. A smooth end-to-end experience builds loyalty and leads to repeat purchases.
In short, smart checkout design goes beyond looks. It’s about speed, clarity, and removing friction. From clean layouts to helpful CTAs and ongoing testing, every detail helps customers buy with less effort and more confidence.
FAQs on eCommerce Checkout Page Design
How often should I update my checkout page design?
You don’t need to redesign it often, but it’s smart to review it every few months. Look at what’s working and what’s causing drop-offs, and test small changes. Trends and customer behavior can shift fast, so stay flexible.
Do I need a developer to improve my checkout page?
Not always. Many platforms like Shopify or WooCommerce offer apps and built-in tools to help you customize checkout without coding. But if you want more control or advanced features, a developer can help fine-tune the experience.
Should I use upsells or cross-sells during checkout?
It depends on how you present them. If they’re subtle and don’t interrupt the process, they can work well. But avoid cluttering the page or making checkout feel like a sales pitch. Keep the focus on completing the purchase first.
Is single-page checkout better than multi-page checkout?
It depends on your audience and product. Single-page checkouts are faster, but multi-page flows can feel more organized. The best option is the one that makes it easiest for your customers to complete the process.
What is the checkout flow for eCommerce?
The checkout flow is the step-by-step process a customer follows to complete a purchase. It usually includes entering shipping details, selecting a payment method, and confirming the order. A smooth flow keeps buyers from dropping off.
Does Shopify have a checkout system?
Yes, Shopify has a built-in checkout system that’s fast, secure, and mobile-friendly. It supports multiple payment methods and can be customized to fit your brand. Many top brands use it because it’s simple and effective.
Summing Up
Having a good eCommerce checkout page design is a key part of your eCommerce success. When done right, it removes friction, builds trust, and helps more customers complete their purchase.
From offering guest checkout to showing clear pricing and using smart design choices, every small detail matters. Brands like Etsy and Samsung show that improving checkout isn’t just about looks; it’s about making the process easier, faster, and more reliable for your shoppers. If you want better conversions and fewer abandoned carts, your checkout page design should be on point. And if you want experts to work on the checkout page and other parts of your eCommerce stores, you can get in touch with us today!
]]>If you’re switching platforms, redesigning your store, or changing URLs, SEO should stay top of mind. Many store owners focus only on design or speed. But forget that their Google rankings also need to move with the site. So, what are the things that you need to keep in mind when migrating your eCommerce site?
In this blog, we’ll give you a detailed eCommerce SEO website migration checklist that will help maintain your search rankings so you don’t lose organic traffic. Our experienced eCommerce developers have prepared this list keeping the best practices in mind to ensure maximum results. So, let’s dive in!
What is eCommerce SEO Website Migration?
eCommerce SEO website migration happens when you make major changes to your online store that can affect how it appears in search engines. These changes might include moving to a new platform, changing your domain name, redesigning the site, or updating your URL structure.
While the goal is often to improve your store, these updates can also disrupt how Google sees your site. That’s where SEO comes in. Search engines like Google use your existing pages, links, and content to understand and rank your website. If those elements suddenly change or disappear without proper planning, you could lose your rankings, traffic, and sales.
A good SEO migration strategy helps protect that. It ensures that the value your site has built over time, like authority, backlinks, and visibility, moves with you. Even with a proper plan, it’s normal to see a small dip in traffic. But without the right steps, the impact can be long-term.
Some common triggers for eCommerce SEO website migration include:
- Moving to a different eCommerce platform (like switching from Magento to Shopify).
- Changing your domain name or URL structure.
- Redesigning your website or merging content.
- Switching to HTTPS for better security.
In all these cases, SEO must be part of the migration plan from day one. Otherwise, search engines may not recognize the changes, which can hurt your site’s visibility.
In short, eCommerce SEO migration is not just about moving your website. It’s about making sure your customers (and Google) can still find you afterward.
The Impact of eCommerce Migration on Search Rankings
When you migrate your eCommerce website, your search rankings can change. This is because Google and other search engines rely on certain signals, like URLs, page content, and links, to understand your site. If those signals change or disappear, Google might struggle to connect the new site to your old one.
This can lead to a drop in rankings. And when rankings drop, so does your traffic. Even if you’re just changing platforms or redesigning the site, search engines may need time to reprocess your content. During that time, your visibility in search results can go down.
Some common reasons for rankings dropping during migration:
- Old URLs are not redirected to the new ones.
- Important pages are removed or moved without notice.
- Metadata like titles and descriptions gets lost.
- Internal links break or point to the wrong pages.
- Google doesn’t recognize the new site structure.
These issues confuse search engines. When that happens, they can’t properly index your site. Or worse, they may treat it like a brand-new website. That’s why having an SEO plan during migration is critical. It helps protect the authority and trust your site has built over time.
If done right, any drop in traffic should be small and temporary. But if done wrong, your rankings can take months to recover or never come back at all. This could lead to a direct loss in sales. To avoid that, you need to have a checklist in place. And that’s exactly what the next section will cover.
eCommerce SEO Website Migration Checklist
A website migration can affect your entire business, especially when SEO is involved. This checklist is here to help you go step by step, without missing the things that protect your search rankings, traffic, and user experience.
Set Migration Goals
Before doing anything, be clear on why you’re migrating. Are you switching platforms? Improving design? Fixing performance issues? Knowing the reason helps you stay focused and make the right choices throughout the process.
Prepare a Migration Plan
A proper migration plan is a must. Write down every step of the process, including what will change and who’s responsible for what. This keeps your team aligned and avoids last-minute surprises. A good plan lowers the chances of SEO errors.
Choose the Right Time to Migrate
Timing matters. Avoid peak traffic times like holidays or major sale events. Choose a quiet period so any technical issues won’t hurt your revenue or customer experience. Fewer visitors during launch make fixes easier and safer.
Audit Your Existing Site
Run a full SEO audit of your current site. Note what’s working, what pages are getting traffic, and what needs improvement. Tools like Google Search Console or Screaming Frog can help. This gives you a clear picture of what to protect.
Make a Full List of URLs
Before the migration, crawl your site and export every live URL. This list is your safety net. It helps ensure nothing is left behind and makes it easier to track down issues later. You’ll use it to plan redirects, monitor lost pages, and compare performance before and after the move. Keeping this record helps prevent traffic loss from forgotten or broken pages.
Make a List of the Most Important Pages and Keywords
Identify the pages that bring in the most traffic, sales, and backlinks. Also, list the keywords that rank well. These are your priority pages; you’ll want to handle them with extra care during migration. Focus on preserving their content, structure, and internal links. If these pages drop in performance, your overall site may feel the impact.
Create a URL Mapping Plan
Match every old URL with its new version. If URLs are changing, this step is critical. A solid mapping plan ensures you can properly redirect users and search engines without losing ranking or link value. It also prevents broken links, improves user experience, and helps Google understand the changes faster. Keep this map organized and ready for your dev team.
Create a Backup of Everything
Always back up your full site before any migration. Save your content, images, product data, and databases. If anything breaks, you’ll have a way to restore it. Backups give peace of mind and safety. Store the backup in multiple places if possible, like on a server and in cloud storage, to avoid any risk of data loss.
Prepare Your Development Teams for the Migration
Your developers should know the SEO requirements before starting the build. That includes things like redirects, page speed, mobile optimization, and technical SEO elements. Keep your dev and SEO teams in sync. Make sure everyone understands the timeline, what needs testing, and how changes may affect search performance.
Design Your New Site with SEO in Mind
Don’t wait until after launch to think about SEO. While designing the new store, keep your site structure, page speed, and mobile experience strong. Also, carry over title tags, meta descriptions, and image alt text. Your design should support both users and search engines. A clean layout with easy navigation helps customers shop and helps Google crawl your site better.
Use 301 Redirects
301 redirects are key to protecting your rankings. They tell Google where your old pages have moved. Set up redirects for every changed URL, especially high-traffic and high-ranking ones. This preserves your SEO value and ensures visitors don’t land on broken pages. A missing or incorrect redirect can quickly lead to traffic drops and a poor user experience.
Create an XML Sitemap for Search Engines
Once your new site is ready, generate an updated XML sitemap. Submit it to Google Search Console. This helps search engines quickly discover and index your new URLs. Make sure your sitemap includes all important pages and reflects the new structure. Keeping it clean and updated makes it easier for Google to understand and crawl your site.
Test Your Store for Complete Functionality
Before going live, test everything, like product pages, filters, checkout, forms, and navigation. Also, test on mobile. A broken experience can drive users away and hurt SEO indirectly. Make sure no links are broken, all pages load fast, and the checkout process is smooth. Even small errors can lead to lost sales and higher bounce rates.
Check Broken Links and Existing Redirects
Use tools to scan your new site for broken links and failed redirects. Fix them quickly. Broken links create a poor user experience and confuse search engines. Even a few broken links can hurt your SEO and frustrate users trying to browse your store. Regular scans help you catch issues early and keep your site clean and trustworthy.
Launch SEO Campaign to Educate Customers
Let your audience know you’ve moved or improved your store. Use email, blog posts, or social media to share updates. This builds trust and keeps customers engaged during the transition. Let them know what’s new, what’s better, and how to find things. Good communication reduces confusion and shows that your brand is active and reliable.
Monitor SEO Post Migration
After launch, keep a close eye on your SEO. Use Google Search Console and Analytics to track traffic, rankings, and crawl errors. Watch for any major drops and fix issues early. Continue checking for broken pages, slow-loading content, or indexing problems. Staying on top of performance helps your site recover faster and protects long-term growth.
Simply put, migrating an eCommerce site without an SEO plan can cost you rankings, traffic, and sales. A checklist helps you move step by step, covering everything from planning and backups to redirects and post-launch checks. Follow each step carefully to avoid costly mistakes during the migration. And if you need help with a safe and SEO-friendly migration, our eCommerce migration service is here to assist.
FAQs on eCommerce SEO Website Migration
Will my store disappear from Google after migration?
No, not if it’s done right. If you use proper redirects and keep SEO best practices in place, Google will understand the changes and update your rankings. You may see a small dip at first, but it usually recovers. The key is to make sure all important URLs are mapped and redirected correctly. That way, users and search engines find the right pages without confusion.
How long does it take for SEO to recover after migration?
In most cases, it takes a few weeks to a few months. Google needs time to reindex your new pages. The better your planning and redirects, the faster things usually bounce back. Keep tracking your traffic and rankings daily right after launch. Fixing any issues early can speed up recovery and help avoid long-term damage.
Can I migrate my eCommerce site without losing product reviews and ratings?
Yes, you can keep your reviews if they’re stored properly in your database or backed up through apps. Just make sure they’re included when setting up the new site, and the URLs match or are redirected. If your reviews live on third-party platforms, double-check integration before going live. They add trust, so don’t skip them during migration.
Do I need to inform Google before or after migration?
You don’t have to inform Google directly before, but after the new site is live, you should submit your updated XML sitemap in Google Search Console. It helps speed up the indexing of your new pages. Also, keep an eye on crawl stats, indexing issues, and ranking changes. Google will pick up signals faster if everything is clear and working properly.
Closing Lines
Migrating an eCommerce website is a big task, and SEO plays a key role in making it successful. A small mistake can lead to traffic loss, drops in rankings, or even broken user journeys. But with the right plan, clear goals, and proper SEO steps, you can avoid these risks.
Following a solid checklist keeps your store safe during the move. Things like setting redirects, keeping your top pages intact, and watching performance after launch all matter. Don’t treat it like a quick update. It’s a full process that needs attention at every step. And if you want to ensure complete accuracy with your migration, our eCommerce development company has a dedicated team to do it. Get in touch with us today!
]]>When your inventory is a mess, your entire store feels the same way. Customers can’t buy what’s not available. You waste time tracking down what’s missing. And when your numbers don’t match up, it’s hard to make smart business decisions. Thankfully, WooCommerce gives you the tools to stay on top of everything if you know how to use them right.
In this blog, we are going to discuss WooCommerce inventory management in detail. We’ll cover the key features, pros & cons, how Woocommerce experts set it up, and more. So, let’s dive in!
Importance of WooCommerce Inventory Management
Inventory is the core of your online store. If it’s not managed well, everything else starts to fall apart. You could run out of products, delay orders, or even lose customers. When you don’t know what you have in stock, you’re always playing catch-up. Here’s why it matters so much:
- Keeps Your Store Running Smoothly: When your inventory is in order, everything else works better. You always know what’s in stock, what’s running low, and what needs to be restocked. This helps you avoid last-minute surprises and missed sales.
- Improves Customer Experience: Nothing turns a customer away faster than placing an order only to find out the item is out of stock. With proper inventory tracking, your listings stay accurate. This builds trust and keeps buyers coming back.
- Saves You Time and Stress: A messy inventory slows everything down. You spend more time fixing errors, checking stock manually, or chasing down missing items. Good management tools help you stay organized and work smarter, not harder.
- Supports Better Business Decisions: When you can see which products sell well and which don’t, you can make smarter choices. You’ll know when to reorder, when to run discounts, and when to stop stocking certain items.
- Protects Your Profit Margins: Too much stock can cost you money. Too little can cost you sales. A strong inventory system helps you keep the right balance so you don’t tie up cash or miss out on revenue.
Simply put, a well-managed inventory is key to smooth eCommerce fulfillment. It keeps your store organized, improves customer experience, and helps you avoid stock issues, lost sales, and unnecessary costs.
How Does WooCommerce Inventory Management Work?
WooCommerce makes it simple to keep track of your products. The system is built to help you stay organized, avoid stock issues, and run your store smoothly.
- Start with Products: When you list a product in your store, you can add basic details like the name, price, images, and description. You also get the option to enter how many units you have in stock. This is where inventory management begins.
- Real-Time Stock Updates: As customers place orders, WooCommerce automatically reduces the stock count. You don’t have to update it by hand. If a product has different options, like color or size, you can manage the stock for each version separately.
- Clear Stock Status: Each product shows whether it’s available or not. You can set it as “In Stock,” “Out of Stock,” or even allow backorders if you want customers to buy now and receive it later. This keeps your store accurate and up-to-date.
- Smart Alerts: You can turn on low stock alerts. When a product is running low, you’ll get a notification. This gives you time to reorder before it sells out completely.
- Simple Inventory Reports: WooCommerce offers basic reports that show what’s available, what’s running low, and what’s sold out. These reports help you keep an eye on your inventory without digging through every product.
- Advanced Options with Plugins: If you need more control, like managing inventory in more than one location, there are plugins that work with WooCommerce. They add more features without making things complicated.
WooCommerce handles the hard part behind the scenes. All you need to do is set things up once, and the system keeps your inventory in check as you grow.
Key Features of WooCommerce Inventory Management
WooCommerce gives you several helpful features to manage your stock with ease. These tools are built right into the system, so you don’t need to add anything extra to get started.
- Stock Tracking: WooCommerce automatically tracks your inventory as customers place orders. You just enter how many items you have, and it updates the count every time something sells. This saves time and helps prevent stock errors.
- Product-Level Control: You can manage inventory for each product separately. This includes setting stock levels, choosing whether to allow backorders, and deciding if you want the product to show as “In Stock” or “Out of Stock.” It gives you full control without being confusing.
- Variation Management: If your products come in different options, like sizes, colors, or styles, you can manage stock for each variation. For example, you can track how many small blue shirts you have, not just how many shirts in total.
- Low Stock Notifications: WooCommerce lets you set alerts for low stock. When a product drops below a certain number, you get an email. This helps you restock before you run out and miss a sale.
- Inventory Reports: You get access to simple stock reports that show what’s in stock, what’s low, and what’s sold out. It’s a quick way to check the health of your store without digging into every product manually.
- Backorder Options: Want to keep selling even when something is out of stock? You can allow backorders. Customers can still buy the item, and you can fulfill the order once you restock. This is useful for popular products that sell fast.
These features work together to help you stay on top of your inventory without getting overwhelmed. Whether you sell one product or a hundred, WooCommerce gives you the tools to keep things running smoothly. If you need more advanced features for managing the inventory, consider integrating an ERP system with your WooCommerce store.
Pros & Cons of WooCommerce Inventory Management
WooCommerce offers a strong set of tools for managing your stock. But like any system, it has its strengths and limitations. Here’s a quick look at the main pros and cons, so you know what to expect.
Pros
- Built-In Features: You don’t need extra software to manage inventory. WooCommerce comes with stock tracking tools already included.
- Easy to Use: The system is simple and beginner-friendly. You can manage products, stock levels, and variations without needing technical skills.
- Real-Time Updates: Inventory updates automatically with every sale. This keeps your stock accurate and saves you from doing it manually.
- Custom Alerts: Low stock notifications help you restock on time. You won’t have to keep checking your products every day.
- Supports Product Variations: You can track inventory for different sizes, colors, or styles. This is great for stores that sell clothing or custom items.
- Reporting Tools: Basic inventory reports give you a quick overview of what’s available, low, or out of stock.
Cons
- Cannot Track Raw Materials: WooCommerce doesn’t support tracking raw materials. If you sell handmade or bundled items, you’ll need extra tools to manage that.
- Limited Advanced Features: The built-in system works well for small to medium stores. But if you need advanced tools (like warehouse tracking), you’ll need extra plugins.
- No Barcode Support by Default: WooCommerce doesn’t include barcode scanning out of the box. You’ll need third-party tools if you want that feature.
- Can Get Complex with Plugins: To unlock more advanced inventory features, you may need to install several plugins. This can slow down your site if not managed well.
Overall, WooCommerce inventory management is strong for most users. It’s easy to use, flexible, and works well for everyday store owners. Just keep in mind that as your business grows, you may want to expand with plugins or custom tools.
Setting Up WooCommerce Inventory Management
Getting your inventory set up in WooCommerce is easier than you might think. With a few simple steps, you can start tracking your stock and avoid common inventory problems.
Step 1: Enable Inventory Management
First, log in to your WooCommerce dashboard. Go to Settings and then click on Products. Here, find the Inventory tab and check the box that says Enable stock management. This lets WooCommerce track your inventory automatically.
Step 2: Set Stock for Each Product
Next, go to your product list. When you add a new product or edit an existing one, scroll down to the Inventory section. Enter the number of items you have in stock. This is the starting point WooCommerce will use to update your stock as sales happen.
Step 3: Manage Stock Status
You can choose if a product is In Stock, Out of Stock, or if you want to allow Backorders. This tells your customers if the item is available or if they can still order it while you restock.
Step 4: Set Low Stock Notifications
In the Inventory settings, you can set a number for the low stock threshold. When your stock drops below this number, WooCommerce will send you an email alert. This helps you reorder before running out.
Step 5: Manage Product Variations
If your products have different options, like sizes or colors, you can manage stock for each variation. Edit the product, select the variation, and enter the stock amount. WooCommerce will track each variation separately.
Step 6: Review Your Inventory Regularly
Finally, use WooCommerce’s built-in reports to keep an eye on your stock. Check what’s selling fast, what’s running low, and what needs a restock.
In short, setting up WooCommerce inventory management is simple and helps you track stock, manage product variations, and get alerts before running low. Regularly reviewing your inventory keeps your store organized and ready to meet customer demand. If you want expert help to get this right, consider hiring our WooCommerce developers.
How To Keep WooCommerce Inventory Updated
Keeping your inventory up-to-date is key to running a smooth online store. Here are some easy tips to help you stay on top of your stock in WooCommerce.
- Regularly Check Your Inventory: Make it a habit to review your stock often. Check which products are selling fast and which ones need restocking. This helps avoid surprises.
- Set Low Stock Alerts: Turn on low stock notifications in WooCommerce. When your stock gets low, you’ll get an email alert. This gives you time to reorder before running out.
- Update Stock After Sales: WooCommerce automatically reduces your stock when a sale happens. Still, it’s good to double-check and make sure the numbers match your actual inventory.
- Manage Stock for Variations: If your products have options like size or color, track each variation’s stock separately. This keeps your inventory accurate and your customers happy.
- Use Inventory Management Plugins: For bigger stores, plugins can help. They add features like barcode scanning, warehouse management, or bulk stock updates. These tools save you time and reduce mistakes.
- Perform Regular Audits: Count your stock physically from time to time. Compare the real numbers with what WooCommerce shows. This keeps your data reliable.
- Use Bulk Edit Tools: When you have many products, updating stock one by one takes too long. WooCommerce and some plugins let you edit stock for many products at once.
- Allow Backorders if Needed: If a product sells fast, you can let customers order even when it’s out of stock. This keeps sales going while you restock. Just be clear about the delivery time.
By following these steps, you’ll keep your inventory accurate and avoid stock problems. This helps your business run smoothly and keeps your customers satisfied.
How to Manage WooCommerce Stock Status
Keeping your stock status updated is important. It helps your customers know what’s available and keeps your store running smoothly. Here’s how to manage it step-by-step.
- Log in to your WordPress dashboard and go to Products. Choose the product you want to update or create a new one.
- In the product details, look for the Inventory tab. This is where you control your stock settings. Check the box for Manage stock. This lets WooCommerce track how many items you have.
- Add the number of items you currently have in stock. WooCommerce will automatically adjust this number when customers buy the product.
- Set stock status by choosing one of these options: In Stock (Items are available for purchase), Out of Stock (Product is not available right now), or On Backorder (Customers can still order even if you’re out of stock).
- Set low stock alerts for a number to get notifications when your stock is running low.
- If your product has different options, like sizes or colors, manage each variation’s stock on its own. This keeps your stock accurate for every version of the product.
- Save your changes.
By managing stock status well, you keep your customers informed. It also makes your store easier to run and helps avoid selling products you don’t have.
Steps to View WooCommerce Status Reports
WooCommerce gives you built-in reports to keep track of your stock. These reports help you see what’s in stock, what’s running low, and what’s sold out.
Here’s how to check them:
- Log in to your WordPress dashboard and click on WooCommerce from the left menu.
- From the dropdown, click on Reports. This takes you to a page with different types of store reports.
- At the top, select the Stock tab. Here, you’ll find three simple reports: In Stock, Low Stock, and Out of Stock.
- Use these reports to spot what needs attention. This helps you restock on time and avoid losing sales.
Simply put, WooCommerce’s built-in status reports make it easy to track your stock levels in real time. With just a few clicks, you can view what’s in stock, running low, or sold out, so you can manage inventory before it impacts sales.
WooCommerce Inventory Management Limitations
While WooCommerce is great for basic inventory needs, it does have a few limitations you should know about.
- No Raw Material Tracking: If you make your own products, WooCommerce can’t track raw materials by default. You’ll need extra tools to manage that.
- Limited Warehouse Support: Managing inventory across multiple locations isn’t built in. For that, you’ll need plugins or custom setups.
- No Built-in Barcode Scanning: There’s no barcode feature included. If you want to scan products for faster updates, you’ll have to use third-party solutions.
- Bulk Management Can Be Slow: Updating stock for many products takes time. While bulk edit tools help, large stores may find it less efficient.
- Reports Are Basic: The built-in inventory reports are simple. They show what’s in stock, low, or out, but not much beyond that.
WooCommerce is great for simple inventory tasks, but it falls short on things like raw material tracking, barcode scanning, and managing stock across multiple warehouses. These limits can impact efficiency as your store grows. If you’re looking to overcome these gaps with the right tools and setup, experts at our WooCommerce development company can help you. You can also explore the possibilities of eCommerce development with WordPress to better understand how to build scalable and flexible online stores.
FAQs on WooCommerce Inventory Management
Can I pause inventory tracking for certain products?
Yes, you can turn off stock management for any product you choose. Just uncheck the “Manage stock?” box in the product’s inventory settings. This is helpful for digital products, services, or anything you don’t want WooCommerce to track. The product will still be available for purchase.
What happens if I forget to update my stock levels?
If your stock numbers aren’t accurate, customers might buy items that are actually sold out. This can lead to order cancellations, refund requests, and negative reviews. Keeping your stock updated helps avoid customer issues and keeps your store running smoothly.
Does WooCommerce stop sales automatically when stock runs out?
Yes, when a product’s stock reaches zero and stock management is enabled, WooCommerce marks it as “Out of stock.” This will prevent customers from buying it unless you’ve allowed backorders. It’s a simple way to avoid selling something you don’t have.
Can I hide out-of-stock products from my store?
Absolutely. WooCommerce gives you the option to hide out-of-stock products so customers don’t see them on your site. You can enable this in the settings under “Inventory.” It keeps your shop looking fresh and avoids confusion or frustration for buyers.
Is there a way to see which products sell the fastest?
Yes, WooCommerce includes basic sales reports that help you track your top-selling products. You can use these insights to reorder popular items, plan future promotions, or decide what to feature on your homepage. It’s a smart way to grow your store with data.
Closing Lines
Managing your inventory in WooCommerce isn’t just about numbers. It is essential for keeping your store running smoothly. When your stock is updated and organized, everything else gets easier. Orders flow better, customers stay happy, and you stay in control.
WooCommerce gives you the tools you need, but it’s up to you to use them right. Regular updates, smart settings, and helpful plugins can save you time and reduce stress. It’s not about doing more. It’s about doing it smarter. If you need help setting up or improving your WooCommerce store, we’re here for you. Our team builds smart, user-friendly solutions that make managing your store easier. Contact us today so that we can make your WooCommerce store work better for you.
]]>But what exactly is it? Jamstack eCommerce is a new way to build stores with speed and performance in mind. Instead of relying on bulky, all-in-one platforms like WordPress or Magento, Jamstack breaks things into smaller, more efficient parts. The result is a faster, mobile-friendly site that’s easier to grow and manage.
In this post, we’ll discuss what Jamstack eCommerce is, how it works, and why it might be the smartest move you can make for your online business. So, let’s dive in!
What is Jamstack eCommerce?
To understand Jamstack eCommerce, let’s start with the first part: Jamstack. It is a modern way of building websites. The name stands for JavaScript, APIs, and Markup. Instead of relying on a traditional, all-in-one system (like WordPress or Shopify’s back-end), Jamstack separates the front-end from the back-end. This makes websites faster, more secure, and easier to scale.
With Jamstack, most of the website is pre-built ahead of time and delivered through a Content Delivery Network (CDN). That means pages load almost instantly, no matter where your visitors are in the world. The site still connects to real-time data, like prices or inventory, using APIs, but the rest is already ready to go.
Now, what does this mean for eCommerce? Jamstack eCommerce is simply applying this modern approach to online stores. It’s about building shopping websites using the Jamstack model. This gives you a store that’s lightning-fast, flexible, and easy to maintain while still being fully functional with shopping carts, payments, product filters, and everything customers expect.
How Does Jamstack eCommerce Work?
Jamstack eCommerce may sound complex, but it’s built on a very simple idea: do as much work as possible before someone visits your site so the shopping experience feels fast, smooth, and reliable.
What this means in simple terms is that instead of building each page on the spot every time someone clicks (like many traditional websites), Jamstack pre-builds your pages ahead of time. It’s like preparing your store before customers walk in. The shelves are stocked, signs are up, and everything is ready. So when someone visits your site, the page is shown instantly.
But what about live data, like prices, product availability, or customer logins? That’s where APIs come in. APIs (Application Programming Interfaces) connect your site to services like payment providers, product databases, and content tools. These plug-and-play services work behind the scenes and keep everything up to date without slowing things down.
- Your product pages, homepage, and blog are pre-built and served quickly through a global CDN (Content Delivery Network).
- Anything dynamic (like the shopping cart or checkout) is handled by JavaScript in the browser.
- APIs pull in real-time data like stock levels or customer info when needed.
Everything works together smoothly, giving your customers a fast, seamless experience while giving you a flexible system that’s easier to manage.
In short, Jamstack eCommerce works by preparing what it can in advance and only fetching live data when it truly matters. That’s why it feels faster and more reliable for both you and your customers. If you’re looking to build with Jamstack but are confused about how to do it, you can hire our eCommerce developers.
Advantages of Using Jamstack to Build eCommerce Stores
Choosing the right tech for your online store can make a huge difference. Jamstack offers a modern approach that brings real, everyday benefits both for you as the store owner and for your customers. Here are some of the biggest advantages of using Jamstack for eCommerce:
- Faster Load Times: With Jamstack, most of your website is pre-built and ready to go. That means pages load almost instantly, even on slower connections. And faster sites lead to better user experience and higher conversions.
- Better Security: Since Jamstack separates the front-end from the back-end, there’s less risk of your site getting hacked. You’re not running a full server or database all the time, which greatly reduces vulnerabilities.
- Easier to Scale: Whether you’re selling 10 products or 10,000, Jamstack makes it easier to grow. Your store runs on a global eCommerce CDN, so it can handle traffic spikes without crashing or slowing down.
- More Flexibility: You’re not locked into one platform. Want to change your payment provider or update your product system? With Jamstack, you can plug in the tools that work best for you without rebuilding everything.
- Better Developer Experience: Jamstack is loved by developers because it’s clean, modern, and easier to work with. This often means faster development, fewer bugs, and lower long-term costs for you.
- Improved SEO: Google loves fast websites. With Jamstack’s speed and clean structure, your store has a better chance of ranking higher in search results, bringing in more traffic over time.
In short, Jamstack eCommerce helps you build a store that’s fast, secure, flexible, and future-ready. It’s not just about keeping up; it’s about getting ahead.
Jamstack eCommerce vs Traditional eCommerce
If you’re wondering how Jamstack eCommerce stacks up against traditional platforms (like WordPress, Magento, or older Shopify setups), we will break it down for you through this table.
| Feature | Jamstack eCommerce | Traditional eCommerce |
| Speed | Very fast; pages are pre-built and load instantly | Often slower as pages are built on the fly |
| Security | More secure with fewer moving parts, less risk | Higher risk as more server-side processing is involved |
| Flexibility | Highly flexible, you choose the tools you want | Limited, as it is tied to one system or plugin ecosystem |
| Scalability | Highly flexible, you choose the tools you want | May require upgrades or heavy hosting |
| Development control | Full control: developers can fully customize | More limitations, depending on the platform |
| Maintenance | Low: fewer updates and less server management | Ongoing: plugins, themes, and servers need updates |
| SEO performance | Strong, fast load times and clean code help rankings | Can vary. A slower speed can affect visibility |
| User experience | Strong, fast load times and clean code help rankings | May lag, especially on mobile or poor connections |
| Cost efficiency | Can be more cost-effective long term | Costs may rise with hosting, plugins, and updates |
Popular Jamstack eCommerce Solutions
Once you decide to build your online store using Jamstack, the next question is, which tools should you use? There are several trusted, developer-friendly solutions built to work seamlessly with the Jamstack approach. Some of the most popular ones include:
Commerce Layer

Commerce Layer is a powerful headless commerce platform designed for global brands. It lets you build your front-end however you like (using any Jamstack tool), while it handles all the eCommerce features like inventory, pricing, and checkout in the background.
Best for: Large or international stores that want full control over how things look and work.
Snipcart
Snipcart is a simple way to add a shopping cart to any static website. You just drop in a few lines of code, and you instantly get cart functionality, checkout, taxes, and more, all while keeping your site fast and Jamstack-friendly.
Best for: Smaller shops or developers who want to keep things lightweight and easy to set up.
Shopify Plus (with Headless Setup)
Shopify Headless is a great option if you want the power of Shopify’s back-end with the flexibility of a custom front-end. With Shopify Plus, you can go headless, meaning you handle the storefront using Jamstack tools while still managing products, payments, and orders through Shopify’s powerful engine.
Best for: Established businesses that want enterprise-level features with Jamstack flexibility.
BigCommerce
BigCommerce also offers a headless eCommerce setup, allowing you to connect their powerful back-end engine with any Jamstack front-end. You get all the benefits of a large eCommerce platform without the slow or bloated front-end experience.
Best for: Businesses that need robust product management and want the freedom to design a custom front-end.
In short, these tools let you mix and match what works best for your store. Whether you’re just starting out or scaling fast, there’s a Jamstack eCommerce solution that fits your needs.
What Should You Consider Before Choosing Jamstack eCommerce?
Jamstack eCommerce offers many advantages, but it’s important to think through a few key points before making the switch. This will help ensure it’s the right fit for your business and goals.
- Your Technical Resources: Jamstack sites often require some development skills to set up and manage. Do you have access to developers who understand JavaScript, APIs, and modern web tools? If not, are you ready to learn or hire help? Knowing this upfront will save you frustration later.
- Complexity of Your Store: How complex is your online store? If you have many products, complicated inventory needs, or advanced features, make sure the Jamstack tools you pick can handle them. Some Jamstack platforms are better for simple shops, while others scale up to large stores.
- Budget and Timeline: Jamstack development can be cost-effective in the long run, but the initial setup might take more time and resources compared to traditional platforms. Consider your budget and timeline carefully.
- Integration Needs: Think about what tools you already use or want to use, like payment processors, CRM systems, marketing platforms, etc. Make sure your Jamstack solution can connect with these through APIs or plugins.
- Future Growth Plans: Are you planning to scale your store quickly? Jamstack’s flexibility makes it easier to grow without rebuilding everything. But it’s good to plan ahead and choose tools that can support your growth.
Simply put, Jamstack eCommerce can be a powerful choice, but only if it fits your skills, store needs, and growth plans. Taking time to consider these factors will help you build a faster, safer, and more successful online store. You can always work with an experienced eCommerce development company to guide you through the process.
FAQs on Jamstack eCommerce
Is Jamstack worth it?
For most online stores, yes. Jamstack boosts speed, security, and flexibility, which can lead to happier customers and easier site management. It’s a smart choice if you want a modern, future-proof setup.
What is the difference between Jamstack and SPA?
Jamstack is a way to build fast websites using pre-built pages and APIs. SPA (Single Page Application) loads one page and dynamically updates content without full reloads. They can work together, but Jamstack focuses on pre-rendering for speed.
Is Jamstack open source?
Jamstack itself is a concept, not a product, so it’s not “open source” or proprietary. However, many Jamstack tools and frameworks, like Gatsby, Next.js, and Hugo, are open source and free to use.
Can I switch my existing online store to Jamstack easily?
Switching to Jamstack usually means rebuilding your front-end, but you can keep your existing back-end if it supports APIs. It takes some planning, but it’s definitely doable and often worth it for better speed and flexibility.
Will my customers notice the difference with Jamstack eCommerce?
Yes! Your customers will experience faster page loads and smoother browsing. Even small delays can frustrate shoppers, so Jamstack helps keep them happy and coming back.
Summing Up
Jamstack eCommerce is changing the way online stores are built. By focusing on speed, security, and flexibility, it offers a better experience for both store owners and customers. While it might take some learning or help from developers, the benefits, like faster load times, easier scaling, and improved security, are well worth it.
If you want your store to be modern, reliable, and ready for the future, Jamstack is a smart choice. Take the time to consider your needs and explore the tools available, and you’ll be on your way to building a faster, safer online store that customers will love. If you’re exploring Jamstack eCommerce and need a hand making it work for your business, we’re here to help. Contact us today!
]]>Etsy is a marketplace. You list your products, and Etsy brings the traffic. It’s quick to set up. Great for handmade, vintage, and creative items. WooCommerce is different. It’s a plugin for WordPress. You build your own site. You control everything from design to checkout.
So, which one is better? That depends on your goals, your budget, and how much control you want. In this blog, we’re going to give a detailed Etsy vs WooCommerce comparison to help you pick what’s perfect for you with expert insights from our WooCommerce developers. So, let’s dive in!
Etsy vs WooCommerce: Comparison Table
Let us take a quick glance at how these two platforms stack up against each other via this comparison table.
| Feature | Etsy | WooCommerce |
| Type of Platform | Online marketplace | WordPress plugin (self-hosted store) |
| Setup Difficulty | Very easy | Medium (needs some tech skills) |
| Cost to Start | Free to start, but has listing & transaction fees | Free plugin, but you pay for hosting, domain, and extras |
| Monthly Fees | No monthly fee for basic use | No monthly fee for plugin, but hosting usually costs $10–$25/month |
| Listing Fees | $0.20 per item listed | No listing fees |
| Transaction Fees | 6.5% + payment processing | Only payment gateway fees (like Stripe or PayPal, approx. 2.9%) |
| Design Control | Limited; Etsy controls the look | Full design freedom |
| Traffic | Etsy brings built-in traffic | You bring your own traffic (via SEO, ads, etc.) |
| Branding | Limited; Etsy branding dominates | Full branding: your store, your way |
| Ease of Use | Great for beginners | Better for those who want more control |
| Best For | Handmade, craft, vintage sellers | Growing brands or custom stores |
| Mobile-Friendly | Yes (Etsy app included) | Depends on your theme (many are mobile-friendly) |
| Support | Etsy provides support | Highly scalable with plugins and tools |
| Scalability | Limited; Etsy has rules and limits | Highly scalable with plugins and tools |
Overview of Etsy
Etsy is an online marketplace made for creative sellers. It’s known for handmade goods, vintage items, and craft supplies. If you’re a maker or artist, it gives you a simple way to reach buyers without needing a website.
You don’t need to worry about setting up a full online store. Etsy already has 95.5 million active buyers. You just create an account, list your items, and start selling. It’s beginner-friendly and quick to launch.
Key Features of Etsy
Let’s look at some of the key features of Etsy:
- Ready-made marketplace with built-in traffic.
- Simple store setup with no coding needed.
- Easy-to-use seller dashboard.
- Secure payment processing (Etsy Payments, PayPal).
- Mobile app for managing orders and messages.
- Etsy Ads for promoting your listings.
- Customer support for sellers.
- Ability to offer discounts, sales, and coupons.
- Reviews and ratings system to build trust.
Pros & Cons of Etsy
Like any platform, Etsy has its strengths and limitations. Let’s look at the pros and cons to help you decide if it’s the right fit:
Pros
- Quick Setup: Start selling within a few hours.
- Built-in Audience: Millions of shoppers already visit Etsy.
- Low Barrier to Entry: No need for tech or design skills.
- Trusted Platform: Buyers recognize and trust Etsy.
Cons
- Fees Add Up: Listing and transaction fees can eat into profits.
- Limited Branding: Hard to stand out as your own brand.
- Marketplace Rules: You must follow Etsy’s policies.
- Competition: You compete with thousands of similar sellers.
Simply put, Etsy is a beginner-friendly marketplace ideal for handmade and creative goods, offering quick setup and access to millions of buyers. It’s easy to use with built-in tools but comes with fees, branding limits, and strong competition.
Overview of WooCommerce
WooCommerce is a powerful tool that helps you build your own online store. It’s a free plugin for WordPress, which means you can turn your website into a full eCommerce shop. Unlike Etsy, you don’t sell on a shared marketplace; you create your own space, your own brand.
It gives you more control, but it also takes more setup. You’ll need hosting, a domain name, and a basic understanding of how WordPress works. It’s great if you want to grow your business long-term and build a brand that stands out.
Key Features of WooCommerce
Here are some key features that make WooCommerce a strong choice for store owners:
- Fully customizable store and layout.
- No listing or transaction fees from the platform.
- Integration with major payment gateways (Stripe, PayPal, etc.)
- Wide range of plugins and themes available.
- Control over branding, pricing, and shipping.
- SEO-friendly tools for better Google visibility.
- Inventory and order management tools.
- Support for physical and digital products.
- Scalable as your business grows.
Pros & Cons of WooCommerce
Just like Etsy, WooCommerce has its ups and downs. Here’s a quick look at both:
Pros
- Full Control: You own your site and make all the decisions.
- No Marketplace Fees: Keep more of your profit.
- Custom Branding: Your store, your rules, your design.
- Highly Scalable: Add new features as your business grows.
Cons
- Setup Takes Time: Needs hosting, a domain, and some tech skills.
- No Built-In Traffic: You have to market your store yourself.
- Ongoing Costs: Hosting, themes, and plugins may cost extra.
- Maintenance Needed: You’re responsible for updates and security.
In short, WooCommerce lets you build a fully customizable online store with complete control over branding, features, and growth. It’s ideal for long-term business owners but requires more setup, tech skills, and self-driven marketing. And you can always hire our WooCommerce development company to build your online store.
What are the Similarities Between Etsy and WooCommerce
While Etsy and WooCommerce work differently, they do have a few important things in common. Here’s a breakdown of what they both offer:
- Sell Products Online: Both platforms allow you to sell physical or digital products. Whether it’s handmade goods, art prints, or retail items, you can list and manage them easily.
- Secure Payment Options: They both support secure payment methods. Etsy handles this for you automatically, while WooCommerce connects to trusted gateways like PayPal or Stripe.
- Order & Inventory Management: Each platform helps you track your stock, manage orders, and process shipments. This keeps your store organized and running smoothly.
- Marketing Tools: You can promote your products on both platforms. Etsy offers in-platform ads, and WooCommerce supports marketing plugins, SEO tools, and integrations with email services.
- Customer Communication: Both allow you to message customers, handle questions, and manage reviews. This helps you build trust and offer better service.
- Business Growth Support: Whether you start small or aim to grow, both platforms have tools to support your journey. You can add features, run promotions, and grow your customer base over time.
Etsy and WooCommerce both let you sell products online, manage orders, accept secure payments, and connect with customers. While Etsy is plug-and-play, you can set up WooCommerce to gain more control, flexibility, and room for growth. And if you need assistance in setting up WooCommerce or building a custom eCommerce store, our eCommerce development company can help you.
Detailed Comparison of Etsy vs WooCommerce
Let’s now do a comprehensive Etsy vs WooCommerce comparison to see how different they are:
User-friendliness
User-friendliness is about how easy it is to set up and manage your store. For many sellers, especially beginners, this can make or break the experience.
- Etsy: Etsy is extremely beginner-friendly. You don’t need any tech skills. Just sign up, add your product details, upload photos, and you’re good to go. The dashboard is clean, simple, and easy to understand. Everything is managed for you, like hosting, security, and updates, so you can focus on your products.
- WooCommerce: WooCommerce offers more control, but it’s not as simple to start with. You’ll need to set up WordPress, choose a hosting provider, and install the WooCommerce plugin. There’s a learning curve if you’re not used to websites or tech tools. That said, once it’s running, managing your store becomes easier with time.
Verdict: If you’re a beginner or want to launch quickly, Etsy wins on user-friendliness. WooCommerce is better for users comfortable with websites or those willing to invest time into learning. But for ease of use right out of the box, Etsy is the clear winner.
Ease of Use
Ease of use affects your day-to-day workflow. A simple and smooth platform saves time, reduces stress, and lets you focus on growing your business.
- Etsy: It is designed for non-technical users. Everything is built-in and works out of the box, like product listings, payments, order tracking, and customer messages. You don’t need to worry about hosting, updates, or setting up features. It’s plug-and-play, which makes it ideal for busy sellers or first-timers.
- WooCommerce: WooCommerce gives you a powerful system, but you have to build it yourself. You’ll need to install plugins, manage updates, and sometimes troubleshoot things on your own. There’s more flexibility, but it also means more responsibility. If you’re not used to WordPress or eCommerce tools, it can feel overwhelming at first.
Verdict: Etsy is easier to use, especially if you’re just starting out. WooCommerce gives you more control but requires more time and technical confidence. For overall ease of use, Etsy is the better option for most beginners.
Customization Capabilities
Customization lets you create a store that truly reflects your brand. The more control you have, the more unique and professional your store can look and feel.
- Etsy: Etsy offers very limited customization. You can add your shop logo, banner, and a short bio, but that’s about it. All Etsy shops follow the same layout and structure. You can’t change how your store looks or functions beyond what Etsy allows. It’s simple but also restrictive.
- WooCommerce: WooCommerce gives you full control over your store’s design and features. You can choose from thousands of themes, edit layouts, change colors, and even add custom features through plugins. If you want your store to have a unique style or advanced functionality, WooCommerce gives you that flexibility.
Verdict: WooCommerce clearly wins when it comes to customization. It lets you build your store exactly the way you want. If branding and design flexibility matter to you, WooCommerce is the better choice.
Template & Design
The design of your store helps create a good first impression. A clean, attractive layout can build trust and make it easier for customers to shop.
- Etsy: Etsy uses a fixed layout for all shops. While you can add a shop banner, logo, and photos, the overall design looks the same across all stores. This keeps things consistent but also limits how unique your shop can look. You don’t get to choose templates or change how pages are structured.
- WooCommerce: WooCommerce offers a wide range of themes and design options. You can pick from free or premium templates and customize almost everything including colors, fonts, layouts, and even how your product pages look. It’s great if you want a store that matches your brand’s personality.
Verdict: WooCommerce is the winner for design flexibility. Etsy keeps things simple but very limited. If you want your store to stand out with a custom look, WooCommerce is the better option.
Marketing Features
Marketing helps you attract more customers and grow your sales. The better the tools, the easier it is to promote your products and reach the right audience.
- Etsy: Etsy offers basic built-in marketing tools. You can run Etsy Ads, offer discounts, and create coupons. Etsy also helps drive traffic through its own marketplace, which is great for visibility. But you have limited control over how and where your shop gets promoted.
- WooCommerce: WooCommerce gives you full freedom to market however you want. You can add SEO plugins, connect with email marketing tools, run Facebook and Google ads, use popups, and much more. It’s more hands-on but gives you way more options to grow your brand and reach your ideal customers.
Verdict: WooCommerce wins in marketing flexibility. Etsy offers convenience, but WooCommerce gives you more tools and freedom to scale. If marketing control is important to you, WooCommerce is the better choice.
Inventory Management
Inventory management helps you keep track of your products, avoid overselling, and stay organized. It’s key to running a smooth and professional online store.
- Etsy: It offers simple and easy inventory tools. You can set stock levels, update quantities, and get alerts when items are low. It works well for small shops with a few products. But it’s not built for complex inventory needs or managing large product ranges.
- WooCommerce: It gives you more powerful inventory control. You can track stock, set rules for backorders, manage product variations, and even connect to advanced inventory plugins. It’s great for larger stores or anyone selling multiple product types.
Verdict: For basic inventory, Etsy is enough. But WooCommerce gives more control and flexibility as your store grows. If you plan to scale or manage many items, WooCommerce is the better option.
Shipping
A good shipping setup ensures fast, affordable, and reliable delivery. It also builds trust with customers and keeps your orders running smoothly.
- Etsy: This makes shipping easy for beginners. You can set shipping profiles, print labels, and even get discounted rates with carriers like USPS. It handles most of the process for you, which is helpful if you’re new to selling online. But it offers limited control over more advanced shipping rules or custom setups.
- WooCommerce: This offers full control over shipping. You can set your own rates, create zones, offer free shipping, and connect with major shipping carriers through plugins. It can be as simple or as advanced as you need. But you’ll need to set it all up yourself, which may take time and learning.
Verdict: Etsy is better for beginners who want a fast and easy shipping setup. WooCommerce is more powerful and flexible but needs more effort. If you want control and customization, go with WooCommerce. For ease and speed, Etsy is the better choice.
Seller Support
Good support helps you solve problems quickly. Whether it’s a technical issue or a question about your store, reliable support keeps your business running smoothly.
- Etsy: It offers direct support through chat and email. Their help center is packed with guides and FAQs. Because Etsy is a closed platform, most problems are handled by their own team. This makes getting help faster and easier for most sellers, especially beginners.
- WooCommerce: It support depends on your setup. Since it’s open-source, help usually comes from theme or plugin developers, your hosting provider, or community forums. There’s no single support team unless you pay for premium services. You may need to solve some issues on your own or hire help.
Verdict: Etsy provides more direct and beginner-friendly support. WooCommerce has great resources but can be more complex to manage. For fast and simple seller support, Etsy is the better choice.
Pricing
Understanding pricing helps you plan your budget. It directly affects your profits, especially if you’re just starting or running a small business.
- Etsy: It has no monthly fee, but it charges per transaction. You pay a listing fee of $0.20 per item, plus a 6.5% transaction fee, and additional payment processing fees. These costs can add up over time, especially as your sales grow. It’s low-risk to start but can get expensive with volume.
- WooCommerce: WooCommerce itself is free, but you need to pay for hosting, a domain name, and sometimes extra plugins or themes. The costs vary depending on what you choose. You won’t pay transaction fees to WooCommerce, which can save money in the long run, especially for high-volume stores.
Verdict: Etsy is more affordable upfront and great for testing the waters. WooCommerce has setup costs but may be cheaper over time if you scale. If you’re just starting small, Etsy is easier on the wallet. But for long-term savings, WooCommerce can offer better value.
In summary, Etsy is great for beginners with easy setup and built-in traffic but limited control. WooCommerce offers full customization and long-term growth but needs more setup. Etsy focuses on simplicity, and WooCommerce focuses on flexibility.
How to Choose Between Etsy vs WooCommerce?
Not sure which platform is right for your store? Here’s a simple way to decide based on your needs, goals, and comfort level.
Choose Etsy If:
- You’re just starting out and want something quick and easy.
- You don’t want to deal with tech or website setup.
- You want access to an existing audience of buyers.
- You sell handmade, vintage, or creative goods.
- You’re okay with paying listing and transaction fees.
- You prefer a platform that handles most of the backend for you.
Choose WooCommerce If:
- You want full control over how your store looks and works.
- You’re planning to build your own brand and grow over time.
- You have (or are willing to learn) some basic tech skills.
- You want to avoid ongoing listing or transaction fees.
- You need more advanced features for marketing, inventory, or shipping.
- You want flexibility to add tools and customize everything.
Simply put, choose Etsy if you want a simple, ready-to-use platform with built-in buyers and minimal setup. Go with WooCommerce if you need full control and customization and plan to grow your brand long-term. And if you decide to go with WooCommerce, you can hire expert WooCommerce developers to get the most out of your store setup and growth.
FAQs on Etsy vs WooCommerce
Can I use both Etsy and WooCommerce at the same time?
Yes, many sellers actually do this to expand their reach. You can use Etsy to tap into its built-in audience while running your own WooCommerce store for more control. It’s a smart way to build your brand while still enjoying Etsy’s traffic. Just be ready to manage both platforms side by side.
Do I need a business license to sell on Etsy or WooCommerce?
That depends on where you live and what you sell. Some states or cities may require a business license, sales tax permit, or other registrations. It’s always a good idea to check with your local government. Even if not required, having one can make your business feel more official and trusted.
Which is better for selling digital products?
Both platforms support digital downloads, but WooCommerce offers more flexibility. You can control access, limit downloads, and fully customize the experience. Etsy is easier to start with, but has limited settings for digital files. If your business is purely digital, WooCommerce may be the better long-term option.
Can I switch from Etsy to WooCommerce later?
Yes, you can move from Etsy to WooCommerce whenever you’re ready. There are import tools and plugins that help you transfer product listings and customer data. It does take some effort, but it’s a common move for sellers who outgrow Etsy or want more freedom with their store.
Is it possible to sell services instead of products?
Etsy is mostly designed for physical and digital products, so selling services can be harder. WooCommerce, on the other hand, is much more flexible. With the right plugins, you can sell appointments, consultations, or any type of service with ease. It’s a better choice if services are your main focus.
Etsy vs WooCommerce: The Better Pick?
Choosing between Etsy and WooCommerce comes down to what you need right now. And where you want to take your store in the future. If you want something simple and fast, Etsy is a great place to start. It takes care of the technical stuff and puts your products in front of ready-to-buy customers. But as your business grows, you may feel limited.
WooCommerce gives you full control. You get to build your brand, customize everything, and scale on your terms. It takes more work, but it’s worth it if you’re serious about long-term growth. Think about your goals, budget, and how hands-on you want to be. The best choice is the one that fits your current stage and future plans. If you’re confused as to which platform to choose or need help in building a professional-looking online store, then our experts can help you. Get in touch with us today!
]]>This change might feel overwhelming at first, especially if you’ve built a lot around Scripts. But don’t worry, the Shopify function is a solid alternative, and the transition doesn’t have to be complicated.
In this blog, we’ll break down what the deprecation means, why it’s happening, and what your options are moving forward. You’ll learn how Shopify experts perform the migration smoothly, without disrupting your store or your customers’ experience.
Shopify Scripts Deprecation Deadline
Shopify has pushed back the Scripts deprecation deadline to June 30, 2026 (originally August 28, 2025). This gives merchants more time to plan their migration.
Shopify is using this extra time to improve Shopify Functions, its replacement for Scripts. The goal is to make sure Functions can handle everything Scripts did, like discounts, shipping rules, and payment customizations, but with more flexibility and reliability. If you’re still using Scripts, don’t wait until the last minute. Start exploring Functions now to avoid surprises later.
Why is Shopify Scripts Deprecation Being Done?
Shopify isn’t removing Scripts just for the sake of change. The main reason is to make the platform faster, more scalable, and easier to build on, especially for checkout experiences.
Shopify Scripts were built for the old checkout system. While they offered a lot of flexibility, there were some limits. You need technical knowledge to work on Scripts. They were not easy to manage and didn’t always play well with new features or third-party apps.
Now, Shopify is moving toward Shopify Functions, which are designed to work with the new Checkout Extensibility framework. This new setup is more secure, easier to scale, and better suited for long-term growth. You get similar (or even better) customization options, but in a way that’s easier to update and maintain.
In short, Shopify is retiring Scripts to give you a more modern, reliable way to customize your store. And while the transition may take some planning, it’s a step forward for performance, flexibility, and future-proofing your business.
Shopify Scripts Alternative: Shopify Functions
With Shopify Scripts on their way out, Shopify Functions is the go-to solution for adding custom logic to your store, especially at checkout.
So, what are Shopify Functions?
They’re Shopify’s new way to let you customize things like discounts, shipping rates, and payment methods without touching the core code. Functions are built to work with Shopify’s updated checkout and use modern development tools that are easier to maintain, more secure, and faster to run.
They’re flexible but also designed to scale with your business. Whether you’re a developer or working with one, you’ll find that Functions are more predictable and easier to test compared to Scripts.
Why Shopify Functions Is a Perfect Alternative
Shopify Functions are more than just a replacement. They’re a big upgrade. Here’s why they’re a better long-term option:
- Built for the new Shopify checkout: They work natively with Checkout Extensibility.
- App-based: You install them like apps, so they’re easier to manage, even without coding.
- More secure and scalable: No need to worry about brittle code or complex workarounds.
- More flexible for future features: Shopify is actively investing in expanding what Functions can do.
In short, Shopify Functions are the modern replacement for Shopify Scripts, offering a more flexible and secure way to customize discounts, shipping, and payments. They work seamlessly with the new Shopify checkout and are easier to manage through apps. If you want to switch to Functions and need expert help, our Shopify development company can assist you.
Shopify Scripts vs. Shopify Functions: Quick Comparison
To help you see the difference more clearly, here’s a quick side-by-side comparison of Shopify Scripts and Shopify Functions.
| Feature | Shopify Scripts | Shopify Functions |
| Built For | Legacy checkout | New checkout (Checkout Extensibility) |
| Customization Areas | Discounts, Shipping, Payments | Discounts, Shipping, Payments (expanding) |
| How It’s Applied | Custom Ruby code | App-based, configurable in Admin |
| Developer Dependency | High. Needs custom scripting | Lower. Manageable through apps |
| Performance & Scalability | Slower, less scalable | Faster, more scalable |
| Security | Manual handling required | More secure by design |
| Future Support | Being phased out | Actively supported and evolving |
How to Migrate from Shopify Scripts to Shopify Functions?
Now that you know Shopify Scripts are being phased out and that Functions are the better alternative, the next step is understanding how to make the switch. Let us discuss how to migrate from Shopify Scripts to Shopify Functions.
Step 1: Review Your Existing Customizations
Start by understanding what custom Scripts your store is currently using. Shopify provides a built-in tool called the Shopify Scripts Customizations Report. You can find it directly in your Shopify admin.
This report gives you a full overview of:
- All your active custom Scripts.
- Script names and descriptions.
- Links to helpful resources, such as Shopify Functions documentation or related apps.
You can even export this report as a CSV file, making it easier to review everything in one place.
Once you’ve looked through it, decide whether you want to:
- Rebuild your custom logic using Shopify Functions, or
- Use a pre-built app that offers similar features (built on Functions).
If you go with a custom-built app, you’ll need to use the Shopify Partner Dashboard to create and connect it—these apps can’t be built directly from the Shopify Admin.
Step 2: Recreate Your Customizations
After reviewing your Scripts, it’s time to replace them. Shopify guides you through this right inside your admin panel. Here’s how to get started:
- Go to Settings > Apps and Sales Channels.
- Select Script Editor.
- You’ll see a banner that says “Replace Shopify Scripts”; click on it.
- You’ll then see the Customizations Report, broken down by the types of Scripts you use.
From here, you have three options:
- View existing Scripts: Click on each script name to see what it does.
- Install compatible apps: Under “Recommended Apps,” you can install apps that match your Script’s functionality—or click “More apps like this” to explore others.
- Use Shopify Functions tutorials: If you want a custom build, Shopify links you to step-by-step guides for the right Function APIs.
Once you’ve set up your new Function-based solutions, test them thoroughly. When you’re confident everything works as expected, go ahead and deactivate your old Shopify Scripts. If you need expert help along the way, you can always hire Shopify developers to ensure everything is implemented correctly.
Using Shopify Scripts with Shopify Functions
Shopify Scripts and Shopify Functions can work together in the same store, at least for now. You can continue to use Shopify Scripts for checkouts that are customized with checkout.liquid, or for upgraded checkouts, until the final deprecation date. This gives you plenty of time to test, adjust, and slowly migrate your setup without pressure.
How They Work Together (and When They Don’t)
While you can use both at once, it’s important to understand how Scripts and Functions interact, depending on the type of customization you’re running:
Line Item Scripts
- These run before Shopify Functions.
- They apply to things like product discounts.
- They can’t see or change discounts added by Functions or apps.
Scripts only recognize the first discount code used at checkout. So if multiple discounts are applied, they won’t react to the rest.
Shipping Scripts
- These run after delivery customizations created by Functions.
- They can’t modify renamed shipping options made by Functions.
- But they can still move or hide those shipping methods if needed.
Payment Scripts
- Like shipping scripts, these run after payment customizations made by Functions.
- Scripts can’t rename payment options that were changed by Functions.
- But they can still move or hide payment methods as needed.
If your current Scripts cover use cases that Functions can’t yet handle, you can keep using Scripts until Shopify expands Function capabilities. You can start moving parts of your setup to Functions now, while leaving the rest in place until you’re fully ready. Just be aware of which system is in control for each type of logic.
FAQs on Shopify Scripts Deprecation
Do I need a developer to use Shopify Functions?
Not always. Many Shopify Functions are available through public apps that require no coding. You just install and configure them. But working with a developer ensures things run smoothly. It also helps if you want to create a private Function that fits your unique business flow.
Will my store break if I don’t migrate right away?
No, your store won’t break immediately. Shopify Scripts will keep working until June 30, 2026, if you’re using checkout.liquid or upgraded checkouts. But starting your migration early gives you more time to test, adjust, and avoid last-minute headaches. It also helps you take advantage of newer features sooner.
Can I use discount codes with Shopify Functions?
Yes, Shopify Functions support discount codes, and you can create advanced discount logic through compatible apps or custom development. This gives you more flexibility than Scripts in many cases. You can also combine multiple discount types in a more structured and scalable way.
What if Shopify Functions don’t support my current Script features yet?
You can continue using Shopify Scripts for now. Shopify is gradually expanding Functions APIs to cover more customization options. If a needed feature isn’t available yet, it’s okay to hold off on migrating that part. Just keep an eye on updates so you’re ready when it’s supported.
Are Shopify Functions more secure than Scripts?
Yes, they are. Shopify Functions run within Shopify’s infrastructure, so there’s less risk of bugs, version issues, or security flaws. You don’t need to manually maintain code or worry about performance. It’s a cleaner and more future-ready solution for growing stores.
Summing Up
If you sell on Shopify or plan to start soon, it’s important to understand that while Shopify Scripts have served merchants well for years, Shopify Functions now clearly represent the future. This shift is about giving you more flexibility, better performance, and future-ready tools to customize your store.
You don’t have to rush the migration. Shopify has given enough time, and the ability to use Scripts and Functions together makes the process smoother. Start small, test what works, and gradually build your way forward. The earlier you begin, the more control you’ll have over the transition. And with Shopify constantly rolling out new Function features, you’re stepping into a more scalable and secure way to customize checkout. If you’re looking for experts to migrate your Shopify Scripts to Functions, you can get in touch with our experts.
]]>That’s where WooCommerce ERP integration comes in. It connects your store with an ERP system, automating inventory updates, order processing, and financial tracking. Once you do this integration, you will not face issues like double entries, stock mismatches, or late-night number crunching.
So, in this blog, we’ll break down how ERP integration works and why you should do it. We’ll discuss some of the popular ERPs along with some WooCommerce integration tools that WooCommerce experts recommend. Let’s dive in!
Why Should You Do WooCommerce ERP Integration?
WooCommerce ERP integration simply means connecting your WooCommerce store with an ERP (Enterprise Resource Planning) system. This allows your online store to “talk” directly with your back-office software, syncing data like orders, inventory, customers, shipping, and finances in real time.
Now, why does this matter?
Running an online store isn’t just about selling products. You need to manage stock, track orders, update customer records, process invoices, and handle shipping, all while keeping everything accurate. Doing this manually is time-consuming and often leads to errors.
When you integrate WooCommerce with an ERP system:
- Inventory updates automatically, so no more overselling or running out of stock unexpectedly.
- Orders flow instantly to your ERP, saving hours of manual entry.
- Accounting stays up to date, so your invoices, taxes, and payment records sync without lifting a finger.
- Customer data stays in one place so your support team can work faster and smarter.
- Reports are more accurate, helping you make better decisions faster.
This kind of integration is especially useful as your store grows. Whether you’re using Odoo, SAP, Microsoft Dynamics, or any other ERP, connecting it with WooCommerce brings your entire business onto one page.
In short, WooCommerce ERP integration turns a good store into a smart, efficient business. It saves time, reduces mistakes, and helps you scale smoothly.
Popular ERPs Compatible with WooCommerce
Choosing the right ERP system is just as important as running your WooCommerce store efficiently. To help you get started, here’s a look at some of the most trusted ERP platforms that integrate smoothly with WooCommerce and support your business as it grows.
Odoo ERP
Odoo is a modern, open-source ERP system that covers nearly every area of business, from inventory and sales to accounting, HR, and CRM. It’s modular, which means you can start small with just what you need and add more features as your business grows. Its flexibility and open-source nature make it a favorite among small to mid-sized businesses looking for affordable automation.
When integrated with WooCommerce, Odoo helps centralize your online sales with backend operations. Orders placed on your site sync instantly with Odoo, updating stock levels, creating invoices, and tracking delivery, all in one system. This eliminates the need to manually move data between platforms.
Best for: Businesses that want an affordable, scalable ERP with full control and customization.
NetSuite ERP
NetSuite, owned by Oracle, is a cloud-based ERP designed for growing and enterprise-level businesses. It brings together finance, CRM, inventory, and eCommerce into one powerful system. Known for its reliability and deep functionality, NetSuite helps businesses streamline their operations at scale.
With WooCommerce integration, NetSuite can handle everything from order syncing and financial tracking to customer data management in real time. It reduces manual work, improves accuracy, and offers deep insights through its robust reporting tools.
Best for: Mid-sized to enterprise businesses needing an all-in-one, cloud-first ERP with strong reporting.
Zoho Inventory
Zoho Inventory is a lightweight but powerful inventory and order management system that works well as an ERP alternative for small businesses. It’s part of the larger Zoho ecosystem, which means you can link it with Zoho CRM, Zoho Books, and more for added functionality.
When connected to WooCommerce, Zoho Inventory keeps your stock, orders, and shipping processes in sync. It automates repetitive tasks like order fulfillment and inventory updates, helping small businesses stay organized without needing a full-scale ERP.
Best for: Small businesses looking for a cost-effective solution to manage inventory and orders.
SAP Business One
SAP Business One is a trusted ERP solution built for small to medium enterprises. It brings together everything from finance and purchasing to production and warehousing under one roof. SAP is known for its solid structure and long-term support, making it a reliable choice for growing businesses.
Integrating SAP Business One with WooCommerce helps unify your sales and backend operations. It ensures real-time data sharing, smoother order processing, and better financial accuracy across your business.
Best for: Established small to medium businesses seeking a reliable, enterprise-grade ERP foundation.
Microsoft Dynamics 365
Microsoft Dynamics 365 is a cloud-based ERP and CRM suite that connects all parts of your business, like finance, operations, customer service, and more. It’s flexible and designed to work with other Microsoft tools like Office 365 and Power BI, making it a natural fit for businesses already in the Microsoft ecosystem.
With WooCommerce integration, Dynamics 365 allows seamless order management, real-time inventory tracking, and centralized data access across departments. It gives you a clear, connected view of your entire business.
Best for: Businesses using Microsoft tools and needing a powerful, enterprise-ready ERP with CRM built-in.
Acumatica
Acumatica is a modern, cloud-native ERP built for small and mid-sized businesses that want full functionality without heavy infrastructure. It’s flexible, scalable, and offers a wide range of industry-specific solutions, including retail, manufacturing, and distribution.
Pairing Acumatica with WooCommerce lets you automate order sync, inventory updates, financial records, and shipping, all from a single dashboard. It’s especially helpful for businesses that want to maintain full control over data and workflows without giving up usability.
Best for: Tech-forward small to mid-sized businesses needing a cloud ERP with deep customization options.
In summary, these ERP platforms offer seamless integration with WooCommerce, helping you automate and streamline key business operations. Whether you’re a small startup or a growing enterprise, there’s a solution to match your needs and scale with you.
Popular WooCommerce ERP Integration Tools
If you’re not ready for a full ERP system or want an easier way to connect WooCommerce with one, integration tools are the way to go. These platforms act as a bridge, syncing data between your online store and your ERP, inventory, or accounting systems.
They help automate tasks like order management, inventory updates, shipping, and invoicing, so you can focus on running your business, not managing spreadsheets. Here are some of the most popular WooCommerce ERP integration tools available today:
WPERP
WP ERP is a modular plugin designed specifically for WordPress, making it a natural fit for WooCommerce users. It offers built-in HR, CRM, and accounting features, all integrated within your WordPress dashboard. With its WooCommerce extension, it syncs order and customer data seamlessly into your ERP workflows.
- Built exclusively for WordPress and works smoothly with WooCommerce.
- Offers HRM, CRM, and accounting modules in one dashboard.
- Great for small to medium businesses looking for native ERP functionality.
Webgility
Webgility is a robust automation tool that links WooCommerce with ERPs, accounting systems like QuickBooks, and shipping platforms. It centralizes your operations and reduces manual errors, making it perfect for businesses managing large volumes of transactions.
- Automates order syncing, accounting, and shipping.
- Supports multi-channel sales and ERP connections.
- Best for stores that want a unified backend dashboard.
QuickBooks Commerce
QuickBooks Commerce helps WooCommerce store owners manage inventory, customers, and orders from one place. It integrates smoothly with QuickBooks for accounting, making it easy to track everything from product availability to invoicing.
- Real-time inventory and order management.
- Clean, easy-to-use interface.
- Strong integration with QuickBooks for full financial visibility.
WooERP
WooERP is a simple integration plugin built specifically for WooCommerce users who want to connect with an ERP system. It’s lightweight, easy to set up, and handles basic data syncs between your online store and back-office systems.
- Designed for WooCommerce ERP integrations.
- Syncs orders, stock, and customer data.
- Great for small businesses starting ERP adoption.
ShipStation Integration
ShipStation isn’t an ERP, but it’s an essential tool for WooCommerce businesses that ship products. It automates the entire fulfillment process from pulling in new orders to generating labels and updating shipping status.
- Automates shipping and tracking workflows.
- Integrates with WooCommerce and multiple carriers.
- Saves time for stores with frequent shipments.
Choosing the right integration tool can make a big difference in how efficiently your WooCommerce store runs. These tools help automate everything from inventory updates and order syncing to shipping and accounting.
Whether you’re just starting out or managing high-volume operations, there’s a solution to match your workflow. And if you’re looking for something more tailored to your business needs, our WooCommerce development company can help you build a custom ERP integration that fits perfectly.
How to do WooCommerce ERP Integration
Integrating your WooCommerce store with an ERP system might sound like a complicated process, but it doesn’t have to be. When done right, it can transform the way your business runs.
You can automate daily tasks like order processing, inventory updates, invoicing, and customer management, all from one place. This not only saves you time and effort but also helps your team stay organized and more efficient.
The key is to choose the right ERP system and the right integration approach based on your business needs. Once that’s in place, following a simple step-by-step process will help you set everything up smoothly and avoid future issues.
Step-by-Step Integration Process
Step 1: Assess Your Business Needs
Start by identifying what you want your ERP to handle, like inventory, customer data, sales reports, accounting, or all of the above. Knowing this upfront helps you pick an ERP system that truly supports your workflow.
Step 2: Choose the Right ERP System
Not all ERPs are built the same. Pick one that fits your business size and integrates well with WooCommerce. Popular options include Odoo, SAP Business One, Microsoft Dynamics 365, NetSuite, and Zoho Inventory.
Step 3: Select an Integration Tool
You don’t always need to build everything from scratch. Tools like WPERP, Webgility, QuickBooks Commerce, and WooERP can handle most of the connection work for you, saving time and reducing errors.
Step 4: Install and Configure the Plugin
Once you choose a tool, install it on your WooCommerce store. Follow the setup instructions. Usually, this involves entering API keys, selecting sync options, and choosing how often data updates.
Step 5: Map Your Data
Make sure product names, SKUs, customer info, and orders match between WooCommerce and your ERP. Data mapping ensures both systems talk in the same language, preventing sync issues later.
Step 6: Test the Integration
Run a few test orders. Check if everything, like stock levels, order details, and customer data, syncs correctly between both systems. It’s better to catch mistakes early than fix problems later.
Step 7: Go Live
Once everything looks good, activate the integration fully. Keep a close eye during the first few days to catch anything unusual and fine-tune as needed.
Step 8: Ongoing Monitoring and Support
ERP integration isn’t a one-and-done task. Monitor the connection regularly, update plugins, and adjust settings as your business grows. Ongoing support ensures everything keeps running smoothly.
Using WooCommerce REST APIs
If you’re more technical or working with a developer, WooCommerce offers powerful REST APIs. These APIs allow real-time communication between WooCommerce and your ERP. That means you can push new orders, customer data, inventory updates, and even refund info directly into your ERP system without manual input.
Typical API functions include:
- GET: Retrieve order or customer data
- POST/PUT: Add or update records
- DELETE: Remove outdated info
To set this up, you’ll need to enable the API in WooCommerce, generate secure keys, and define the level of access. From there, your developer can use these endpoints to build a custom, real-time sync between your store and ERP. If you think the process is too complex, you can hire our expert WooCommerce developers.
Key Challenges in WooCommerce ERP Integration
While WooCommerce ERP integration offers huge benefits, it doesn’t come without its challenges. Understanding these hurdles early can help you plan better, avoid delays, and make the process smoother for your team.
- Data Mismatch and Inconsistencies: One of the most common issues is mismatched data between your WooCommerce store and the ERP system. For example, product names, SKUs, or tax structures might not align perfectly. This can lead to sync errors, missing info, or even incorrect reports.
- Integration Compatibility: Not all ERP systems are built to talk to WooCommerce out of the box. Some may need custom development or middleware tools to establish a stable connection. If your ERP is older or highly customized, this can be a challenge.
- Real-Time Sync Issues: Many businesses want real-time data updates, especially for inventory and orders. But if the integration isn’t properly configured, sync delays can happen. This might lead to overselling or outdated stock levels.
- Technical Complexity: If you’re using WooCommerce REST APIs or building a custom solution, it can get technical. You’ll need to handle authentication, endpoint mapping, and error handling. Without a developer or the right support, this part can feel overwhelming.
- System Downtime or Disruptions: During the integration process, especially while going live, there’s a small risk of disruption. If not handled carefully, your store may slow down, or certain processes may fail temporarily.
- Ongoing Maintenance: Integration isn’t a “set it and forget it” task. WooCommerce updates, ERP changes, or plugin compatibility issues can break the connection down the line.
WooCommerce ERP integration can bring powerful automation to your business, but only when done right. Knowing the key challenges ahead of time helps you prepare and avoid costly mistakes. From data mismatches to sync issues, it’s important to approach integration with the right tools, guidance, and best practices.
Best Practices to Avoid These Issues
Integrating WooCommerce with your ERP system can be a good move, but only if it’s done right. The good news is that most of the common problems we’ve discussed can be avoided with a few smart practices. These simple steps can save you time, money, and a lot of unnecessary stress.
- Start With a Clear Plan: Before you dive into integration, take a moment to define your goals. What do you want the ERP system to handle? Inventory updates? Order tracking? Reporting? Knowing exactly what you need helps you pick the right ERP and integration method from the start and avoids costly changes later.
- Choose Compatible Systems and Tools: Don’t try to force a connection between tools that aren’t built to work together. Pick an ERP system and integration plugin that are known to work well with WooCommerce. This reduces the risk of errors and keeps your store running smoothly.
- Clean and Organize Your Data: Take time to clean up your product listings, customer records, and inventory data before syncing. Make sure SKU codes, tax settings, and categories match across both systems. This step may seem small, but it prevents major sync problems later.
- Use a Staging Site for Testing: Never test your integration directly on your live store. Set up a staging environment where you can safely run test orders and sync operations without affecting real customers. Once everything works as expected, move to your live site.
- Monitor the System Regularly: Even after everything is up and running, keep an eye on your integration. Check for errors, delays, or unusual behavior. The earlier you catch a small issue, the easier it is to fix without causing a bigger problem.
- Involve Experts When Needed: If you’re unsure about any part of the process, don’t hesitate to get help. Whether it’s choosing the right plugin or configuring an API connection, working with an experienced WooCommerce development company can make a huge difference.
- Plan for Growth: Your business will evolve, and your systems should grow with it. Make sure your integration setup is flexible and can handle more products, users, or sales volume as you scale. This avoids future rebuilds or disruptions.
In summary, a successful WooCommerce ERP integration depends on good planning, clean data, the right tools, and regular maintenance. By following these best practices, you can avoid common issues and build a system that supports your business long-term.
FAQs on WooCommerce ERP Integration
Can I integrate WooCommerce with more than one ERP system?
Technically, it’s possible to connect WooCommerce with more than one ERP, but it’s usually not recommended. Managing multiple ERP systems can lead to data overlap, syncing issues, and a lot of confusion. Unless you have a very specific use case and a skilled team, sticking to one strong integration is the better route.
Will ERP integration slow down my WooCommerce site?
A properly configured integration shouldn’t slow down your store. Most tools handle data syncing in the background, without affecting your site’s speed or user experience. Just make sure your hosting environment is strong enough to support the additional workload, especially during peak traffic.
Do I need coding skills to manage the integration?
For basic integrations, no coding is needed. Many plugins offer guided setups that are beginner-friendly. But if your ERP system is complex or needs custom fields, you may need developer support. Having someone technical on call is always a smart move for long-term stability.
Can I stop the integration if it doesn’t work for me?
Yes, you can disable or uninstall the integration tool anytime. But before doing that, be sure to back up your data and plan how you’ll handle inventory, orders, and customer details going forward. Some tools may leave behind residual data, so cleanup is important too.
How often does the data sync between WooCommerce and ERP?
That depends on the integration tool you use. Some offer real-time syncing, while others allow you to set custom intervals like every 5 minutes, hourly, or daily. Choose the sync frequency based on how often your store updates stock, orders, or customer records.
Summing Up
Integrating your WooCommerce store with an ERP system is a strategic move to simplify your operations and scale smarter. From managing inventory and orders to syncing customer data and financials, ERP integration helps everything work together in one place.
If you’re using a popular ERP or choosing from reliable integration tools, you should remember that the goal stays the same: save time, reduce errors, and stay in full control of your business. Just remember to plan properly, test thoroughly, and keep your systems flexible for growth. And if you’re not sure where to start, our WooCommerce development company is here to help you build a smooth, custom integration that fits your business needs. Get in touch with us today!
]]>Social commerce fixes this by turning social platforms into instant stores. They allow shoppers to buy your product with two taps while scrolling Instagram or any similar social media app.
You, too, can benefit from this kind of social media integration for your eStore. Here, we’ll understand how important social commerce is to stand out in the competitive market and why you should consider using it. Plus, we’ll cover the best practices followed by experts at our eCommerce development agency when building such stores.
What is Social Commerce?
Social commerce is when people buy products directly through social media apps like Instagram, TikTok, or Facebook. Instead of clicking a link that takes you to another website, you can browse, shop, and pay right inside the app.
It mixes online shopping with the social experience we already enjoy. Think of it like scrolling Instagram, seeing a product you love, tapping it, and checking out, all without leaving the app. It’s fast and feels easier than traditional online shopping.
How Does Social Commerce Work?
Social commerce is completely dependent on social media platforms for displaying and selling products or services. Here is how it works:
- Brands share products through posts, stories, or reels.
- Shoppable tags let users click and see product details.
- Some platforms offer in-app checkout with no redirection needed.
- Influencers promote products through reviews or tutorials.
- Social proof (likes, comments, shares) builds trust fast.
- Users can ask questions or message brands directly in DMs.
- Algorithms show users products based on their interests.
- Live shopping events allow real-time buying during streams.
- Customers can leave reviews right on the product post.
- The entire buying process happens without leaving the platform.
Social commerce works because it’s easy and instant. You see a product, trust the source, and buy it without leaving your social media platform.
Social Commerce vs. eCommerce: What’s the Difference?
Today, online shopping isn’t what it used to be. Most people don’t always want to open an eCommerce app to buy the product; they want something as easy as double-tapping a post. That’s what social commerce offers. But to understand how different it is from traditional commerce, let’s jump to the table below.
| Feature | Social Commerce | Traditional eCommerce |
| Where It Happens | Inside social media apps | On dedicated websites or apps |
| User Journey | Seamless — from discovery to checkout in-app | Users browse, then leave the site to buy |
| Shopping Experience | Interactive and social | More transactional and product-focused |
| Product Discovery | Through feeds, influencers, or live videos | Through search or direct website visits |
| Engagement | Likes, comments, shares, DMs | Limited to reviews or contact forms |
| Checkout Process | Happens within the social app | Happens on an external website |
| Customer Trust | Built through social proof and community | Built through brand reputation or reviews |
| Content Style | Casual, short-form, influencer-driven | Polished, product-focused |
| Target Audience | Mobile-first, social-savvy users | Broader, often desktop and mobile |
| Examples | Instagram Shop, TikTok Shop, Facebook Marketplace | Amazon, Shopify stores, brand websites |
If you want to build a custom store that can directly show up in social apps, consult with our eCommerce development company.
Benefits of Using Social Commerce for Businesses
People don’t just scroll to be entertained anymore; they also shop while doing it. Social commerce blends the fun of browsing with the ease of buying. For businesses, this means a fresh way to reach customers without making them jump through hoops. Here’s how it can work in your favor:
1. Simplifies the Buying Process
Social commerce keeps things easy. A user sees your product, taps on it, and checks out, all within the same app. Fewer steps mean fewer chances of losing a sale.
2. Boosts Product Discovery
Your products show up where people already hang out. Whether it’s through a reel, a post, or a creator’s story, it feels natural. Shoppers find your products without even searching.
3. Encourages Higher Engagement
Likes, shares, and comments create buzz around your product. It’s real interaction that helps your brand feel alive and relevant.
4. Builds Instant Trust Through Social Proof
When people see others talking about your product, it builds trust. Comments, reviews, and user-generated content speak louder than ads. It’s word-of-mouth at scale.
5. Supports Direct Customer Conversations
You can answer questions right in the comments or through DMs. It removes the waiting game. This direct connection makes buyers feel seen and supported.
6. Low-Cost Exposure with Big Reach
You don’t need a huge ad budget to get noticed. A well-timed post or viral video can reach thousands. Social commerce lets creativity beat cost.
7. Tailors the Shopping Experience
Thanks to smart algorithms, your products land in front of the right people. Shoppers see what fits their style and needs. It’s like having a personal shopper, powered by data.
8. Better Mobile Conversion Rates
Social apps are built for mobile, and so is social commerce. No pop-ups or page loads to slow things down. Just a smooth scroll-to-buy experience.
Social commerce meets your customers where they already are, on their favorite apps. It makes the process of buying feel natural, easy, and even enjoyable.
Top Social Commerce Platforms
Now that you know social media isn’t just for scrolling anymore, it’s where people shop. These platforms have become powerful storefronts. Here’s a look at the best social commerce platforms worth your attention.
Instagram blends inspiration with instant shopping. With features like Shops, product tags, and in-app checkout, it makes it easy for users to browse and buy without leaving the app. Reels and Stories also give brands a fun way to show off products in action. It works especially well for visual-first industries like fashion, beauty, and lifestyle. For a deeper look at how brands can make the most of these features, check out this guide on using Instagram Shopping in eCommerce.
Facebook still plays a major role in eCommerce, especially for brands with older or local audiences. Facebook Shops let you build a storefront, and the Marketplace feature is great for community-based selling. You can also run targeted ads to drive traffic to specific products. It’s a strong platform if you’re already building a presence there.
TikTok
TikTok turns entertainment into action with viral product trends and TikTok Shop. People discover products in the middle of watching short, engaging videos, and buy them right there. The algorithm is built for discovery, which means even smaller brands can go viral. It’s especially popular with Gen Z and younger millennial shoppers.
Pinterest is where people go when they’re planning to buy, not just browsing for fun. Product Pins, Catalogs, and Pinterest Shopping allow you to reach users actively looking for inspiration. It’s perfect for niches like home decor, fashion, DIY, and weddings. Plus, the content has a long shelf life compared to other platforms.
YouTube
YouTube is great for showing how products work in real life. Features like product tagging, shoppable video links, and live shopping give viewers the chance to buy straight from videos. Creators can drive serious influence here with product reviews, demos, and hauls. If your product needs explanation or builds trust through visuals, this is your platform.
Each platform plays a different role in how people discover and shop. Instagram and TikTok are perfect for visual engagement and trends. Facebook and Pinterest help drive intent-based browsing. YouTube builds trust through education and creator content. The best approach is often to combine a few that match your audience and brand vibe.
6 Social Commerce Statistics You Should Know About
We can go on and on about how social commerce is changing the way people buy things, but what makes us think like that? Our experts have gone through various statistics. These numbers show just how much it’s becoming part of everyday life.
- Facebook leads with 64.6 million social commerce buyers expected in 2024.
- Social commerce penetration grew 23.6% in 2023 and is expected to rise another 5% by 2028.
- About 32% of Gen Z buy based on influencer recommendations, compared to 21% of Millennials.
- There are 5.22 billion social media users worldwide as of October 2024; that’s nearly 64% of the world’s population.
- Almost 95% of internet users engage with social media monthly.
- Sponsored ads featuring creators are the most effective for 76% of brands.
These stats show that social commerce is a major part of how people shop today. If you want to grow your business, use social commerce.
Here’s my advice: Stop thinking about whether you should sell on social media, and start figuring out how. Because your competitors already are.
Social Commerce Trends in 2025
Social commerce is changing how we experience shopping online. Here are the trends shaping the future of social commerce.
1. Augmented Reality Shopping
AR is making shopping more fun and interactive. Think virtual dressing rooms or previewing a sofa in your living room, all before you hit buy. Grocery brands are using AR for smart labels that show nutrition or allergy alerts. It’s not just cool tech; it’s becoming what shoppers expect.
2. Integration of NFTs
NFTs are changing the way brands connect with their audiences. From fashion to collectibles, they offer digital proof of ownership for limited-edition items. Some companies are using NFTs to reward loyal customers in unique ways. As blockchain grows, this space will only get more creative.
3. Adoption of Voice Commerce
Voice shopping is growing fast. People are using Alexa or Siri to place orders, manage subscriptions, or check prices. It’s easy, hands-free, and accessible, especially for users with disabilities. If your store isn’t voice-ready yet, it’s worth exploring soon.
4. Ethical and Sustainable Shopping
More shoppers want to support brands that care about the planet. Transparency matters when it comes to where products come from and how they’re made. Social platforms make it easier to tell these stories. Brands that highlight sustainability clearly are gaining more trust.
5. Hyper-Personalized Recommendations
Generic ads don’t cut it anymore. Customers want content that feels made just for them. Thanks to AI, brands can now customize everything, from product suggestions to offers based on real behavior. Personalized experiences feel better and lead to more sales.
These trends bring smarter, more immersive shopping experiences. Whether it’s AR, NFTs, or AI-driven suggestions, the key is staying relevant to your audience.
Best Practices for Social Commerce
Social commerce is great, but to really make it work, you need the right approach. Here are some best practices that can help you.
Choose the Right Platform
Every social platform works a little differently. Instagram is great for visuals, while TikTok leans into trends and short videos. Facebook still works well for community-driven selling. Go with the one where your audience already spends their time.
Collaborate with Influencers
People trust people, especially ones they already follow. Partnering with influencers can introduce your product to a ready-to-buy audience. Just make sure the partnership feels natural and matches your brand’s vibe. Forced content doesn’t work.
Engage with Customers
Social selling is about conversations, not just conversions. When someone comments, responds, or sends a DM, talk back. It shows you’re present and that you care. These small moments build real trust and loyalty.
Use Chatbots
No one likes waiting for replies. Chatbots help answer questions fast, even when you’re offline. They guide users through the basics and help keep the conversation moving. A helpful bot can go a long way in making the experience smooth.
Personalize Recommendations
Everyone wants to feel like a brand “gets” them. Use browsing behavior, preferences, or purchase history to suggest products people actually want. Personal touches like this can turn casual scrollers into paying customers.
Social commerce is about creating real connections and making shopping feel natural. These best practices can help you show up better and keep customers coming back.
FAQs on What is Social Commerce
Is social commerce just Instagram shopping?
Nope! While Instagram is big, social commerce includes Facebook Shops, TikTok shopping, Pinterest buyable pins, and even WhatsApp stores. It’s any purchase made directly through social platforms. The key difference? No redirecting to external websites.
Do I need a website to do social commerce?
Not necessarily. Many businesses run entirely through Instagram or Facebook shops. But having a website helps with credibility and gives customers another way to find you. Start simple – you can always add a site later.
How is social commerce different from regular eCommerce?
Traditional eCommerce needs a website; social commerce happens where people already hang out online. It’s more visual, interactive, and built for impulse buys. Think “see it, want it, buy it” in three taps.
What products sell best through social commerce?
Visual products like fashion, beauty, and home decor kill it. But I’ve seen stuff like garden tools do well with the right video content. If you can make it look good in photos/videos, it’ll sell.
Why is social commerce growing so fast?
It blends entertainment with convenience. People are already on social media, so discovering and buying there feels easy and natural. It’s shopping that fits into everyday scrolling.
Let’s Summarize
Social commerce changes how people shop and brands connect with their audience. People don’t want complicated checkout processes; they want to click and buy without leaving their social media apps.
To start with social commerce, you don’t need a big budget or a fancy website to start. A few great products, engagement, and the right platform is all you need to have loyal buyers. So, pick one strategy, test it, and watch those likes finally turn into sales. If you want to build a social commerce store that is well-designed and aligns with your needs, contact us today!
]]>