How to Create an Invoice on Shopify: A Complete Guide
Quick Summary
Creating invoices on Shopify is straightforward, using either the built-in options or third-party apps to manage invoicing easily and professionally.
Invoices differ from receipts; they request payment and include detailed order information, while receipts confirm payment has been made.
Popular invoicing apps like Order Printer Pro and Sufio offer advanced features such as custom templates, automation, and compliance with tax regulations.
Best practices for invoicing include being timely, maintaining clear and consistent layouts, and ensuring all legal requirements are met for compliance and professionalism.
Running a Shopify store? Then you’ve probably faced this — a customer asks for an invoice, and you’re not sure how to create one.
It might seem like a small thing, but not having a proper invoice can confuse buyers, delay payments, or even hurt your store’s trust.
The good news? Creating an invoice on Shopify is easier than you think — and you don’t need any fancy tools or coding skills. Even expert Shopify developers recommend simple built-in methods or apps for handling invoices quickly and professionally.
In this blog, we’ll walk you through step-by-step ways to create and send invoices using Shopify — manually and with apps. Let’s make billing smooth and stress-free.
Does Shopify Provide Invoicing Features Natively?
Shopify does have some built-in options to help store owners with basic invoicing. When a customer places an order, Shopify automatically creates an order confirmation, which includes most of the details found in a typical invoice, like the product name, price, quantity, taxes, and total amount.
You can download and print this confirmation or send it to customers directly. However, Shopify’s default setup doesn’t include a full-featured invoicing tool with customization or automation.
If you need more control over invoice layout and branding or want to include payment links for manual orders, you’ll likely need to use an app. These apps give you extra features like automated invoice delivery, PDF generation, and custom templates.
Invoices vs. Receipts: What’s the Difference?
Many business owners mix up invoices and receipts, but they serve completely different purposes. Here’s the breakdown in simple terms:
Invoices come first: They’re what you send to request payment. An invoice lists everything the customer needs to pay, including products, prices, taxes, and the due date. It’s how you officially bill customers before they pay.
Receipts come after: They confirm payment was made. A receipt shows what was purchased, the final amount paid, and how the customer paid. Customers need receipts for their records and for any returns or exchanges.
Invoices ask for money. Receipts prove money changed hands. Getting this right helps you stay organized and keeps your customers informed at every step of the buying process. Keeping these documents straight makes your business look more professional and makes accounting much easier.
Methods to Create an Invoice on a Shopify Store
Creating invoices on Shopify can be done in different ways, depending on what your store needs. Some store owners prefer doing it themselves, while others like using apps to save time and make things easier. Shopify gives you the flexibility to choose the method that works best for your workflow and customer needs.
There are several ways to create invoices on Shopify. Let’s look at the most common ones:
Using Shopify’s Admin Panel (Basic Method)
If you’re looking for a quick solution, Shopify allows you to print order details that can serve as a basic invoice.
Go to your Shopify admin.
Click Orders and select the specific order.
Click the Print dropdown.
Choose the Print order page.
This printout includes customer and product details. You can customize it slightly by editing your store details and logo under Settings > Store Details.
Using Shopify Apps for Invoicing
For more advanced invoice features, the Shopify App Store offers several apps that make the process easier and more professional.
These apps offer better flexibility and save time with automation, making them ideal for growing businesses. No matter which method you pick, the goal is to make invoicing smooth and reliable.
Whether you’re handling things on your own or using an app to help, keeping your invoices clear and professional will help you stay organized and keep your customers informed.
Steps to Create an Invoice Using an App (Example: Order Printer Pro)
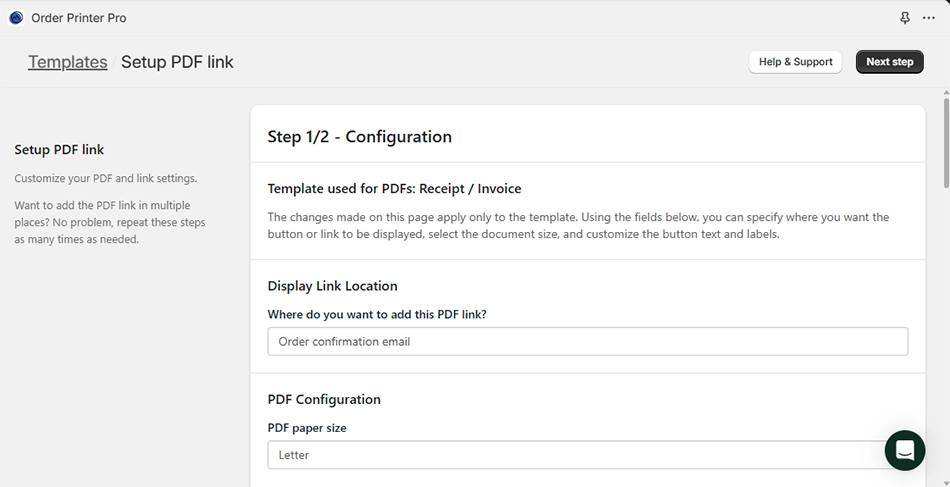
If you want more features and flexibility when creating invoices, using an app like Order Printer Pro can be a great option. It’s simple to set up and makes the whole process faster. You can customize your invoices, send them automatically, and even download them as PDFs. Here’s how you can get started with it.
Here’s how you can use Order Printer Pro to create invoices:
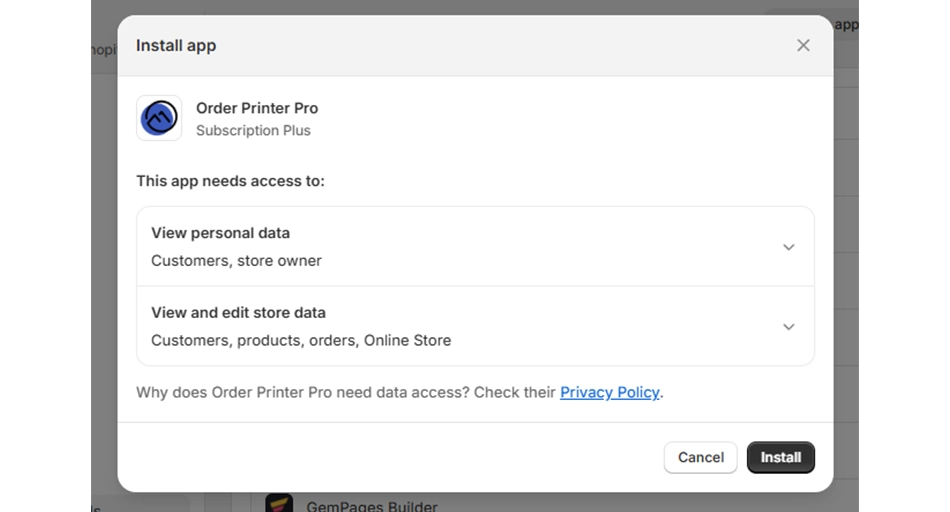
Go to the Shopify App Store and install Order Printer Pro.
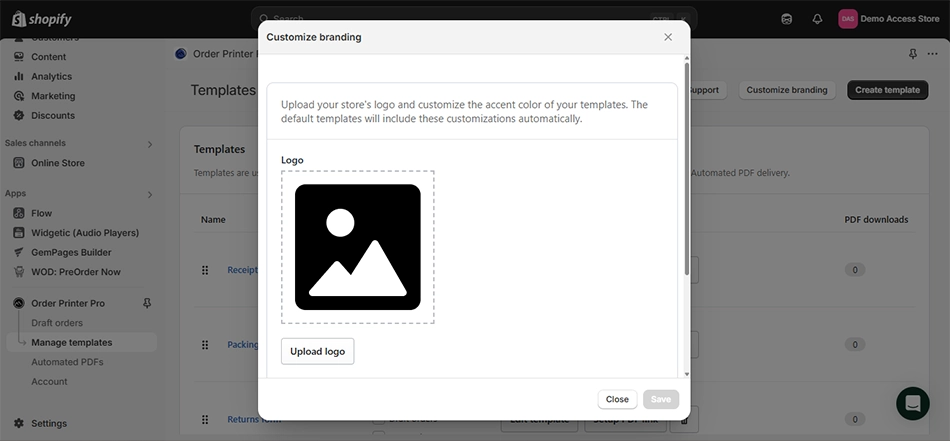
Open the app and choose a pre-designed template or create your own.
Add custom fields like tax details, store logo, refund policies, etc.
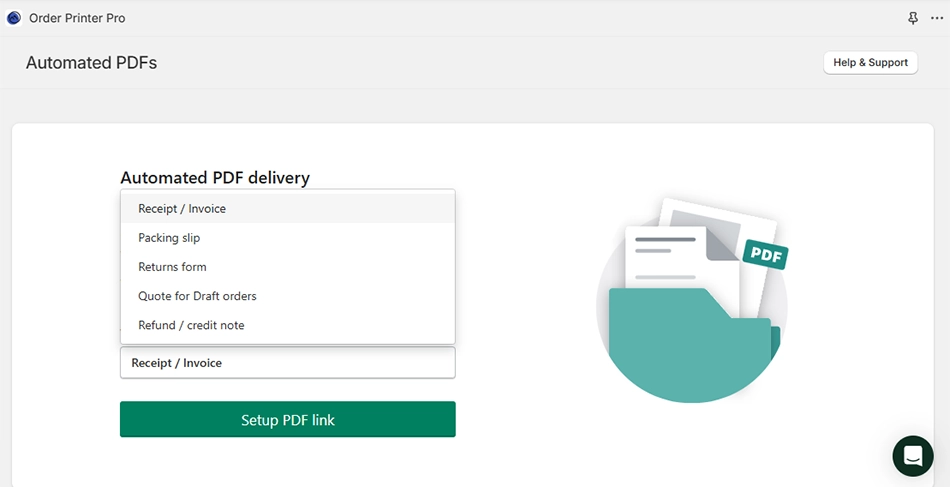
Configure settings to auto-generate invoices when an order is placed or payment is confirmed or the order is fulfilled.
Download, print, or email the invoice directly from the app.
Most of these apps also let customers download their invoice from the order confirmation page or email.
Once the app is ready, you’ll find it much easier to manage and send invoices. It saves you time and helps make your store look more professional. With just a few clicks, your invoices can be ready to go–no manual work needed.
Custom Invoicing (Advanced Method)
Some store owners want to have complete control over how their invoices look and what information is included. If you want this kind of control, custom invoices just might be what you’re looking for. This method takes a little longer and involves a little more technical knowledge, but takes invoice design to meet your brand and specific requirements.
Use Liquid templates and the Order Printer app to create custom invoice layouts if you are comfortable with code or hire a Shopify developer.
Step 1: Install Order Printer (free app from Shopify).
Step 2: Create a new template using HTML and Liquid.
Step 3: Insert placeholders for:
{{ order.name }}
{{ order.line_items }}
Step 4: Preview and test before printing or sharing with customers.
This method is more flexible and lets you completely control the invoice design.
Custom invoicing gives you a lot of freedom, but it also requires careful setup. If you’re comfortable with code or you’re working with a developer, this will add a nice touch to your store.
Best Practices for Shopify Invoices
Sending clear and professional invoices is more than just a business task—it helps build trust with your customers and keeps your records tidy. Whether you are using an app or manually doing this, developing a few good habits will make all the difference. Here are a few good tips to keep your invoices accurate and easy to understand.
Include All Key Details: Make sure every invoice shows important information like product names, quantities, prices, taxes, and the total amount. Also, don’t forget your store name, contact info, and order number.
Use a Consistent Layout: Keep the design simple and easy to read. Use the same formats and styles on every invoice to avoid confusion and look more professional.
Add Your Branding: Add your logo, brand colors, and any tag lines to make the invoice feel like part of your business. It helps in creating a stronger bond with the customer.
Send Invoices Quickly: You shouldn’t take too long after an order has been placed. Invoices sent right away keep everything clear and show customers your organizational skills.
Offer a PDF Option: Always allow customers to download or receive the invoice as a PDF. It will be easier for them to save, print, or use in future reference.
Follow Tax Requirements: Ensure that all your invoices comply with local tax rules. Tax breakdowns are needed, especially if you are selling to different regions or countries.
Good invoicing practices help you stay on track and keep your customers happy. When invoices are neat, complete, and easy to understand, it reflects well on your business and builds trust over time.
Sending Invoices to Customers on Shopify
Creating an invoice is only half the battle. Knowing how to send it properly is just as important for getting paid on time.
How to Send an Invoice in Shopify?
Shopify handles invoices a bit differently, calling them Draft Orders. Here’s how to send one:
Go to your Admin Dashboard and click ‘Orders’.
Select ‘Create Order’.
Fill in product details, discounts, taxes, and customer info (add a note if needed).
Choose ‘Save as Draft’ for later or ‘Send’ to email it directly.
Once sent, your customer gets an email with the invoice attached. You can even include a payment link for faster checkout. Use follow-up emails like back-in-stock alerts to encourage repeat purchases.
Tracking Invoice Status
After sending an invoice, monitor its progress in the ‘Invoices’ section of your dashboard. Each invoice will show one of these statuses:
Sent (awaiting payment).
Paid (success!).
Viewed (customer opened it).
Refused (payment declined).
Draft (not sent yet).
Keeping an eye on these helps you follow up smartly and maintain steady cash flow.
Automating Invoice Delivery for Shopify Store
Invoicing every order manually could take a lot of time as the business grows. Now, here comes automation. It will help deliver invoices automatically, saving time and minimizing errors.
Here are some ways to make that happen on Shopify.
Use Invoice Apps with Auto-Send Features: Many apps like Order Printer Pro and Sufio have settings to automatically email invoices after every purchase. You set them up once and let the app do everything else.
Customize Email Templates: Most invoice apps let you edit the email message sent with the invoice. You can include a thank you, any contact information, and instructions to help clear things in your customer’s mind.
Schedule Invoice Sending: Some solutions allow delays in dispatching invoices. For example, sending the invoice after an order is fulfilled rather than right after purchase. This lets you manage the timing efficiently.
Attach Invoices to Order Notifications: Another option is to attach invoices to Shopify’s order confirmation emails directly. This way, customers can collect all important information in one box, without any extra steps to take.
Automating your invoice delivery will keep multiple processes running smoothly while ensuring a great customer experience. Once everything is set up, you will not have to think about missing a step. So, you will get an organized and professional store.
Legal and Tax Considerations
Creating invoices and sending them is not just about the business; it is also necessary for compliance with the laws. Every country or region has set rules on what must be included in an invoice and taxes. These laws will help you avoid complications and also maintain a good accounting record. Here are a few key points to remember:
Include Required Business Information: Most places require invoices to show your business name, address, and registration number. This helps demonstrate that your store is legally registered and operating within the law.
List Tax Details Clearly: If you charge tax, your invoice should show the tax rate, the amount charged, and the total with tax included. This is important for both customer clarity and legal reporting.
Add Your Tax ID or VAT Number: Tax ID numbers should always be on invoices when such numbers are used in that jurisdiction (like the VAT or GST). This gives legitimacy to the document for tax purposes, especially for business buyers.
Follow Local Invoice Rules: Different countries have different rules about what makes an invoice valid. Always check the requirements in the areas you sell to, especially if you run an international store.
Store Invoices for Record-Keeping: Keep copies of all invoices for several years. This is helpful during tax season and in case you’re ever asked for proof by tax authorities.
Paying attention to legal and tax details may not be the most exciting part of running a store, but it’s one of the most important. Well-prepared invoices help protect your business and keep everything running smoothly when it’s time to handle taxes or audits.
Troubleshooting Shopify Invoicing Problems
Even with Shopify’s user-friendly system, you might hit some snags when creating or sending invoices. Here are simple solutions to frequent issues:
Product Selection Mistakes: Before sending, carefully review all product options (sizes, colors, etc.) in your draft order. A quick double-check prevents wrong items from being invoiced.
Emails Not Reaching Customers: First confirm the recipient’s email address is entered correctly. Then check your Shopify notification settings to ensure your store emails are properly set up and not going to spam folders.
Errors in Invoice Information: Shopify lets you edit draft orders before sending. If you spot wrong prices, quantities, or details, simply update the draft. No need to start over.
Payment Link Problems: If customers can’t pay, verify your payment gateway is active and test the invoice payment link yourself before sending it to clients.
Missing Tax Calculations: Ensure your tax settings are properly configured in the Shopify admin so that rates automatically apply to invoices for different locations.
The key is catching these issues early. Always preview drafts and send test invoices to yourself before contacting customers. Most invoicing problems have quick fixes once you know where to look. Need help? Please consult with our Shopify development services for better results.
Let’s Conclude
Creating and managing invoices on Shopify doesn’t have to be complicated. Whether you prefer using apps or want a custom setup, there are flexible options to suit your needs. Invoices not only help you keep track of orders and payments, but they also build trust with your customers and ensure you meet legal requirements.
By setting up a clear process and using tools that save time, you can stay organized and focused on growing your business. As your store expands, having a solid invoicing system in place will make daily operations smoother and more professional.
Facing issues with Shopify invoicing? Contact us today!
FAQs on Creating an Invoice on Shopify
Q1.Why is invoicing important in eCommerce?
Invoicing ensures timely payments by clearly stating what customers owe and payment deadlines. It provides legal transaction records for taxes, returns, and financial tracking. Professional invoices build trust with buyers and make accounting easier. For eCommerce businesses, proper invoicing prevents payment disputes and keeps cash flow organized.
Q2.How will my customer receive the invoice?
When you click on a Draft Order, Shopify immediately generates and emails a professional invoice to your customer’s registered email address. The email includes a secure payment link for easy checkout, and you also have the option to manually download and send the invoice through other channels if needed.
Q3.Can I set payment due dates on Shopify invoices?
Yes, you can specify payment terms by adding details like Due in 15 days or Payment due upon receipt in the customer notes section when creating a Draft Order. For automated payment reminders and more advanced due date tracking, you’ll need to install a dedicated invoicing app from the Shopify App Store to extend this functionality.