Skip to content
logo
  • Company
    Company
    • About Us
    • Testimonials
    • Infrastructure
    • Culture & Values
    • Career
    • Life At BrainSpate
  • Technology
    Technology
    • WooCommerce
    • Shopify
    • Magento
    • Salesforce
  • Hire eCommerce
    Hire eCommerce
    • Hire WooCommerce Developers
    • Hire Shopify Developers
    • Hire Magento Developers
  • eCommerce
    eCommerce
    • eCommerce Development
    • eCommerce Marketplace
    • eCommerce Website Design
    • eCommerce Website Packages
    • eCommerce Management
    • eCommerce Consultant
    • B2B eCommerce
    • B2C eCommerce
    • Headless Commerce
    • eCommerce Maintenance
    • eCommerce Implementation
    • eCommerce Migration
  • Portfolio
  • Blog
  • Contact Us

Add Sections to Templates in Shopify: Step-by-step Guide

Quick Summary

  • Shopify allows you to build and manage your online store, while sections let you create reusable components for your website layout.
  • To add a section, create a new .liquid file in the Shopify admin, define its content, and link it to a JSON template for your page.
  • You can customize section content, like images and text, directly through the Shopify theme editor for a tailored store experience.
  • Use advanced features like conditional logic and dynamic data to make your sections even more customizable and interactive.
publisher
John Niles
|Jan 06, 2025
5 min read
Add Sections to Templates in Shopify: Step-by-step Guide
Table of Content
  • What are Sections in Shopify?
  • How to Add Sections to Templates in Shopify
  • Advanced Tips For Adding Sections to Templates in Shopify
  • FAQs on Adding Sections to Templates in Shopify
  • Let’s Summarize

Adding sections to templates in Shopify is a crucial aspect of theme customization. Sections are reusable, modular components that allow store owners to easily manage content and design elements through the Shopify theme editor. 

Our expert Shopify developers recommend using sections, to create dynamic, customizable themes that enhance both the user experience and the store’s functionality. Whether you’re working on a homepage, product page, or any other part of a Shopify store, sections provide the flexibility to structure content efficiently.

This guide outlines the steps to create and add sections to templates in Shopify, providing clear instructions and examples. Let’s dive in.

What are Sections in Shopify?

Sections in Shopify are modular, reusable components that can be used to organize and display content dynamically. They are defined using Liquid, Shopify’s templating language, and can include settings that allow merchants to customize their appearance and behavior directly in the admin panel.

Sections are stored in the sections folder of a theme and can be added to any template, such as the homepage, product pages, or custom pages. Their flexibility makes them a key feature for creating responsive and interactive store designs.

How to Add Sections to Templates in Shopify

If you want to add a custom section to your Shopify store, such as a banner or special announcement, you can easily do this by creating a new section file.

Creating a Section File

Start by creating a section file.

Navigate to the Shopify Admin:

  • Go to Online Store > Themes
  • Click on Actions > Edit Code

Add a new section:

  • In the left-hand menu, locate the Sections folder.
  • Click Add a new section.
  • Provide a name for your section (e.g., custom-banner)

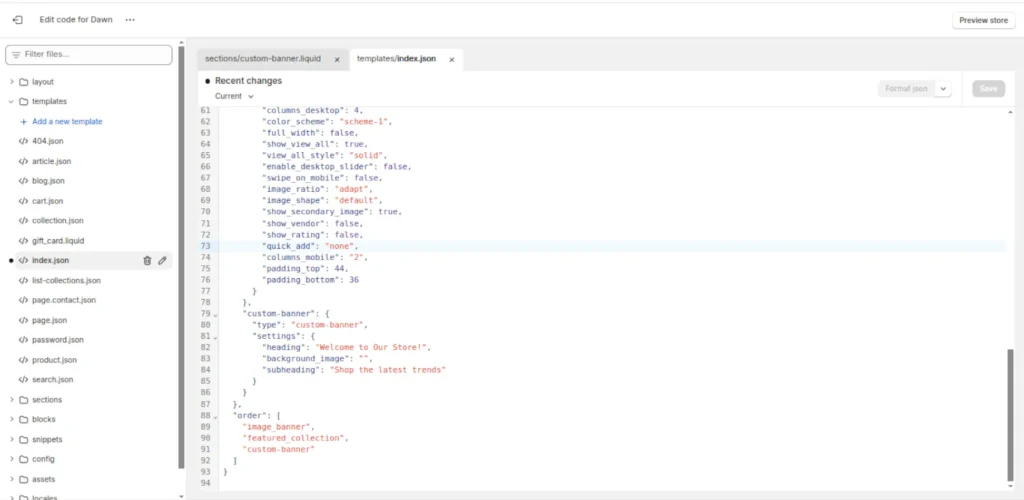
This creates a new file named custom-banner.liquid in the sections folder.

Defining the Section Content

Open the newly created custom-banner.liquid file and add the following:

{% schema %}
{
 "name": "Custom Banner",
 "settings": [
   {
     "type": "text",
     "id": "heading",
     "label": "Banner Heading",
     "default": "Welcome to Our Store!"
   },
   {
     "type": "image_picker",
     "id": "background_image",
     "label": "Background Image"
   },
   {
     "type": "text",
     "id": "subheading",
     "label": "Subheading Text",
     "default": "Shop the latest trends"
   }
 ]
}
{% endschema %}

<div class="custom-banner" style="background-image: url('{{ section.settings.background_image | file_url }}');">
 <h1>{{ section.settings.heading }}</h1>
 <h3>{{ section.settings.subheading }}</h3>
</div>
<style>
 .custom-banner {
   text-align: center;
   padding: 50px;
   color: white;
   background-size: cover;
   background-position: center;
 }
</style>

Now that you’ve defined the section, the next step is to add the section to a JSON template.

Adding the Section to a JSON Template

Templates in Shopify are JSON files that define the structure of a page. To add the section to a template:

Locate the relevant JSON template:

  • Go to the Templates folder.
  • Open the desired JSON file, such as index.json for the home page.

Insert the section in the sections array:

{
     "type": "custom-banner",
     "settings": {
       "heading": "Welcome to Our Store!",
       "background_image": "",
       "subheading": "Shop the latest trends"
     }
}

Example JSON structure:

{
   "sections": {
       "custom-banner": {
           "type": "custom-banner",
           "settings": {
                "heading": "Welcome to Our Store!",
                "background_image": "",
                "subheading": "Shop the latest trends"
           }
        }
    },
    "order": [
       "custom-banner"
     ]
}

Customizing the Section in the Shopify Admin

Follow these steps to customize the section:

  1. Go to Online Store > Themes
  2. Click Customize on your active theme
  3. Navigate to the page where the section is added
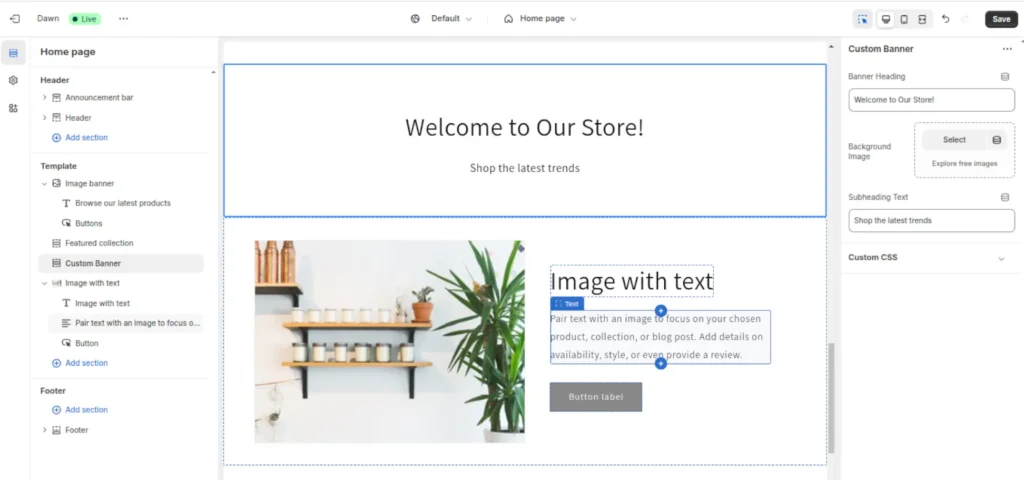
  4. Use the sidebar to adjust the section settings (e.g., text, image)

Testing Your Section

After adding and customizing the section:

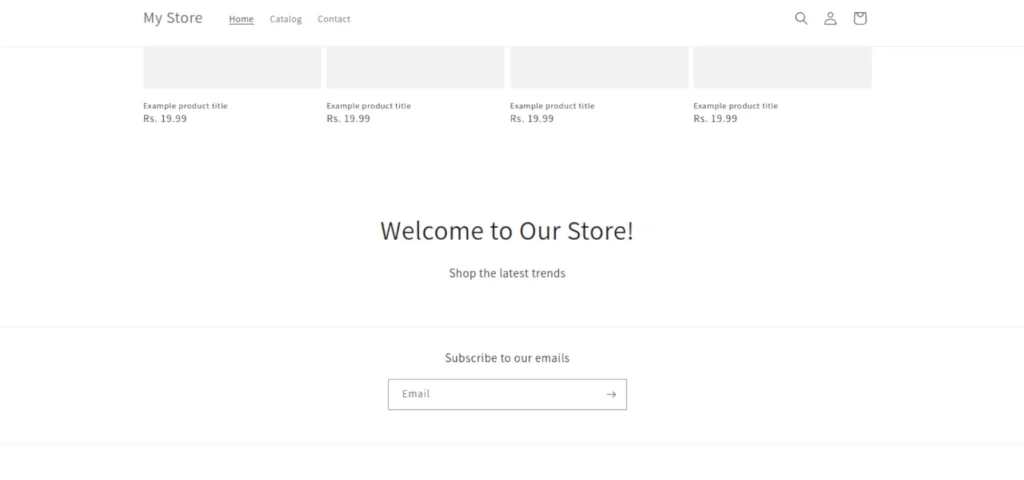
  • Preview the changes in the Shopify editor.
  • Test on multiple devices to ensure responsiveness.
  • Check for potential styling conflicts.

By following this step-by-step guide, you’ll be able to easily add and customize sections in your Shopify templates, helping you create a more personalized and engaging shopping experience for your customers.

Get your Shopify store developed by experts. Work with our professional Shopify Development company.

Advanced Tips For Adding Sections to Templates in Shopify

If you’re looking to take your Shopify store customization to the next level, adding advanced features to your sections can make a big difference. Here are some advanced tips for doing it:

  • Use conditional logic in the section schema to show or hide settings based on user input.
  • Incorporate dynamic sources to fetch product or collection data.
  • Use Liquid loops and filters for more advanced customization.

Example:

<ul>
 {% for product in collections.frontpage.products %}
   <li>{{ product.title }}</li>
 {% endfor %}
</ul>

By using these advanced techniques, you can unlock even more possibilities for customizing your Shopify store. 

FAQs on Adding Sections to Templates in Shopify

How do I add a custom section to my Shopify store?

To add a custom section, go to Online Store > Themes > Edit Code, create a new section file, and define its content using Liquid code. Then, add it to your template.

Can I customize the section content in Shopify?

Yes, you can customize the section’s content, such as text, images, and links, directly through the Shopify Admin by using the theme customization options.

How can I make sections display only under certain conditions?

You can use conditional logic in the section schema to show or hide settings based on user input or specific conditions, like if a product exists or a collection is selected.

Let’s Summarize

Adding sections to templates in Shopify helps streamline the design and customization process, empowering merchants to take full control over their store’s appearance. Creating reusable, dynamic sections tailored to meet your needs or enhance your own store’s functionality can be a great option. 

With the right customization, you can create an appealing Shopify store. Don’t forget to test your changes so that your visitors don’t face any issues accessing your store. For a wider range of customizations, use conditional logic and dynamic data.

If you need expert assistance on your Shopify store, contact us today.

Share this story, choose your platform!

facebook twitterlinkedin
publisher

John Niles

John Niles, a dedicated Technical Consultant at BrainSpate since 2023, specializes in eCommerce. With a global perspective, he crafts insightful content on cutting-edge web development technologies, enriching the digital commerce landscape.

PreviousNext
Let's build a custom eCommerce store.
At BrainSpate, we recognize the power of standing out from the crowd in an effort to get more customers and product admirers. For that, you can have a consultation with us and get a free quote.
Get Free Quote
Standing Man
logo

BrainSpate is a top eCommerce development company that specializes in providing top-notch online business solutions. We cater to businesses of all sizes and offer a range of eCommerce development services.

SocialIcons SocialIcons SocialIcons SocialIcons

Our Expertise

  • eCommerce Development
  • Shopify Development
  • WooCommerce Development
  • Magento Development
  • Salesforce Development

Countries We Serve

  • CountryIcons

    Switzerland

  • CountryIcons

    Canada

  • CountryIcons

    Sweden

  • CountryIcons

    Australia

  • CountryIcons

    United Kingdom

Contact Us

  • +1 803 310 2526
  • [email protected]
  • 919, City center 2 ,
    Science City Road,
    Ahmedabad - 380060, India.
  • 3520 Aria DR,
    Melbourne
    Florida, 32904, USA.
© Copyright 2025 BrainSpate
  • All Rights Reserved
  • Privacy
  • Policies
  • Terms of Services
  • Sitemap