When you set up a Shopify store, one of the first big questions is: how will customers pay you? That’s where a payment gateway comes in. It’s the bridge between your store and your customer’s bank, making sure money moves safely every time someone checks out.
Many new store owners feel nervous about this step. The good news is that Shopify makes the process easier than most people think. Once your gateway is in place, customers can check out without trouble, and you can focus on growing sales.
In this blog, we’ll discuss how to integrate a payment gateway in Shopify. We’ll also look at how to keep every transaction secure, so your customers trust you from the start. So, let’s dive in!
Why Do You Need a Payment Gateway in Shopify?
A good eCommerce payment processing system is essential for your Shopify store to accept payments smoothly and securely, keeping both you and your customers confident.
It Allows You to Get Paid
Without a payment gateway, customers can’t complete their orders. They might add items to the cart, but the checkout stops there. The gateway is what makes the money move from the customer’s bank to your account.
It Works Like a Digital Cashier
Think of a payment gateway as the cashier of your online store. Just like a cashier verifies and accepts payments in a physical shop, the gateway does the same online, but much faster and more securely.
It Connects Your Store to Banks
In Shopify, the gateway links your store with banks and card networks. It checks the customer’s payment, approves it, and ensures the funds reach your account. This process happens in seconds, without you lifting a finger.
It Keeps Transactions Secure
A good gateway doesn’t just process payments. It also protects sensitive data like credit card numbers by using encryption. This prevents fraud and keeps your business safe.
It Builds Trust With Customers
US shoppers expect quick and safe payments. If the checkout looks complicated or insecure, they may leave. A trusted gateway gives customers confidence, which leads to more completed sales and repeat buyers.
Simply put, a payment gateway helps you get paid securely and efficiently every time a customer checks out. It acts like a digital cashier for your eStore, verifying all the transactions.
Key Considerations Before Setting Up a Payment Gateway
Before you connect a payment gateway in Shopify, there are a few things you should think about. These points will help you avoid problems later and choose the best option for your store.
Check Supported Gateways in Your Region: Not every payment gateway works everywhere. For example, if you’re in the US, you have access to popular payment providers for Shopify like PayPal, Stripe, and many more. Always confirm that the gateway you choose is supported in your region.
Understand the Fees: Every gateway charges a fee for each transaction. Some charge a flat rate, while others take a percentage. Make sure you compare these costs. Even small differences can add up if you have many sales.
Look at Payout Times: Some gateways transfer money to your bank in 1–2 days. Others may take longer. If cash flow is important for your business, choose a gateway with faster payouts.
Review Security Features: Security should be a top priority. Pick a gateway that uses strong encryption and fraud detection. This keeps your customers’ information safe and protects your store from chargebacks.
Think About Customer Experience: A smooth checkout can increase sales. Gateways that allow customers to pay with credit cards, debit cards, or digital wallets like Apple Pay can make the process faster and more convenient.
Match It With Your Business Needs: Every business is different. A small store might want the simplest option, while a larger store may need advanced features. Choose a gateway that fits your current needs but can also grow with you.
In short, before setting up a payment gateway in Shopify, consider fees, payout speed, security, and customer experience to avoid issues and ensure smooth transactions. Choose a gateway that fits your business needs and is supported in your region.
Setting Up Shopify Payments
Shopify Payments is the easiest way to accept payments in your store. It’s built right into Shopify, so you don’t need to set up a third-party provider. For most store owners, it’s the fastest and simplest choice.
Here’s how you can set it up:
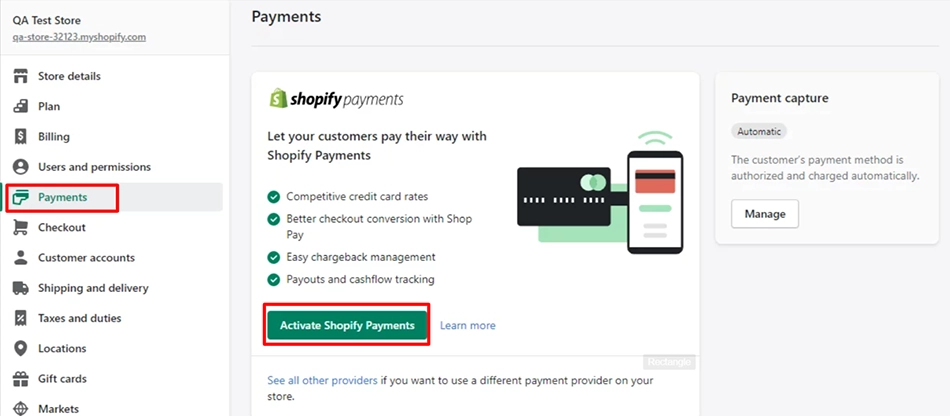
1. Log In to Your Shopify Admin
Go to your Shopify dashboard. From the left menu, click on Settings, then choose Payments.
2. Select Shopify Payments
In the Payments section, you’ll see Shopify Payments as an option. Click Activate Shopify Payments to start the setup.
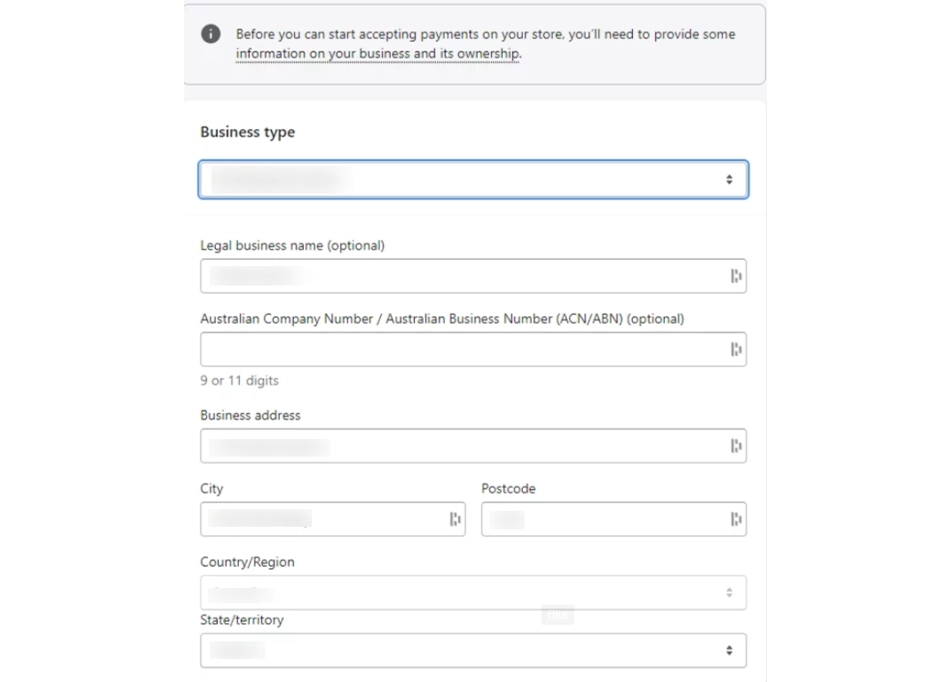
3. Enter Business Details
Shopify will ask for your business information. This includes your business type, address, and tax details. These are required to verify your account and to comply with banking rules in the US.
4. Add Bank Account Information
Next, enter the bank account where you want Shopify to send your payouts. Make sure the details are accurate, or your payments could be delayed.
5. Review Fees and Payout Times
Shopify Payments has clear fees for each transaction. In the US, the standard fee is a small percentage plus a fixed amount per order. Payouts usually arrive in your bank within 2–3 business days.
6. Save and Activate
Once you finish entering your details, save the settings. Your store is now ready to accept payments directly through Shopify Payments.
With this setup, customers can pay using credit cards, debit cards, and even wallets like Apple Pay or Google Pay. Everything is handled inside Shopify, which means fewer steps, better security, and a smoother checkout experience. If you need expert help to set up or customize Shopify Payments, you should hire Shopify developers to streamline your store’s payment process and boost sales today.
Steps to Integrate a Third-Party Payment Gateway in Shopify
Setting up a third-party payment gateway in Shopify may feel complex at first, but it’s actually a simple process when broken down. The key is choosing the right provider for your business and then connecting it to your store the right way. Let’s walk through the steps.
1. Identify Your Business Needs
Before picking a provider, think about what matters most for your store:
Payment methods: Do you want to accept credit cards, PayPal, Apple Pay, or bank transfers?
Customer location: Are you selling only in the US or worldwide? If global, make sure the provider supports international payments.
Security: Look for gateways that meet security standards like PCI DSS and offer fraud protection.
This step is important because every provider has different strengths. Knowing your needs will help you make the best choice.
2. Research Payment Gateway Providers
Once you know your needs, explore the available options. Popular choices for Shopify include:
PayPal: Widely trusted and easy for customers. Accepts cards, PayPal balance, and PayPal Credit.
Stripe: Great for flexibility. Supports subscriptions, recurring billing, and over 100 currencies.
Authorize.Net: Reliable option with fraud detection and data management.
Square: Simple to use with transparent pricing, works well for both online and in-person sales.
Also, check for industry-specific or regional gateways if your business has unique needs.
3. Sign Up With Your Provider
After choosing a provider, create an account with them. You’ll need to share basic business information, connect your bank account, and complete any verification steps. This ensures your payouts go smoothly.
4. Configure the Gateway in Shopify
Now it’s time to connect your chosen provider with Shopify:
Log in to your Shopify admin.
Go to Settings > Payments.
Under “Third-party providers,” click Choose third-party provider.
Pick your chosen gateway from the list.
Enter the required account credentials or API keys (these come from your provider).
Save your settings.
This links your Shopify store directly with the payment provider.
5. Test the Integration
Before going live, run a test. Most providers offer a “sandbox mode” where you can process test transactions without charging real money. Try a few payments with different methods to confirm everything works.
6. Go Live and Accept Payments
Once testing looks good, switch your store to live mode. Keep an eye on transactions during the first few days to make sure payouts are smooth and no issues pop up.
To sum up, for integrating a third-party payment gateway in Shopify, first choose a provider that fits your business needs, set up an account, and connect it through Shopify’s payment settings. Test the integration in sandbox mode, then go live to start accepting payments securely.
Tips to Manage Payment Gateway in Shopify
Managing your payment gateway properly is important for smooth transactions and happy customers. Here are some simple tips to keep things running well:
Monitor Transactions Regularly: Check your payments every day or week. Look for failed payments or unusual activity. This helps you fix problems before they affect your customers.
Keep Your Gateway Updated: Payment providers often release updates to improve security or performance. Make sure your gateway is always up to date. This protects your store and customer data.
Set Up Notifications: Enable alerts for transactions, chargebacks, or failed payments. Getting notifications helps you respond quickly and avoid bigger issues.
Maintain Security Standards: Use strong passwords and enable two-factor authentication if possible. Keep customer payment data safe and comply with PCI DSS standards.
Test After Changes: If you update settings or add new payment methods, test them in Shopify’s sandbox mode first. This ensures transactions work without risking real money.
Offer Multiple Payment Options: Giving customers choices like credit cards, PayPal, and digital wallets can increase sales. Make sure all options are easy to use and work properly.
Keep Records Organized: Maintain clear records of payments, refunds, and fees. Organized records make it easier to handle disputes and manage your finances.
By following these tips, your Shopify store will process payments smoothly, stay secure, and provide a better experience for your customers.
Common Issues and Troubleshooting
Even with the best setup, payment gateways can sometimes have problems. Knowing common issues and how to fix them can save time and keep your store running smoothly.
Failed Transactions: Sometimes, payments don’t go through. This can be due to incorrect card details, insufficient funds, or temporary network issues. Ask customers to try again, or suggest an alternative payment method.
Slow Payouts: If money takes longer than expected to reach your bank, check your gateway’s payout schedule. Some gateways take a few days to process payments. Make sure your bank info is correct.
Account Verification Issues: Payment providers may require extra verification for security. Keep all business documents ready and update any expired information to prevent delays.
Technical Errors in Shopify: Occasionally, Shopify may show errors while processing payments. Clear your browser cache, update your Shopify app, or try a different device. If the problem continues, contact Shopify support.
Security or Fraud Alerts: Gateways may flag suspicious activity. Monitor alerts closely, verify the transactions, and follow the gateway’s instructions to resolve issues.
Integration Problems: If your third-party gateway isn’t working properly, check that API keys and credentials are correct. Make sure the gateway is properly selected in Shopify’s payment settings.
Customer Complaints: Sometimes, customers may report double charges or failed payments. Keep records handy and respond quickly to resolve disputes.
Regular monitoring and quick action are key to avoiding long-term issues. By staying proactive, your Shopify store can provide a smooth and secure checkout experience.
Let’s Summarize
Integrating a payment gateway in Shopify is key to running a smooth and secure online store. Choosing the right gateway ensures your customers can pay easily, and your business can receive funds without hassle. Always consider fees, security, and customer experience before making a choice.
Regularly managing and testing your payment gateway keeps everything running smoothly. By following the right steps, you can make your Shopify store more professional, reliable, and ready for growth. If you need help integrating your preferred payment gateway into your Shopify store, you should get in touch with us today!
FAQs on Integrating Payment Gateway in Shopify
Q1. Does Shopify offer a payment gateway?
Yes, Shopify provides its own payment gateway called Shopify Payments. It allows you to accept credit cards and other payment methods directly on your store without needing a third-party provider. It’s simple to set up and fully integrated with Shopify.
Q2. Can I add my own payment gateway to Shopify?
Absolutely! Shopify lets you connect third-party payment gateways like PayPal, Stripe, Authorize.Net, and more. You just need to create an account with the provider and configure it in your Shopify settings.
Q3. What is the payment gateway fee for Shopify?
Fees vary depending on the gateway you use. Shopify Payments has a standard rate, while third-party gateways may charge a percentage per transaction or a flat fee. It’s best to compare fees and pick the one that fits your store and sales volume.
Q4. Do I need a merchant account for a payment gateway?
Not always. Some gateways, like Shopify Payments, don’t require a separate merchant account. Others, like certain banks or third-party providers, may ask for one. Check your chosen gateway’s requirements before setting it up.
Q5. What payment method should I use for Shopify?
It depends on your business and customers. Credit/debit cards, PayPal, and digital wallets like Apple Pay are popular and convenient. Offering multiple options can improve customer experience and increase sales.
Ankur is a highly experienced E-commerce Platform Expert dedicated to maximizing the online potential of businesses. His deep knowledge spans across leading platforms, including Shopify, Magento, and WooCommerce, among many others. Ankur specializes in guiding companies to effectively leverage these technologies and their capabilities to drive significant growth and success for their online ventures.
At BrainSpate, we recognize the power of standing out from the crowd in an effort to get more customers and product admirers. For that, you can have a consultation with us and get a free quote.