If you have just launched a new Shopify store, there’s a good chance it looks a little generic. So what can you do to bring out the uniqueness? Well, you can start by customizing your Shopify header.
Whether it’s a personalized color scheme, a custom logo, or a unique navigation menu, the possibilities are endless. A well-designed header not only reinforces your branding but also ensures a smooth shopping experience.
So, how to edit the header in Shopify? In this blog, we’ll explain how Shopify experts customize it using different approaches. But let’s start by understanding the Shopify header structure.
Basics of Shopify Header Structure Explained
Your Shopify store’s header is more than just a static banner. It’s a dynamic element, constructed using a powerful templating language called Liquid. This language allows you to create flexible and customizable layouts.
At the heart of your header lies the header.liquid file, nestled within your theme’s Sections folder. This file serves as the blueprint for your header, dictating its structure and content.
In this .liquid file, you’ll find the HTML code excerpts, along with Liquid logic and CSS styles defining your header’s appearance and behavior.
Components of the Header:
Logo: Represents your brand and links to the homepage.
Navigation Menu: Guides users through your store’s key pages.
Search Bar: Helps customers quickly find specific products.
Cart Icon: Provides easy access to the shopping cart.
Announcement Bar (Optional): Displays promotions or important notices.
Here’s a detailed overview table to understand which elements you should add as a priority:
Header Element
Priority
Why It Matters
Logo / Store Name
Essential
Reinforces branding and links to the homepage.
Navigation Menu
Essential
Helps visitors browse products and pages.
Cart Icon
Essential
Provides quick access to checkout.
Mobile Menu
Essential
Ensures navigation works on smaller screens.
Search Bar
Recommended
Helps shoppers find products faster.
Announcement Bar
Recommended
Highlights promotions and important updates.
Customer Account Links
Recommended
Enables customers to access orders and profiles.
Sticky Header
Recommended
Keeps navigation visible while scrolling.
Mega Menu
Optional (for large catalogs)
Organizes extensive product categories and collections.
Wishlist Icon
Optional (app/theme dependent)
Allows customers to save products for future purchases.
Contact Information
Optional (industry-specific)
Makes it easier for customers to reach your business.
Store Locator
Optional (for physical stores)
Helps customers find nearby retail locations.
Accessibility Features (ARIA, Skip Links)
Recommended
Improves usability for all visitors, including those using assistive technologies.
Localization Selector
Optional (international stores)
Allows shoppers to switch languages or currencies.
Header Section Schema ({% schema %})
Essential (for developers)
Enables header customization through Shopify’s Theme Editor.
Before you learn how to edit the header in Shopify, understand these components. Then you can modify or add elements as needed.
Advantages of a High-Converting Shopify Header
A well-optimized Shopify header can influence how visitors navigate and engage with your eCommerce store, directly affecting conversions.
Creates a Memorable First Impression An iconic and polished header increases engagement, instills brand recall, and keeps visitors on your site. High-quality visuals with eye-catching typography and layout establish professionalism and set you apart from the competition.
Builds & Maintains Brand Recognition Consistently presenting your logo, colors, and messaging helps reinforce brand identity, enhance recognition, and build credibility among your customer base.
Improves Navigation Efficiency A well-structured navigation menu in your Shopify header enables quick, easy access to product categories, collections, and key pages. A smoother browsing experience reduces the friction between the storefront, products, and conversion.
Simplifies Product Discovery A simple search bar helps customers reach their desired product much faster. Features like predictive search, filters, and sorting options further improve search accuracy, helping customers reach purchase decisions more quickly.
Highlights Offers & Promotions You can prioritize and showcase important calls to action, including promotions, limited-time offers, and new arrivals, directly on the header of your storefront. It helps you control what your customers see first when they visit your eCommerce store.
Before implementing these improvements, it’s important to know where Shopify header settings and code are located and how to access them safely.
How to Access Your Shopify Header for Customizations?
To customize your Shopify header with HTML, you’ll need to access and edit the header.liquid file. Here’s how it goes:
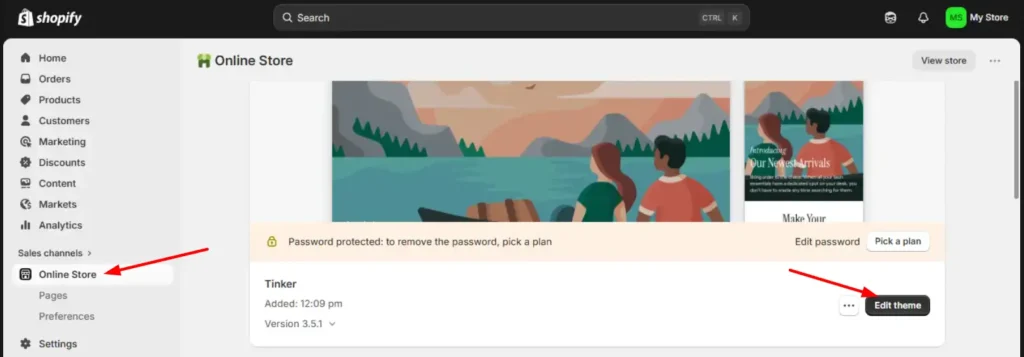
Step 1: Log in to your Shopify Admin.
Step 2: Go to Online Store 🡆 Themes.
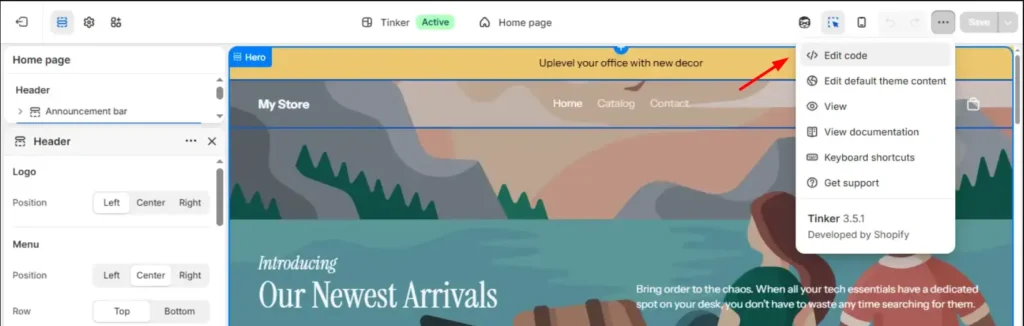
Step 3: Click Actions 🡆 Edit Code.
Step 4: Navigate to Sections in the file tree 🡆 header.liquid.
This file contains the HTML, Liquid, and sometimes JavaScript that make up your store’s header.
But before editing the theme, duplicate it by navigating Theme 🡆 Actions 🡆 Duplicate. Edit the duplicate theme to avoid breaking your live store. Now let’s get into the 3 main approaches to editing the header in Shopify.
How to Edit The Shopify Header? (3 Proven Ways)
There are three primary ways to edit the header in Shopify:
Use the Theme Editor
Edit your theme files
Use a Shopify app
The best method for you depends on the depth of customization you require and your proficiency with Shopify’s theme architecture.
Method 1: Edit the Shopify Header with Theme Editor (No-Code)
As the simplest way to edit the Shopify header, this approach provides a live preview of visual changes without requiring code modifications.
Steps to access the header settings:
1. Go to Shopify Admin 🡆 Online Store 🡆 Themes.
2. Click Edit Theme to enter the customization page.
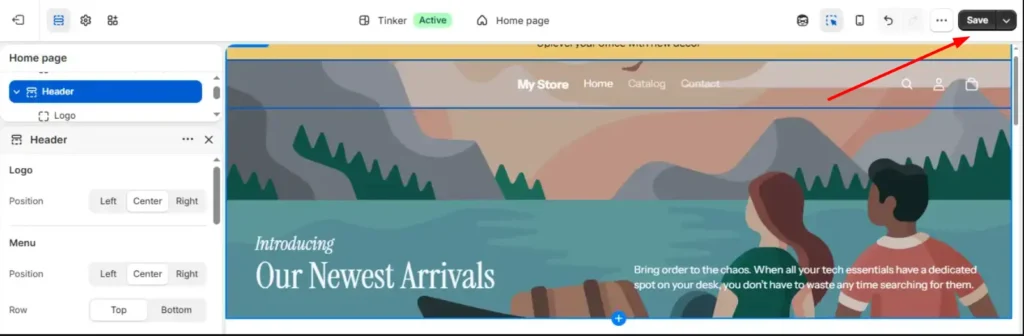
3. In the left sidebar, select the Header section.
4. Make your changes and click Save.
Components you can usually customize:
Logo: Upload file, adjust size, and control its placement directly under the header section with ease. Ensure your logo is optimized across devices.
Pro Tip: Some themes include separate settings for desktop and mobile logos.
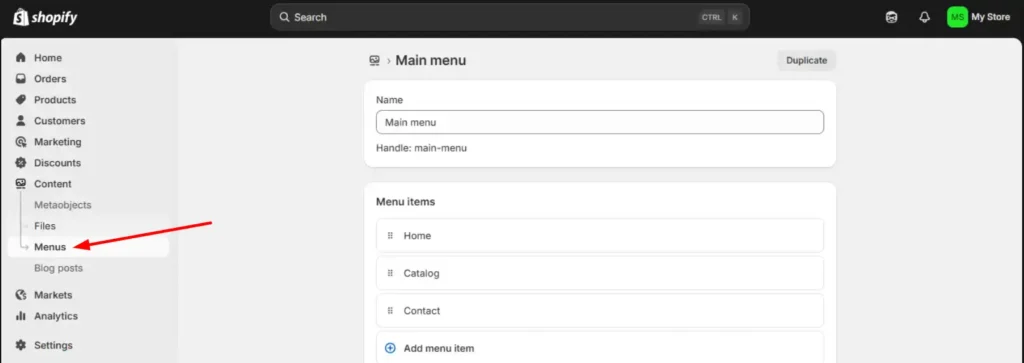
Navigation Menu: You need to manage this separately in the Content 🡆 Menus section. Easily add, remove, reorder, and organize menu items. You can also add dropdown menus or mega menu options with certain themes.
Announcement Bar: Customize and highlight promotional messages, shipping updates, or special offers and discounts.
Search Functionality: It is preferable to select a theme that includes an icon featuring a search bar with predictive search.
Additional Header Elements:
Cart icon
Customer account icon
Country selector
Language selector
Sticky header behavior
Social media links
Mobile menu layout
It is possible to manage and edit global theme settings, such as colors, typography, the favicon, and more, from the Theme Editor. Some premium themes offer more extensive header customization than free themes.
Method 2: Advanced Code Editing for Your Shopify Header
There are some specific design or functionality requirements that the Theme Editor cannot accommodate. In such cases, you can modify your Shopify header from your theme code files.
Pro Tip: Before making any changes, duplicate your theme to create a backup copy.
sections/header.liquid – The HTML/Liquid template for your header. Change structure, add classes, reorder blocks, and integrate new elements here.
assets/base.css or assets/theme.css – Your main stylesheet. In Shopify OS 2.0 themes (Dawn and most modern themes), this is a plain .css file, not a theme.scss.liquid. Shopify no longer supports Sass processing, so add your styles here in native CSS.
assets/global.js or assets/theme.js – Your main script file. Name varies by theme; check your Assets folder. OS 2.0 themes typically use global.js. Add your JS here.
Pro Tip: Older tutorials reference theme.scss.liquid for CSS and assume jQuery for JS. OS 2.0 themes use plain .css files and ship without jQuery. Use native CSS and vanilla JavaScript.
Customizing Store Title:
In sections/header.liquid, find the store title element. Use {{ shop.name }} – this is the standard Liquid variable for the store name and works across all themes. Replace whatever is there with:
<h1 class="site-title">{{ shop.name }}</h1>
Style it in your main stylesheet (Example: assets/base.css):
A sticky header improves navigation by keeping the header fixed at the top as the user scrolls and browses. The exact selector depends on your theme; common options include .header-wrapper (Dawn), .site-header, or .header. Inspect your rendered HTML to confirm the right class before adding CSS.
Then adjust page content so it does not sit beneath the fixed header. Add to your main JS file (global.js or equivalent) – vanilla JS only, no jQuery dependency:
function adjustHeaderPadding() {
    const header = document.querySelector('#shopify-section-header')
                || document.querySelector('.site-header');
    const main   = document.querySelector('#MainContent');
    if (header && main) {
      main.style.paddingTop = header.offsetHeight + 'px';
    }
  }
  window.addEventListener('load', adjustHeaderPadding);
  window.addEventListener('resize', adjustHeaderPadding);
This calculates the header’s height and pushes the page content down by that much, so nothing gets hidden underneath the fixed header. These two selectors cover both cases: #shopify-section-header is what Shopify assigns to the header section by default; .site-header is the fallback for themes that use a different class.
Adding Sticky Header without the Announcement Bar:
In OS 2.0 themes, the announcement bar is its own separate section, so targeting .header-wrapper already excludes it; no extra steps needed. In older themes where the announcement bar sits inside the header section, target the inner nav wrapper class instead of the full section wrapper. The class name varies by theme; inspect your rendered HTML to find it. Use the same position: fixed CSS block, and the JS padding function remains unchanged.
Save each file after editing. Reload your storefront and verify on both desktop and mobile.
Method 3: Use a Shopify App for Header Customization
Shopify apps come into play when you want to avoid custom development but still add advanced layouts, including mega menus, animated announcement bars, countdown timers, and more in the header.
What to know before choosing this route:
Most Shopify page builder apps (GemPages, EComposer, PageFly, etc.) only modify the page body, the section between the header and the footer. The header itself remains under your theme’s control.
Some apps do offer a custom header section that replaces the default theme header. In those cases, you toggle off the theme header on a per-page basis and mount the app-built version instead.
Some themes have an inbuilt option for sticky headers. Check the Theme Editor under Header before checking an app or custom code.
If your requirement is a purely sticky header, use the CSS/JS approach above. It is a much cleaner approach and does not add app overhead during page load.
For dedicated header features like mega menus or custom announcement bars with advanced behavior, search the Shopify App Store for “sticky header” or “mega menu” and filter by review count and active installs.
Now that you know how to edit the Shopify header across all three methods, here are some simple customizations that you can implement easily.
Get a professionally optimized Shopify header tailored to your brand and conversion goals.
Remember to test your changes thoroughly before deploying them to your live store. If you need help with these technical changes to your Shopify store, get our professional eCommerce website design services. We’ll inspect the store and strategize the customizations accordingly.
Common Header Issues and Troubleshooting
You might face issues that might cause visual glitches or slow down your eCommerce store. Here are a few fixes to keep in mind while learning how to edit the header in Shopify:
Logo Appears Blurry, Oversized, or Too Small A Shopify header that looks amazing on desktop but is unreadable on mobile can undermine your brand’s visual consistency. For most Shopify stores, a desktop width of 150–200px and a mobile width of 100–120px create a balanced look. Always review the header in both desktop and mobile previews before publishing changes.
Navigation Menu Looks Cluttered or Misaligned When there are too many links in a small space, the Shopify header can appear crowded, especially on smaller screens. Limit primary navigation to the most important pages and use dropdown menus for secondary links.
Sticky Header Covers Content While Scrolling If elements underneath become partially hidden, adjust the header spacing or padding settings within your theme customization panel. Confirm the header remains functional without interfering with content visibility.
Search Bar or Header Icons Aren’t Working Missing or unresponsive search, cart, or account icons are often caused by disabled settings or incorrect configurations. Verify that each feature is enabled within the header settings and review icon placement. Overcrowded header layouts can overlap buttons, particularly on mobile.
Header Displays Differently Across Browsers To reduce compatibility issues, stick with widely supported fonts and test your store across major browsers such as Chrome, Safari, Edge, and Firefox. Use a well-maintained Shopify theme with strong cross-browser support.
Logo Is Missing After Updating the Header Ensure the logo is in an appropriate format, such as PNG or JPG, and that its dimensions meet your theme’s recommended specifications. Always check on multiple devices.
Navigation Links Lead to the Wrong Page Broken navigation often results from incorrect menu redirects rather than header design issues. Review your menu structure and verify that each link connects to the intended collection, product, or page.
Search Feature Doesn’t Appear You need to activate the search feature manually for certain themes. If the feature is activated but still missing, check whether your theme supports a search bar within the header layout.
Announcement Bar Isn’t Showing First, review the visibility settings. Many Shopify themes allow announcements only on specific pages, such as the homepage, which can make them disappear elsewhere on the store.
A properly configured header should work consistently across devices, browsers, and screen sizes. Let’s go one step further and discuss the best practices for editing the header in Shopify.
Best Practices for Designing a Shopify Header
Here are a few header design practices that improve usability and conversions:
Keep Navigation Clear and Focused Let your users find key pages quickly. Limit navigation to essential links, keep menu labels concise, and use dropdowns to organize secondary pages without cluttering the layout.
Maintain Consistent Branding Use your brand’s colors, typography, and visual style consistently throughout the header. A cohesive design strengthens brand recognition and recall.
Optimize for Mobile Users Resize and adjust every header element (menus, search, cart, and account links) for smaller screens, as a significant share of online shoppers are on mobile devices.
Use High-Quality Visual Assets Upload high-resolution logos and graphics to ensure they remain sharp across all devices. Blurry or pixelated visuals can negatively impact your store’s professional appearance.
Make Accessibility a Priority Every header element should be fully accessible via keyboard navigation. Maintain a logical tab order and flow that improves usability. Also, ensure sufficient color contrast for content, icons, and buttons, and integrate ARIA labels so screen readers can easily interpret their purpose.
Ensure Consistency Across Devices Menus should adapt smoothly, buttons should remain easy to tap, and content should never become hidden or misaligned as screen sizes change.
Support SEO Without Sacrificing Usability Where possible, naturally include relevant keywords within navigation labels and header content. This can improve search visibility.
Test and Refine Regularly Continuously monitor changes in engagement and navigation behavior after design or functional updates to identify what works best for your audience.
Validate Accessibility Before Launch Use tools such as WAVE, axe DevTools, NVDA, or VoiceOver to identify accessibility issues. If you prefer a no-code approach, Shopify accessibility apps can help improve compliance and usability without modifying theme files.
With your Shopify header optimized for usability, branding, accessibility, and performance, let’s recap everything we’ve learned.
Conclusion
By learning how to edit headers in Shopify, you can elevate your online store’s visual appeal, enhance user experience, and ultimately drive more sales. From simple tweaks to advanced modifications, you get complete control over your eCommerce store.
Remember to start with a strong foundation by understanding your header structure and customizing it using the built-in theme editor or Shopify apps. As you gain confidence, experiment with code modifications tocreate dynamic and personalized experiences.
Don’t forget to prioritize performance and accessibility. Customize Shopify headers for enhanced brand consistency, recognition, and recall. Ultimately, a well-optimized Shopify header does more than improve navigation; it creates a seamless, enjoyable shopping experience that supports engagement, trust, and conversions.
FAQs on Shopify Header HTML
1. What is the header.liquid file?
The header.liquid file is a template file in your Shopify theme that defines the structure and content of your store’s header. It’s where you can make customizations to the header’s appearance and functionality.
2. How can I change the font and color of my header text?
You can use CSS to style the text elements in your header. Add CSS classes to the elements you want to style and then define the styles in your theme’s CSS file.
3. How can I integrate third-party scripts into my header?
You can add third-party scripts, such as Google Analytics or https://brainspate.com/blog/facebook-pixel-on-shopify/ to your header by placing the script code within.