Webflow to Shopify Integration Made Easy: Quick Connect Guide
Quick Summary
Integrate Webflow and Shopify to merge stunning design with robust e-commerce. This powerful combination allows you to leverage Webflow’s superior visual design for your storefront. Plus, you can utilize Shopify’s reliable backend for secure payments and inventory management. The result is a uniquely branded, high-performing online store that drives sales and enhances customer experience.
Trying to run a high-conversion online store? The kind that sets you apart from millions of other e-stores. While Webflow is an outstanding platform, its visually rich storefront might need the scalability or e-commerce capabilities of Shopify.
With Webflow, you can gain the freedom to design high-impact experiences. Shopify, on the other hand, can help with secure checkout, inventory management, and operational efficiency. It’s a blend of creativity and commerce to reduce development overhead and improve conversion paths. Plus, you can get a consistent brand experience across channels.
This blog explores the Webflow-Shopify integration, including how to connect the platforms, add products, and the various ways to do so.
Why Connect Shopify With Webflow?
While Shopify alone is enough to create an e-commerce website, sometimes you need more control over the design. Webflow offers you the tools to create a custom storefront without heavy development work.
Shopify, meanwhile, is better suited for secure checkout, reliable inventory management, and an extensive app ecosystem. Plus, the website is hosted on Shopify.
Let’s look at a few major benefits of this integration.
Streamlined E-commerce Workflows (With Shopify)
Shopify is among the best e-commerce platforms, powering over 6.5 million websites. So you can let it handle the heavy backend systems. That includes managing secure payments, tracking inventory, and automatically processing orders. So you can focus on growing the business rather than getting bogged down in logistics.
Optimized for Search Rankings & Conversions (With Webflow)
Webflow is inherently SEO-friendly with clean semantic code, auto-generated sitemaps, customizable meta tags, and more. It offers you the tools to design lightning-fast, visually stunning pages. They guide the customers from browsing to buying and turning clicks into conversions.
Advanced Product Management (With Shopify)
With Shopify, you can manage the entire product catalog, from tracking multiple variants and syncing stock across channels to running seamless discounts. Shopify serves as the command center for inventory management, so your business can scale up without extra effort.
Quality Design (With Webflow)
With Webflow as your design partner, your store stands out from the crowd of generic Shopify websites. Webflow’s low-code background is perfect for designing unique brand experiences reflecting the quality of your products. Your site will be custom-coded for visual appeal and interactive elements.
Both Shopify and Webflow bring nuanced benefits for e-commerce websites. Their integration is the perfect combination of design and function.
How to Connect Shopify with Webflow? (Step-by-Step)
This integration is relatively straightforward. It involves using Shopify’s Buy Button to embed products into your beautifully designed Webflow site. You will manage the products in Shopify while displaying and selling them on your custom Webflow site.
Step 1: Create a Shopify Account and Set Up the Basics
First, you need to sign up for an account on Shopify to set up the e-commerce backend. Start with a free trial to test the platform before purchasing.
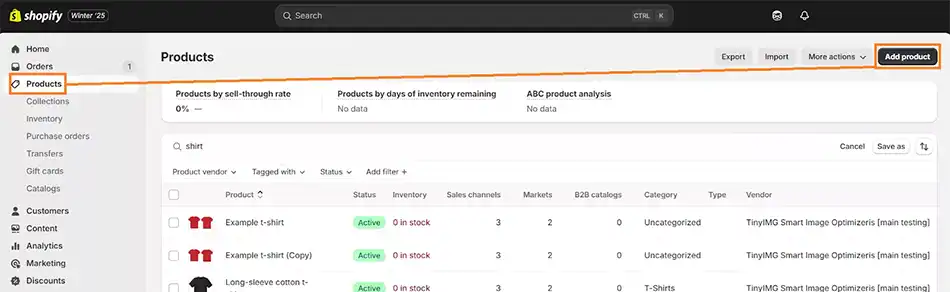
Open the Shopify admin panel and navigate to ‘Products’.
Click ‘Add product’ and fill in all key details for each item.
Title and Description: Make them compelling and clear, and optimize them with SEO tactics.
Images and Other Media: Upload high-quality photos and videos of the product (by itself and in use, if possible).
Price: Explore competitors’ websites and set pricing accordingly.
Inventory: Track your SKU (Stock Keeping Unit) and quantity.
Since we are only using Shopify for its product management, you don’t need to fully design or integrate a Shopify theme.
Pro Tip: Before generating the buy buttons, complete the setup, including shipping zones and taxes.
Step 2: Create a Webflow Collection for Your Products
The Webflow collection is the structured “template” where the products will reside.
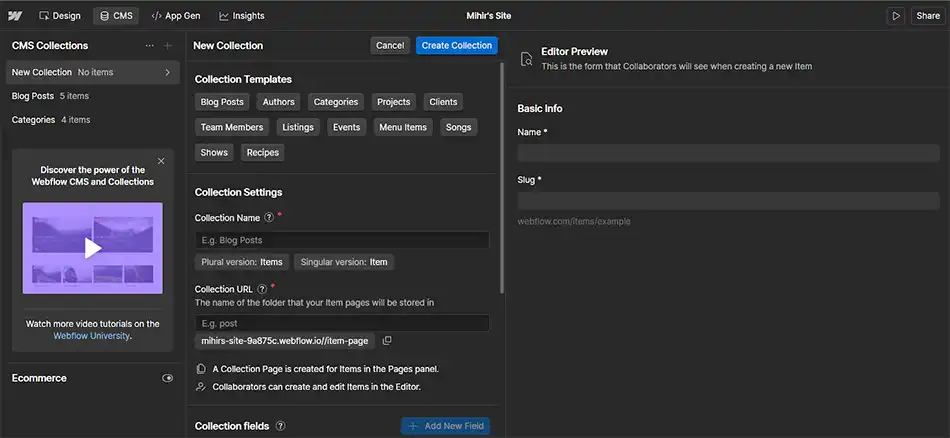
In the Webflow dashboard, navigate to your project and click on the ‘CMS’ (Collections) tab.
Then, click ‘Create New Collection’.
Name the collection something like “Shopify Products”.
Define the fields of your collection. Add fields such as:
Name (Plain Text): The product title
Price (Plain Text or Number): This figure will be for display only. The real pricing will be controlled from the Shopify panel.
Slug (Plain Text): For the product page URL
Description (Plain Text): You can also use rich text for more formatting
Main Image: The primary product image
Step 3: Add Your Products from Shopify to the Collection
Now we start adding the products from Shopify to the Webflow page. For that, you will need the product ID and component from Shopify.
Open the Shopify dashboard and click on the “Buy Button” from the left sidebar.
Choose a product and click “Generate Code.”
In the generated embed code, find the values for “Product ID” and “Product Component.”
Copy these values from the code excerpt and paste them into the Webflow collection fields.
Step 4: Add an Embed Component to Your Collection
Next, we work on Dynamic Embeds for dynamic content. This embed block is where Shopify’s Buy Button script will live — it connects Webflow’s design with Shopify’s checkout. It requires a Collection Page or Collection List. Here, we’ll use the latter.
Open the “Collection List” you have designed for the products and drop the Embed Component in it. Place it where you want the “Buy Button” to appear.
Step 5: Take the Embed Code From Shopify
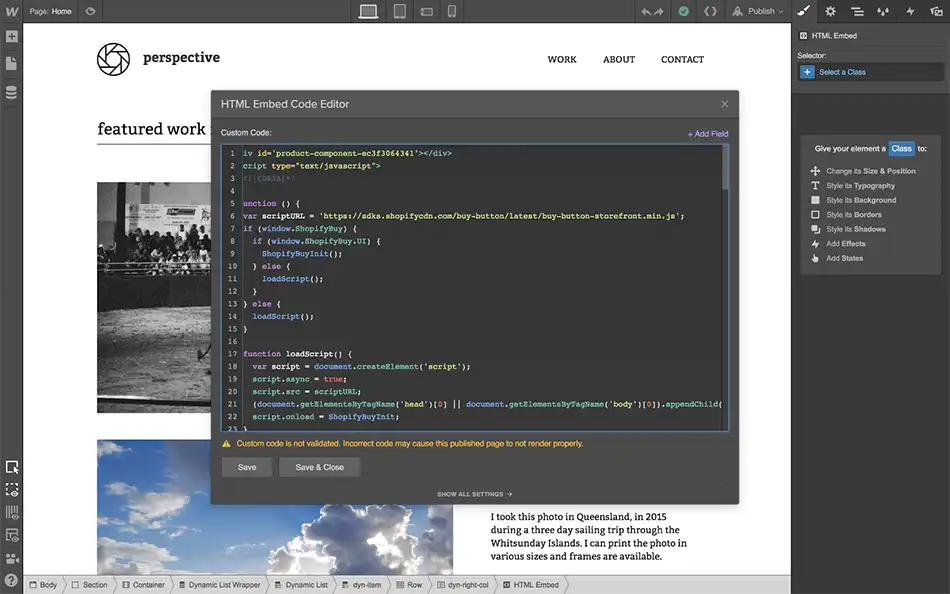
Shopify embed codes are of two types: one for product image, name, and price, and the other for creating the Buy Button. The latter ensures maximum customizability, so we’ll go with it in our example.
Copy the Buy Button embed code from Shopify and paste it into the Webflow Embed Component.
Step 6: Replace the Unique IDs with New Ones
Now, if you test the page, every Buy Button will be exactly the same; but that’s not what you want, do you?
So for each product, paste the embed code copied from Shopify. That means replacing each Product ID and component in the Dynamic Embed.
There’s an easier way to achieve this as well. For any product,
Select the Product ID or Component code.
Click on ‘+Add Field’ and select ID or Component (whichever code you selected).
That concludes the Webflow Shopify integration and the process of adding products to the store through it.
Manually going about this process can feel overwhelming. For advanced integration, contact our Shopify integration expert. We’ll migrate your product catalog to Webflow CMS and create a perfect integration between design and function for the best results.
Popular Tools for Webflow Shopify Integration
While the “Buy Button” method works well, manually adding the products to Webflow can be complicated. Fortunately, there are a few good tools available.
Shopyflow
Shopyflow acts like a dedicated integration layer between Shopify and Webflow. With it, you can design your storefront in Webflow while using Shopify for e-commerce functionality. Here’s what you get with this tool:
Real-time product sync from Shopify into Webflow
Native Webflow elements for subsequent Shopify features (like variants, bundles, subscriptions, multi-currency, cart components, and more)
Full design control via Webflow’s visual designer
Best for: This would most likely be your go-to if you want a direct integration between Webflow and Shopify.
Smootify
Smootify is a low-code tool to build a Shopify storefront in Webflow. It hooks Shopify’s Storefront API into Webflow through pre-made components and automatic sync. You design a visually-focused store in Webflow and then import the products from Shopify. Then, this tool will maintain auto-sync between Shopify data and Webflow CMS.
Best for: If you want a fast setup and design flexibility while keeping Webflow as the primary interface, go for Smootify.
Udesly
You build your site in Webflow and use Udesly’s extension/app to convert the project into a full-functioning Shopify theme with minimal coding. That includes design components, animations, complex layouts, and more. Your Webflow design is translated into a language Shopify understands.
Best for: If you have a Webflow design and want to run your store on Shopify, Udesly would be a good tool. Using this, too, you won’t have to design in Webflow and sync live continuously.
Zapier
Zapier isn’t a full storefront integration like the other three. Instead, Zapier automates the workflows between Webflow and Shopify. For example, when a new order is placed in Shopify, the record will be created in Webflow. Or, when a form is submitted in Webflow, a customer is created in Shopify.
Best for: This tool is designed for data syncing workflow automation rather than a full storefront integration. It’s useful for marketing, CRM, notification, lead capture, and more.
If you want these and more integrations in your Shopify workflow or want to integrate Shopify with another platform, get our Shopify integration services.
Common Shopify Webflow Integration Problems (& How to Fix Them)
While the integration between Webflow and Shopify is straightforward, there may be some challenges, like limited design control, data sync issues, and more.
Implementation is Time-consuming
Whether you integrate the two platforms manually or use one of the above tools, it may take longer than expected to complete. It may range from a week to even a few months. Plus, it will need significant upfront investment and ongoing developer dependency, slowing down the launches and updates.
Solution
Automate the initial sync with a tool like Shopyflow or Udesly. They can help bulk import your Shopify products into the Webflow CMS. Thereafter, Zapier can help with the ongoing updates by triggering CMS item changes from Shopify.
Design Limitations With Shopify Elements
The standard “Buy Button” can feel like a “sticker” with pre-styled buttons, fonts, and cart drawers. The clash with Webflow’s personalized aesthetics creates a jarring user experience.
Solution
With this integration, you can use advanced embed tools or custom code. With Smootify, you can create a cart matching your site’s design language. Also, the Shopify Storefront API can be used to build a custom “add to cart” experience as per the branding.
Data Synchronization
When a product sells out on Shopify, but your Webflow site isn’t updated, that means it’s an unsuccessful integration. This leads customers to see “In Stock” on your site, but they face errors during Shopify-enabled checkout. This data sync issue erodes trust in the website.
Solution
Use a dedicated connector like Shopyflow to reflect inventory changes and unpublish sold-out items in Webflow automatically. For a simpler approach, set up low-inventory alerts in Shopify to trigger a manual update in Webflow before items sell out.
Analytics & Tracking
Since the purchases occur on Shopify’s domain, Webflow’s analytics sees a “dead-end” when a user clicks “Checkout”. It breaks the conversion funnel and makes it difficult to track what’s actually working.
Solution
Adopt cross-domain tracking to bridge the data gap. In Google Analytics, enable cross-domain tracking between your Webflow site and Shopify checkout (like checkout.shopify.com). So the site admins can see the full path from first visit to final purchase.
Functionality Gaps
Out of the box, the integration lacks native features you take for granted, like a persistent mini-cart, dynamic search, or a user login portal. You have the design control but not the built-in features.
Solution
Specialized tools can be helpful, like Algolia for dynamic search and Smootify for direct integration. For features like customer accounts, you’ll need the Shopify Customer API.
The biggest challenge in achieving superior front-end design and a powerful back-end is to integrate them seamlessly. But you can hire expert Shopify developers to evade these challenges and ensure the best results.
Turn Your Webflow Design Into a Fully Functional Shopify Store
The result of integrating Shopify checkout with Webflow design is a store that performs at its full potential. It’s the combination of Webflow’s unmatched design freedom and Shopify e-commerce supremacy.
Your storefront becomes a unique, brand-focused asset that captivates visitors and improves search rankings and visibility. And at the same time, your store runs on a trusted, secure infrastructure powering millions of websites worldwide. While there are some challenges, you can handle them with tools like Smootify, Shopyflow, Zapier, and more.
FAQs on Webflow Shopify Integration
1. Do customers check out on Webflow or Shopify?
Typically, customers check out on Shopify. When they click “Add to Cart”, they are usually redirected to a secure Shopify checkout page to complete their payment, ensuring PCI compliance.
2. Is the inventory synced automatically?
With basic embed codes, no. Inventory must be updated in both systems. However, 3rd party tools like ShopyFlow can automate real-time inventory and product syncing.
3. What is the main advantage of Shopify Webflow integration?
You get unparalleled design control and a superior front-end user experience from Webflow, combined with Shopify’s powerful, reliable e-commerce platform.
4. What is the biggest drawback of Webflow Shopify integration?
The main drawback is the potential for dual data management and the technical complexity of creating a truly seamless experience between the two platforms. Integration requires third-party apps or custom code.
5. Is Webflow SEO affected if Shopify handles checkout?
No — as long as you set up cross-domain tracking and ensure proper canonical tags. Your Webflow pages still rank, while Shopify securely handles checkout.