Standing out in the crowded eCommerce landscape requires a unique online store. Generic templates can hinder your brand identity and make it difficult to attract and retain customers. Customizing your Shopify theme is crucial for creating a distinctive online presence that resonates with your target audience.
By customizing your store’s design, functionality, and user experience, you can enhance brand recognition and improve customer engagement. In this blog, we’ll help you learn how Shopify experts customize their store. We’ll explore the advanced ways for customization such as using Liquid templates and editing CSS and JS. With that said, let’s begin!
Understanding Shopify Themes
Shopify themes are pre-designed templates that determine the layout and style of your online store. They control everything from your store’s color scheme and typography to how products and collections are displayed. Shopify offers both free and paid themes, allowing you to choose one that aligns with your business goals. If you’re planning to switch your existing theme, here’s a simple guide on how to change theme on Shopify.
You can also customize the theme with Shopify’s theme editor, which allows you to modify content, fonts, and images without coding. For more advanced customizations, you can access the theme’s code files (HTML, CSS, JavaScript) through the Shopify admin panel. This flexibility ensures that store owners can create a unique and personalized shopping experience for their customers.
The Basics of Theme Editor
The Shopify Theme Editor is a powerful tool designed for non-developers to easily adjust the appearance of their store. Here’s how you can get started:
Accessing the Theme Editor: Here is how you can navigate to theme editor:
From the Shopify admin, navigate to Online Store > Themes.
Under the Themes section, click Customize on the theme you want to modify.
Making Basic Adjustments: The theme editor lets you adjust key elements like:
Typography: Change fonts across headings, paragraphs, and buttons.
Colors: Modify the color scheme to match your brand.
Layout: Adjust sections such as header, footer, homepage layout, etc.
These changes don’t require coding knowledge and can be applied with just a few clicks. With that learned, now let’s jump to the advanced customization you can make to shopify themes in the next section.
How to Create and Customize a Shopify Theme?
Creating custom sections in Shopify is a great way to enhance your store’s design and functionality. Here’s a stepwise guide to customizing a simple text section for your Shopify theme:
Step 1: Create a New Section File
Go to your Shopify admin panel.
Click on Online Store > Themes > Edit Code.
In the Sections folder, click Add a new section.
Name the section simple-text-section and click Create Section.
This will create a new Liquid file named simple-text-section.liquid.
If you’re looking to better understand how section files work within templates, this Shopify section guide offers a clear, step-by-step breakdown.
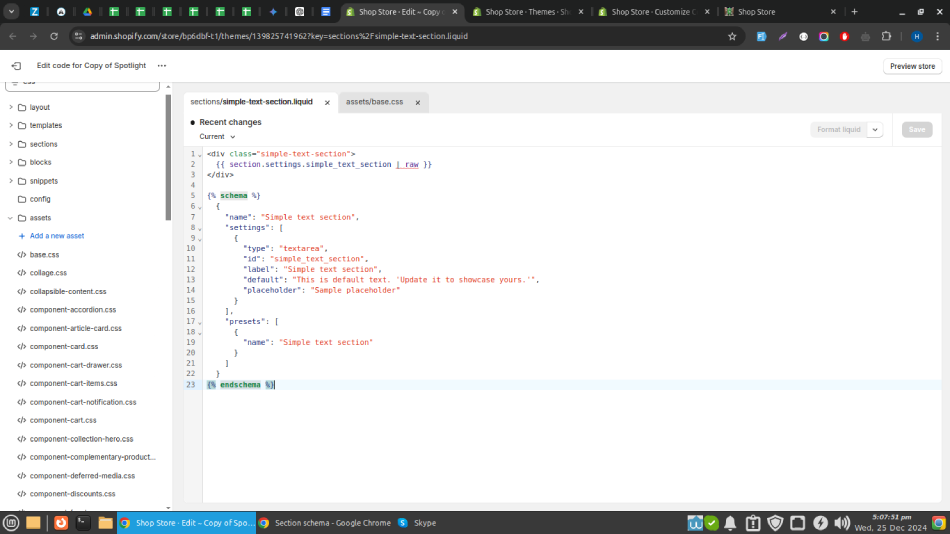
Step 2: Define the Section Schema
The schema is the JSON structure that defines the section’s settings. Add the following code inside your simple-text-section.liquid file:
{% schema %}
  {
    "name": "Simple text section",
    "settings": [
      {
        "type": "textarea",
        "id": "simple_text_section",
        "label": "Simple text section",
        "default": "This is default text. 'Update it to showcase yours.'",
        "placeholder": "Sample placeholder"
      }
    ],
    "presets": [
      {
        "name": "Simple text section"
      }
    ]
  }
{% endschema %}
Explanation of Schema:
name: The name of the section displayed in the theme editor.
settings: The configuration options for the section includes.
– type: textarea: Allows multiline input.
– content_type: html: Enables HTML rendering.
– default and placeholder: Provide default text and placeholder text.
Step 3: Add the HTML Markup
Below the schema block, write the HTML to render the content. Use Liquid to access the user-defined setting:
<div class="simple-text-section">
  {{ section.settings.simple_text_section | raw }}
</div>
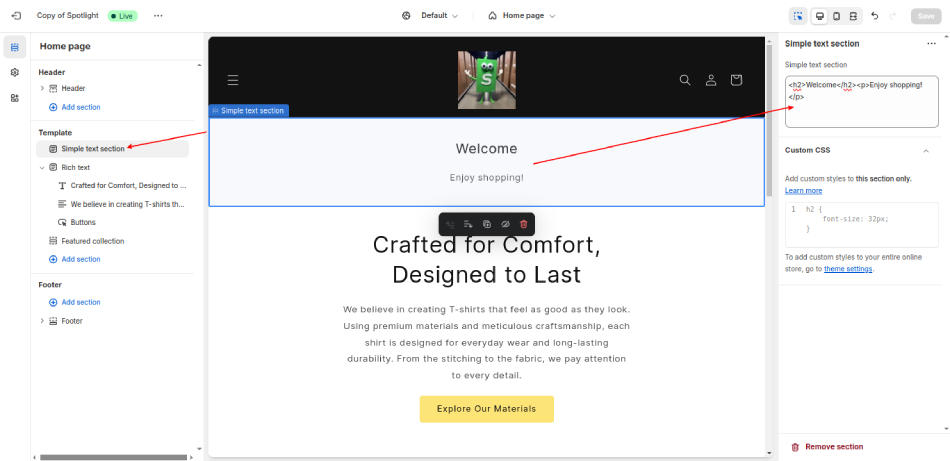
Step 4: Customize the Section in the Theme Editor
Go to Online Store > Themes > Customize.
Click Add Section and find the Simple Text Section in the list.
Drag and drop it to your desired location.
To edit the text, use the text area to input content, including plain text or HTML, such as <h2>Welcome</h2><p>Enjoy shopping!</p>.
Step 5: Style the Section with CSS (Optional)
You can add custom styles to your section by editing the theme’s CSS file. Here is how:
Go to your Assets folder and open the main CSS/SCSS file (e.g., base.css or theme.css or theme.scss.liquid).
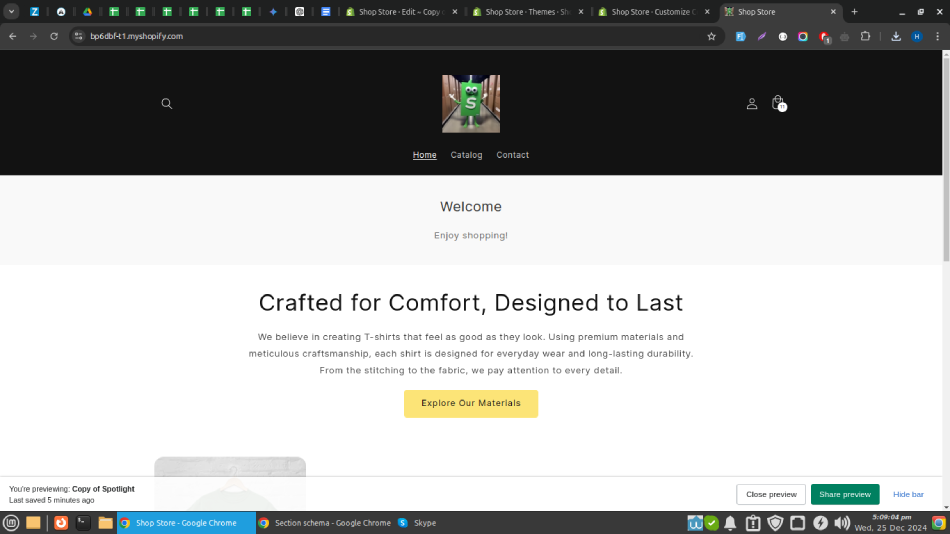
Once you’ve added the section and customized it, your store will display a beautifully styled text block where you can include HTML for headings, paragraphs, and more.
By following this simple process, you can create versatile and reusable sections for your Shopify theme, enhancing your store’s functionality and design.
Once you’re comfortable editing your theme, you can also add a wishlist to your Shopify store to boost engagement and help users save their favorite products.
Customizing a Shopify Theme with Liquid?
For more control over your store’s appearance, Shopify uses Liquid, a flexible templating language that lets developers add dynamic content. Liquid files define your store’s structure and include logic for displaying content like products, collections, or customer details. Here are the steps to customize shopify theme:
Step 1: For assessing the theme file from the Themes page in Shopify admin, click Actions > Edit Code. There you’ll find different folders: templates, snippets, assets, and config.
Step 2: Template files define the layout of different pages (e.g., product pages, cart pages). You can edit .liquid files to change how information is displayed.
Step 3: Using the section-based approach introduced in Shopify’s Online Store 2.0, you can create modular content blocks that make the store easier to customize. These sections can be added or removed directly from the theme editor.
Customizing your Shopify theme with Liquid allows for more control over your store’s layout and content. It will enable you to create a more personalized shopping experience for users.
Customizing Your Store with CSS & JavaScript
While Shopify provides various customization options through the Theme Editor and Liquid, adding your own CSS (Cascading Style Sheets) and JavaScript can help create a unique user experience and improve functionality.
Adding Custom CSS
CSS (Cascading Style Sheets) is a powerful tool for enhancing the appearance of your Shopify store. It allows you to modify the layout, colors, fonts, and other visual elements of your store to align perfectly with your brand. By adding custom CSS, you can go beyond the basic theme settings and create a look that’s uniquely yours.
To add custom CSS in Shopify, navigate to the Assets folder in your theme editor and locate the theme.scss.liquid file. Here, you can insert your CSS rules to style specific elements in your store. It’s a good idea to group related styles together and add comments to make your code easy to understand. Additionally, test your changes on multiple devices to ensure consistency across different screen sizes.
Custom CSS gives you control over the visual elements of your store, helping you build a distinct brand identity. Keep your styles organized and test thoroughly to maintain a seamless user experience.
Adding JavaScript
JavaScript is essential for adding dynamic features and interactivity to your Shopify store. It enables you to go beyond static content, creating engaging experiences like pop-ups, videos, sliders, and dynamic forms that capture your customers’ attention. To learn how to directly upload and embed video files within your Shopify product gallery or pages, check out our guide on how to upload video file to Shopify store.
To add custom JavaScript, you can edit the theme.js file or other script files located in the Assets folder. Use JavaScript to implement features like live search, animation effects, or auto-updating cart totals. Ensure your code is efficient and well-tested to avoid slowing down your site. Using comments in your code can help you track your customizations for future updates.
With JavaScript, you can significantly enhance your store’s functionality and interactivity. Keep your code clean and optimized for a better customer experience and to ensure your site remains fast and responsive.
Best Practices for Shopify Theme Customization
Customizing your Shopify theme can help you create a unique and engaging store. Following best practices ensures that your changes enhance your store without causing performance or usability issues.
Backup Your Theme: Before making any changes, always create a duplicate of your live theme. This allows you to experiment with customizations without risking downtime on your store.
Test Your Changes: After customizing your theme, always preview it on different devices and browsers to ensure compatibility and responsiveness.
Keep Your Code Clean: If you’re working with Liquid or JavaScript, ensure your code is clean, well-commented, and organized. This makes it easier to maintain and update in the future.
Optimize for Speed: Customizations should not affect your site’s loading speed. Compress images, minify CSS and JavaScript files, and reduce unnecessary code to improve performance.
Mobile Optimization: With the majority of eCommerce traffic coming from mobile devices, make sure your customizations are mobile-friendly.
By following these best practices, you can customize your Shopify theme while maintaining a seamless user experience and optimal store performance. If you need help building a customized store, opt for our professional Shopify development services.
To Summarize
By effectively customizing your Shopify theme, you can transform your online store into a powerful marketing tool. From simple color changes and font adjustments to advanced coding techniques, the possibilities are vast.
Remember to prioritize a user-centric approach, ensure cross-browser compatibility, and optimize for speed and mobile devices. With careful planning and execution, you can create an engaging online shopping experience that sets your store apart from the competition and drives business growth.
If you are looking to build a Shopify store that is robust and aligns with your needs, consult with our experts today!
FAQs About Customizing Shopify Theme
Q1. How can I add custom CSS to my Shopify theme?
To add custom CSS, go to Online Store > Themes, click Actions > Edit Code, and open the Assets folder. Then, you can modify the theme.scss.liquid file or add a new custom CSS file.
Q2. Can I customize the Shopify checkout page?
Shopify allows some checkout customization, but to access advanced changes, you need Shopify Plus. With Shopify Plus, you can edit the checkout.liquid file to fully customize the checkout experience.
Q3. What’s the difference between Shopify Liquid and HTML?
Liquid is Shopify’s templating language, allowing dynamic content like products and collections to be displayed, whereas HTML is static and used for basic page structure. Liquid adds logic and flexibility to Shopify pages.