API Rate Limiting: How to Use It for Downtime Prevention & Traffic Management?
Quick Summary
API rate limiting is a crucial safeguard for web services, controlling how many requests a user can make to an API within a specific timeframe. This functionality protects servers from overload and abuse, ensures fair resource distribution, and maintains stability for all users. Understanding its mechanisms is essential for both API consumers and providers.
A sudden surge in traffic can cripple even the most robust applications with well-built APIs. This issue becomes clearly evident when thousands of users hit your service after a product launch. That’s where API rate limiting becomes essential.
API rate limiting controls how many requests a user can make to an API within a specific timeframe. Far from being a restrictive measure, it protects performance, prevents abuse, and ensures fair access to all users. Plus, it serves as a strategic tool for reliability, cost management, and security, making it suitable for scaling digital operations.
This blog elaborates on how API rate limiting works, its common algorithms, how it compares to API throttling, and more. But first, check out what this concept is. Let’s begin.
What is API Rate Limiting?
API rate limiting is a control mechanism to limit the number of requests a client can make to an API within a defined time window. Its core purpose is to:
Prevent system overload.
Safeguard infrastructure from misuse.
Maintain consistent performance for all users.
With this mechanism, you can set limits like requests per second, per minute, or per hour. That ensures no single client consumes disproportionate resources.
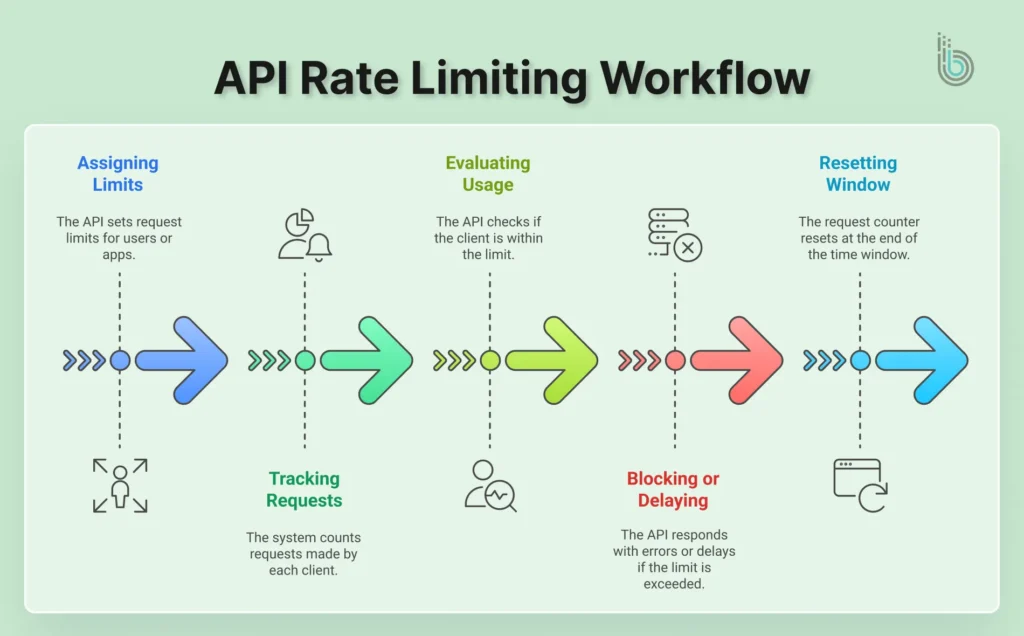
How API Rate Limiting Works
At its core, API rate limiting functions by identifying a requester, counting their actions, and applying a predefined limit. Here’s a breakdown of the typical workflow:
Assigning Limits: The API sets a maximum number of requests (for example, 1000 requests per hour) per user, app, or IP address.
Tracking Requests: The system counts how many requests each client makes within the current time window.
Evaluating Usage: If the client stays within the limit, the API responds normally.
Blocking or Delaying Requests: Once the limit is exceeded, the API may return error responses (like HTTP 429), queue requests, or slow the client down.
Resetting the Window: After the time window resets, the counter returns to zero, and the client can send new requests.
Rate limiting involves constantly monitoring and managing incoming traffic. It keeps APIs resilient, responsive, and fair for all users.
How APIs Detect & Control Incoming Requests
Rate limiting involves two key steps:
Identify the requester
Enforce the limit
Detection: Identifying the Requester
Before applying a limit, the system must answer a critical question: “Who is making this request?” It does this by examining key attributes of the incoming HTTP request. The most common identifiers are:
API Keys: It’s a unique credential assigned to a developer or application, offering the most control for commercial and partner APIs.
IP Addresses: Identifying traffic originating from a particular server or network location, useful for blocking simple abuse.
User Accounts: For authenticated APIs, the system can track requests per logged-in user, so there’s fair usage across a platform.
So the key in a tracking system is this identifier; it’s usually a high-speed database like Redis, which logs each request.
Control: Enforcing the Limits
Once identified, the system uses algorithms to determine the traffic’s shape and rhythm to enforce the limits. Common methods include:
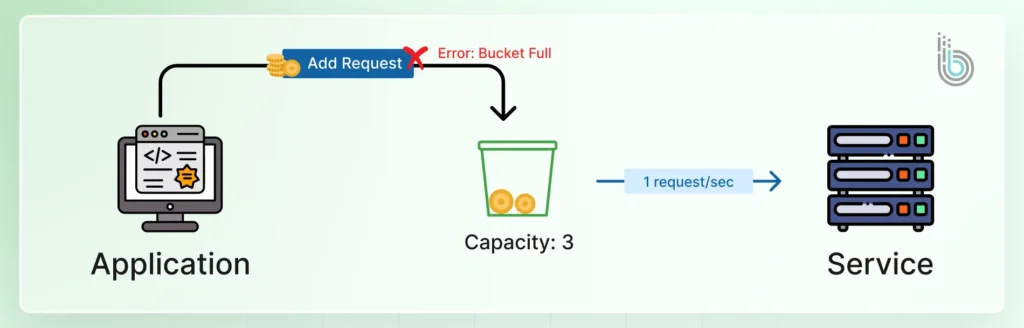
Token Bucket: A virtual “bucket” fills with tokens at a set rate. Each request consumes a token; if the bucket is empty, the request is denied until new tokens are added.
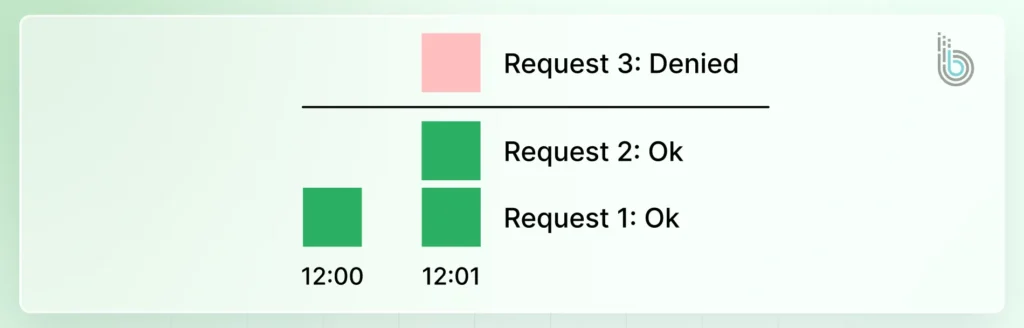
Fixed Window: Limits are applied to fixed time intervals (like 100 requests per minute). It’s simple but can allow bursts at the window’s edge.
Sliding logs: A more precise method that tracks the timestamp of each individual request. That ensures a smooth and consistent rate without bursts.
You can combine precise detection with a strategic control algorithm to manage the traffic, prevent resource exhaustion, and maintain service quality for all consumers.
But how does that differ from API throttling? Let’s find out.
Rate Limiting vs API Throttling
Although often used interchangeably, rate limiting and API throttling serve different purposes in controlling API usage.
Rate limiting is a hard stop; it’s a defined quota. When you hit the limit, your requests are blocked or rejected with HTTP 429 until the limit resets.
API throttling, on the other hand, is a soft control. It slows down the request processing to a predefined rate. Your requests are still accepted but are delayed to enforce a smooth, steady flow.
Factor
API Rate Limiting
API Throttling
Core Concept
Enforcing a limit
Regulating the traffic spikes
Primary Goal
Protection & Fair Use: Prevent overload and abuse and enforce business tiers.
Performance & Stability: Ensure a consistent, predictable flow of traffic to prevent bursts.
API Behavior
Rejects requests outright once the limit is hit.
Delays request processing to maintain a consistent throughput.
Client Experience
Receives a “429 Too Many Requests” error. The request fails.
Requests are accepted but processed slowly. The client might experience increased latency.
Retry-After (suggesting a wait time) or custom headers indicating throttle status.
Why Do APIs Need a Limit to Stay Stable?
APIs operate on shared infrastructure, including the servers, databases, bandwidth, and computing resources. Without limits, a sudden surge in requests from one client (or many) can overwhelm these resources. This leads to slow responses, timeouts, and even full system outages.
Rate limits help APIs stay stable by:
Preventing system overload caused by unexpected traffic spikes.
Ensuring fair usage so that no single client consumes disproportionate resources.
Protecting backend services like databases and authentication services.
Maintaining consistent performance for all users.
Reducing the risk of abuse, such as bot attacks or accidental infinite loops.
Implementing a limit in place ensures the API continues running smoothly, even under heavy or unpredictable load.
Common Rate Limiting Algorithms Developers Use
For enforcing rate limits effectively, developers rely on a variety of particular algorithms. Each of them has its own advantages and trade-offs. The rhythm and fairness of traffic control depend on the choice of algorithm.
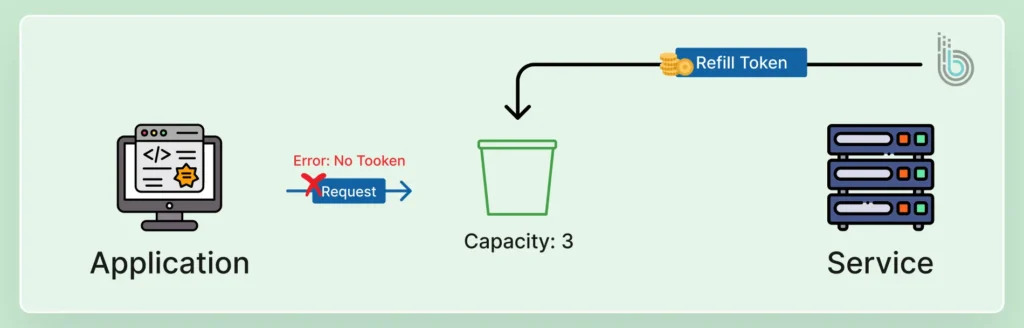
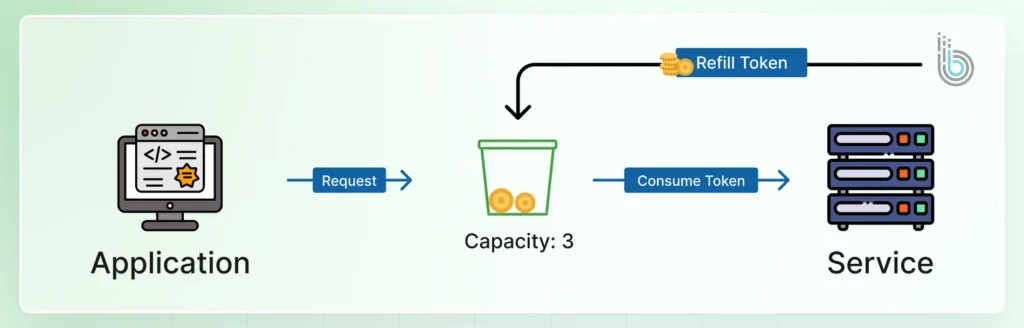
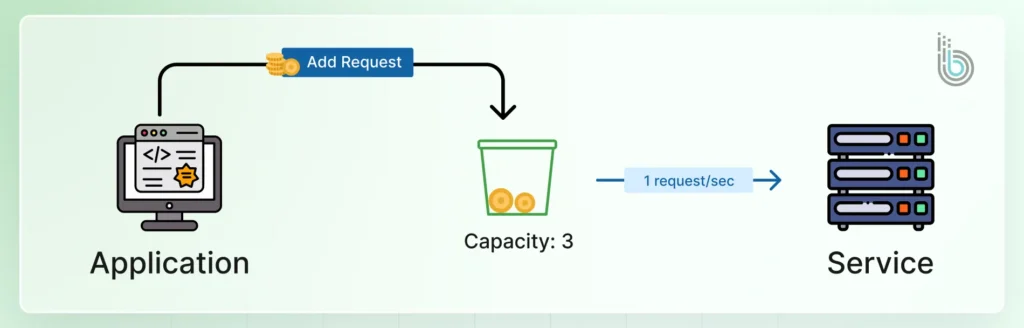
Token Bucket
The token bucket is a versatile and widely used algorithm. A virtual bucket holds a predefined number of tokens. Each API request consumes one token, and tokens are replenished at a steady rate. That allows for brief bursts of traffic up to the bucket’s capacity while capping the long-term average rate.
class TokenBucket {
  constructor(capacity, fillRate) {
    this.capacity = capacity;  // Maximum tokens the bucket can hold
    this.fillRate = fillRate;  // Rate at which tokens are added (tokens/second)
    this.tokens = capacity;    // Current token count
    this.lastFilled = Date.now();
  }

  consume(tokens = 1) {
    // Refill tokens based on time elapsed
    this.refill();

    if (this.tokens >= tokens) {
      this.tokens -= tokens;
      return true;  // Request allowed
    }

    return false;   // Request denied
  }

  refill() {
    const now = Date.now();
    const elapsed = (now - this.lastFilled) / 1000;  // Convert to seconds
    const newTokens = elapsed * this.fillRate;

    this.tokens = Math.min(this.capacity, this.tokens + newTokens);
    this.lastFilled = now;
  }
}

// Example usage:
const rateLimiter = new TokenBucket(100, 10);  // 100 tokens capacity, refills at 10 tokens/second

function handleRequest(req, res) {
  if (rateLimiter.consume()) {
    // Process the request
    res.status(200).send('Request processed');
  } else {
    // Rate limit exceeded
    res.status(429).send('Too many re
‘’’
////////////////////////////quests');
  }
}
Leaky Bucket
This algorithm models traffic like water flowing into a leaky bucket with a finite capacity. Requests are processed at a constant (“leak”) rate. If incoming requests fill the bucket, new arrivals are “spilled” (rejected). It smooths out bursts, ensuring a consistent, orderly output rate.
class LeakyBucket {

  constructor(capacity, leakRate) {

    this.capacity = capacity;      // Maximum queue size

    this.leakRate = leakRate;      // Rate at which requests are processed

    this.queue = [];               // Queue of requests

    this.lastLeaked = Date.now();

    this.processQueue();           // Start processing

  }

  add(request) {

    if (this.queue.length < this.capacity) {

      this.queue.push(request);

      return true;  // Request accepted

    }

    return false;   // Request rejected

  }

  processQueue() {

    setInterval(() => {

      const now = Date.now();

      const elapsed = (now - this.lastLeaked) / 1000;

      const leaks = Math.floor(elapsed * this.leakRate);

      if (leaks > 0 && this.queue.length > 0) {

        // Process 'leaks' number of requests

        for (let i = 0; i < leaks && this.queue.length > 0; i++) {

          const request = this.queue.shift();

          this.processRequest(request);

        }

        this.lastLeaked = now;

      }

    }, 100);  // Check every 100ms

  }

  processRequest(request) {

    // Process the request

    console.log('Processing request:', request);

  }

}

// Example usage:

const rateLimiter = new LeakyBucket(100, 10);  // Queue capacity of 100, process 10 requests/second

function handleRequest(req) {

  if (rateLimiter.add(req)) {

    // Request added to queue

    return 'Request queued';

  } else {

    // Queue full

    return 'Too many requests';

  }

}
Fixed Window Counter
This simple method divides time into fixed windows (for example, 1-minute intervals). A counter for each user and window is incremented with every request.
Once the counter reaches the limit, all further requests are blocked until the next window resets the counter. Its simplicity is offset by a potential burst of traffic at the reset boundary.
class FixedWindowCounter {
  constructor(windowSize, maxRequests) {
    this.windowSize = windowSize;  // Window size in milliseconds
    this.maxRequests = maxRequests; // Maximum requests per window
    this.counters = new Map();     // Map of user IDs to request counts
  }

  allowRequest(userId) {
    const currentWindow = Math.floor(Date.now() / this.windowSize);
    const counterKey = `${userId}:${currentWindow}`;

    // Get current count or initialize to 0
    const currentCount = this.counters.get(counterKey) || 0;

    if (currentCount >= this.maxRequests) {
      return false;  // Limit exceeded
    }

    // Increment counter
    this.counters.set(counterKey, currentCount + 1);

    // Clean up old counters periodically
    this.cleanup(currentWindow);

    return true;  // Request allowed
  }

  cleanup(currentWindow) {
    // Remove counters from previous windows
    for (const [key, _] of this.counters) {
      const [_, window] = key.split(':');
      if (parseInt(window) < currentWindow) {
        this.counters.delete(key);
      }
    }
  }
}

// Example usage:
const rateLimiter = new FixedWindowCounter(60000, 100);  // 1-minute window, 100 requests max

function handleRequest(req, res) {
  const userId = req.headers['user-id'] || req.ip;

  if (rateLimiter.allowRequest(userId)) {
    // Process the request
    res.status(200).send('Request processed');
  } else {
    // Rate limit exceeded
    res.status(429).send('Too many requests');
  }
}
Sliding Window Log
This approach is more precise but computationally heavier. This system maintains a log of timestamps for each user’s request. To check a new request, it counts how many requests occurred in the preceding window. This prevents the burst issues of fixed windows but requires more storage and processing.
class SlidingWindowLog {
  constructor(windowSize, maxRequests) {
    this.windowSize = windowSize;  // Window size in milliseconds
    this.maxRequests = maxRequests; // Maximum requests per window
    this.requestLogs = new Map();   // Map of user IDs to arrays of timestamps
  }

  allowRequest(userId) {
    const now = Date.now();
    const windowStart = now - this.windowSize;

    // Initialize or get existing logs
    if (!this.requestLogs.has(userId)) {
      this.requestLogs.set(userId, []);
    }

    const logs = this.requestLogs.get(userId);

    // Remove old entries
    const validLogs = logs.filter(timestamp => timestamp > windowStart);
    this.requestLogs.set(userId, validLogs);

    // Check if we're under the limit
    if (validLogs.length < this.maxRequests) {
      // Add current request timestamp
      validLogs.push(now);
      return true;  // Request allowed
    }

    return false;  // Limit exceeded
  }
}

// Example usage:
const rateLimiter = new SlidingWindowLog(60000, 100);  // 1-minute window, 100 requests max

function handleRequest(req, res) {
  const userId = req.headers['user-id'] || req.ip;

  if (rateLimiter.allowRequest(userId)) {
    // Process the request
    res.status(200).send('Request processed');
  } else {
    // Rate limit exceeded
    res.status(429).send('Too many requests');
  }
}
Developers can choose the right algorithm based on the need for precision, tolerance for bursts, and system resources. They can tailor rate limiting to their API’s specific requirements.
How Rate Limiting Helps Protect APIs From Attacks
Rate limiting acts as a frontline defence to restrict how frequently a client can access an API. It caps the request volume, so it becomes much harder for attackers to overwhelm the system. They can’t exploit vulnerabilities or force downtime.
With DDoS (Distributed Denial-of-Service) attacks, attackers can flood an API with traffic to overwhelm and crash it. But rate limiting helps control this incoming traffic and preserves the resource availability for legitimate users. With DDoS incidents surpassing one billion in Q1 2025, this control mechanism has become increasingly important — and it must be properly configured and monitored through reliable eCommerce website maintenance services to remain effective over time.
This strategy can also be helpful against brute force attacks. Malicious actors try to guess passwords or API keys through rapid, repeated logins. But rate limiting blocks the IP or user after a few failed attempts, which renders the attacks impractical.
Furthermore, defining an API rate limit can also prevent credential stuffing and web scraping. This strategy makes it infeasible to submit vast numbers of stolen credentials or rapidly harvest data.
How to Implement Rate Limiting in Your Application?
Rate limiting API is a critical security strategy, so you need to implement it carefully and effectively.
Step 1: Choose the Right Rate Limiting Algorithm
First, select an algorithm matching your traffic patterns and security needs.
Use the Token Bucket or Leaky Bucket for systems that allow brief bursts but require a steady average rate.
Opt for a Sliding Window Log for high-precision enforcement where burst tolerance is low.
The Fixed Window algorithm is a good starting point for its simplicity. But be mindful of its potential for traffic spikes at window reset.
Step 2: Define Rate Limits Based on User Needs
Don’t adopt a one-size-fits-all approach. Establish tiered limits based on user roles or API endpoints. For example, anonymous users might have a strict limit (like 100 requests per hour). But premium authenticated users would enjoy a higher quota (like 10,000 requests per hour). Critical login endpoints should have much lower thresholds to prevent brute-force attacks.
Step 3: Implement Monitoring for Rate Limits
It’s not enough to just implement passive limiting. You need to integrate real-time monitoring and alerts to track how often limits are reached. This data is invaluable; it can reveal misbehaving clients or ongoing attack attempts. It can also show if you need to adjust your limits as your user base grows and their usage patterns evolve.
Step 4: Communicate Limits to API Consumers
The key to a good developer experience is transparency. Clearly document your rate limit for each endpoint. More importantly, use HTTP headers like X-RateLimit-Limit, X-RateLimit-Remaining, and X-RateLimit-Reset in your API responses.
With proper communication, consumers are informed of their current status. That prevents surprises and allows them to adjust their application’s behavior accordingly.
As mentioned earlier, API rate limiting is a key strategy, especially if you operate an e-commerce website. It involves multiple users accessing the same pages at the same time. So you need to ensure your website doesn’t get overwhelmed by the API requests.
After implementation, you need rigorous testing and ongoing monitoring. That ensures the rate limits function as intended without disrupting legitimate traffic. It validates your configuration and provides critical business intelligence.
Testing Your Limits
Before deployment, simulate traffic to verify enforcement. For that, you can use load testing tools (like k6, Apache, and JMeter) to create scenarios that exceed your defined thresholds. Confirm that the correct HTTP 429 status code is returned and that the limits are reset at the expected interval.
This proactively uncovers misconfigurations in your chosen algorithm.
Monitoring for Insights
Once live, monitor rate limit hits and usage patterns. High volumes of 429 errors can signal an integration bug, a misbehaving client, or a potential DDoS attack. They can also reveal if your limits are too restrictive and are throttling user engagement. You need to track metrics like requests-per-second and throttle rates per user tier or endpoint.
This data offers a feedback loop, so you can make informed, data-driven adjustments to your policies. That way, your rate-limiting strategy remains effective for website security.
Best Practices for Handling API Rate Limiting
Even with a thorough procedure, you will still need to implement some key practices to ensure the best results. Let’s discuss them one by one.
Use Appropriate Response Headers
Headers are the primary way to communicate rate limits to the client before they hit the limit.
Here are example headers:
X-RateLimit-Limit: 1000
X-RateLimit-Remaining: 42
X-RateLimit-Reset: 1640995200
With this practice, developers can build clients that proactively slow down or adjust their behavior, preventing errors.
Communicate Limits Clearly
Transparency is important when implementing rate limiting. You need to document your limits, the time window, and how headers work. Developers can design their applications correctly from the start, reducing frustration and support tickets.
Implement Graduated Rate Limiting
Implement graduated rate limiting to distinguish between accidental bursts and malicious abuse. A new API key might have a low limit (e.g., 100 requests per hour). As it’s used responsibly, the limit increases (for example, to 1000 requests per hour).
It’s more welcoming to new users while still protecting your system from bad actors.
Return Proper Status Codes
Standardized HTTP status codes immediately inform the client what went wrong. The key code with rate limiting is 429 Too Many Requests. It signals universally that the client has been rate-limited. The client can then automatically trigger a retry-after logic instead of treating it as a generic error.
Use a Distributed Cache
Using a distributed cache is important for tracking request counts accurately across multiple API servers. Key tools to use are Redis and Memcached. If you have 10 servers behind a load balancer, a distributed cache ensures they all share the same user count. Without it, a user could send 100 requests to 10 different servers and bypass the limit (10 x 100 = 1000 requests!).
With these practices, you can shift rate limiting from a simple “on/off” switch into a communication and trust system between the API provider and the consumer. It leads to a more stable and predictable platform for everyone.
Best Examples of Popular REST APIs Using Rate Limiting
Let’s look at how the top platforms and their REST APIs use rate limiting.
Twitter (X) API
X API rate limiting is a tiered system. Each endpoint has a limit per 15-minute window. For example, fetching tweets might allow 300 requests, while posting a tweet is far lower. Hitting the limit returns a 429 error, and you must wait for the window to reset.
Salesforce API
Salesforce API limit is a 24-hour rolling window, aggregating all API calls across your entire organization. This encourages efficient data usage. You can check headers to track your usage against the allocated limit. It prevents your application from being unexpectedly shut off.
Google Maps API
Google uses a “requests per second” model alongside daily quotas. Different services have different costs; a simple geocode costs less than a complex Directions call. This pay-as-you-go model ensures high-traffic apps can burst but must sustain a manageable average rate.
GitHub API
GitHub API limit is restricted to 5000 requests per hour for authenticated users. The X-RateLimit-Remaining header is your best friend. For search APIs, a more restrictive limit exists to protect server resources. Abiding by these limits is a key part of being a good API citizen on the platform.
QuickBooks API
QuickBooks API limits are based on your subscription plan, with a “bucket” of requests that replenishes each minute. This prevents one user from monopolizing the service. They also employ “max concurrent requests” to control how many operations can run simultaneously. It protects their backend systems.
Every major API uses rate limiting, but their strategies are based on scale, risk, and how critical each endpoint is. They maintain performance, prevent abuse, and ensure fair access for everyone.
And if you want a well-tested API rate limit for your e-store, hire eCommerce developers with BrainSpate.
Wrap It Up
API rate limiting is a core concept for a stable, secure, and fair digital ecosystem. It’s the practice that ensures a high traffic surge doesn’t bring down the website.
For providers, it’s an essential tool for protecting infrastructure and ensuring quality of service. With this tactic, developers can create a sustainable environment where APIs can perform reliably for all.
API rate limiting is just one of the strategies for better performance and security. If you want the best results with more of them, get a consultation with us today!
FAQs on API Rate Limiting
1. What is a good rate limit for an API?
There is no universal number. Start based on your infrastructure capacity and user tiers. A common starting point is 100-1000 requests per hour for anonymous users, with higher limits for authenticated users. Monitor the usage and adjust accordingly.
2. What happens when an API limit is exceeded?
The API will reject your request and return an HTTP 429 Too Many Requests error. You’ll need to wait until the rate limit window (e.g., an hour) resets before making more successful calls.
3. Can we configure API rate limits per user?
Yes, limits can be configured per user, API key, IP address, or tenant. This ensures fair usage and allows for tiered subscription plans (like Free, Pro, and Enterprise).
4. How should I respond when rate limits are reached?
Implement exponential backoff. When you get a 429 error, wait briefly and retry. If it fails again, double the wait time before the next retry. This prevents overwhelming the API.
5. How can I fix the API rate limit exceeded error?
Wait for the limit to reset. Reduce request frequency by caching data and optimizing your code. Check for bugs like infinite loops. Upgrade your plan if you consistently need more capacity.