Your product page directly impacts your website’s conversion. However, the default WooCommerce layout doesn’t let you showcase products the way you want.
That’s why learning how to create a single product page in WooCommerce can be very helpful. You can customize everything: layout, design, and even add extra fields to make your page more user-friendly and engaging.
In this blog, we’ll explore how you can build and customize your product page with and without code. Let’s get started.
What is a WooCommerce Product Page? Explained for Store Owners
A WooCommerce product page is the location where your customers land after selecting a product from your catalog. When you install the WooCommerce plugin, WordPress automatically creates a few pages, most importantly, the shop page that displays your products. Each product links to a single product page that showcases the details needed to influence a purchase.
The theme of your store determines the appearance of the product page, typically including a product title, description, pricing, images, categories, tags, and more.
Store owners can add or manage products in the WordPress dashboard under Products, which supports simple, grouped, variable, and affiliate products. Beyond basic settings, WooCommerce also offers options for shipping, attributes, cross-selling through linked products, categories, and tags.
A similar product structure is applied across all items by default. While some store owners appreciate the consistency, businesses seeking more personalized customer experiences often explore how to create a custom single-product page in WooCommerce.
How the WooCommerce Default Template Works
By default, WooCommerce uses a modular template system to build your final product page by combining multiple files. Instead of a single bulky file, the platform separates page structure and product content into reusable components.
Two important template files drive the layout:
single-product.php initializes the page structure and loads supporting templates.
content-single-product.php controls the product-specific elements such as the title, pricing, descriptions, metadata, and related products.
WooCommerce dynamically pulls product information using functions and hooks.
Hooks like woocommerce_before_single_product and woocommerce_after_single_product give developers flexibility to insert, remove, or reposition content without directly changing core files.
This approach becomes important when you need to change WooCommerce single product page layout settings for more customized experiences.
Why Custom WooCommerce Product Pages Can Drive Better Results
Offering a straightforward buying experience, the default layout works perfectly without any customization. It is enough to provide basic product information and simple purchasing functionality.
However, as you scale your store, the limitations become evident. The basic setup is not flexible enough for you to offer conversion-driven user experiences.
Customizing a WooCommerce single product page can help you:
Give customers more choices, like product personalization, bundles, gift wrapping, or customer-specific pricing.
Add immersive product details through FAQs, videos, variation swatches, 360-degree previews, or AR-based features.
Create strong brand recall through a uniform design style across product layouts and the overall store aesthetic.
Now that we have covered the fundamentals, we can comfortably move into the page creation and customization discussion.
How to Create & Customize a Single Product Page in WooCommerce?
Learning how to create a single product page in WooCommerce starts with understanding what you actually want to build or edit. You can customize a reusable product template, and WooCommerce will automatically fill each page with product-specific content. This eliminates the need for repetitive manual edits on product pages.
From quick visual changes to in-depth design flexibility, there are multiple ways to shape user experiences on your online store.
Three common approaches to customizing a WooCommerce single product page include:
Using the WordPress Block Editor (Site Editor)
Using Theme Builder
Using Plugins
The right choice depends on your customization needs, whether it’s minor tweaks or a completely tailored product experience.
Method 1: Using WordPress Block Editor (Site Editor)
This is a no-code approach that lets you build and adjust product layouts with the block-based WordPress Site Editor. With a basic visual control over your WooCommerce product template, it becomes easy and quick to modify layouts.
To begin:
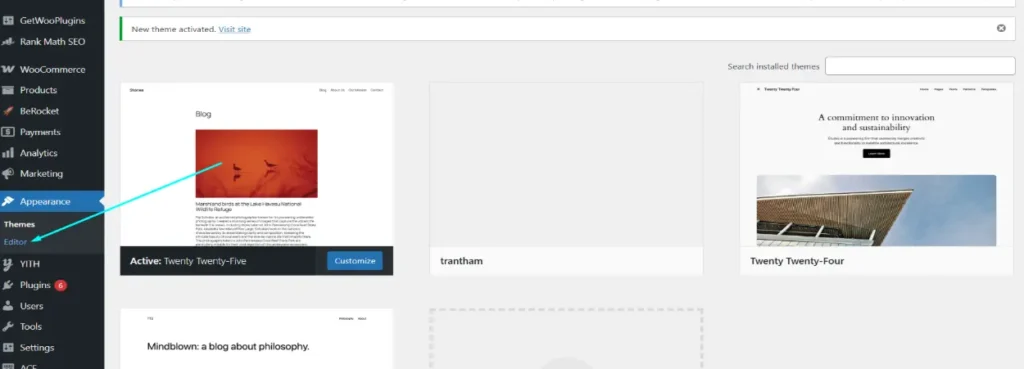
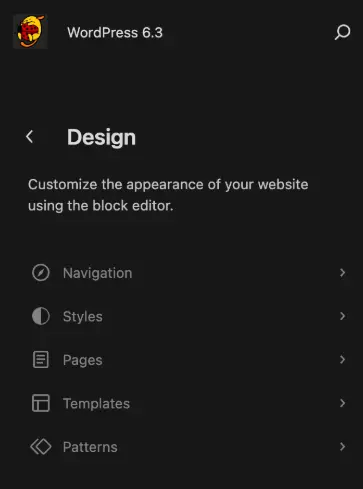
Open your WordPress dashboard and go to Appearance → Editor.
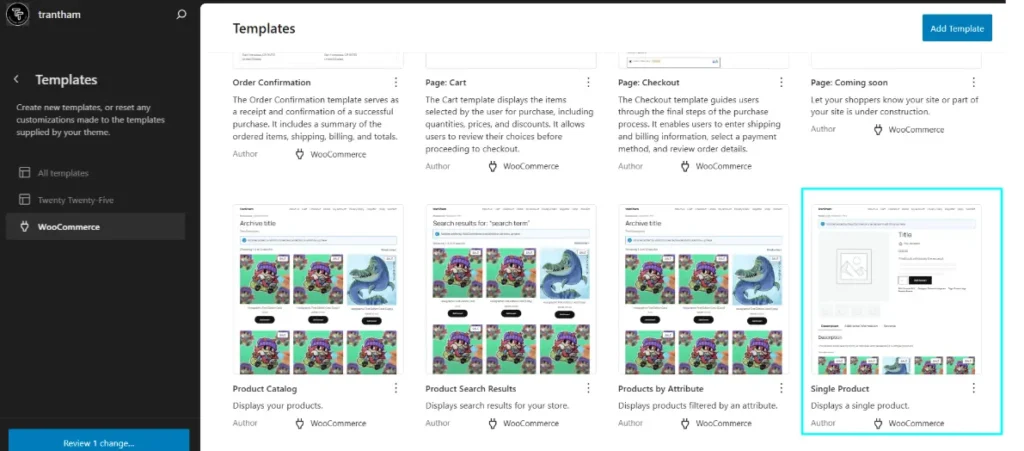
Inside the Site Editor, select Templates from the left panel.
Locate the Single Product template created by WooCommerce.
Open it to access the Gutenberg editing environment.
Every element can be tweaked and rearranged as an editable block, including product images, descriptions, pricing, and supporting content.
Example Use Case: If you want to change the WooCommerce single product page layout positioning, select the image gallery block, move to its parent column settings, and use the directional controls to shift it across the page layout.
For instance, to change the WooCommerce single product page layout:
Select the image gallery block
Move to its parent column settings
Use directional controls to shift it wherever you want
The main advantage of this approach is flexibility with ease of use, a rare combination. From reorganizing sections to layout changes, you can experiment without affecting the dynamic product data. You can update the structure across your store when you’re happy with the changes.
Best For: Lightweight WooCommerce product pages.
Understanding template editing is the first step, but theme builders offer more design flexibility and control.
If you prefer a visual approach over coding, page builders like Elementor Pro and Divi offer an intuitive way to design fully custom WooCommerce product pages. These tools let you drag and drop dynamic widgets and preview changes in real time, making it easier to achieve professional designs without knowledge of PHP or HTML.
Using Elementor Pro
Elementor Pro includes a dedicated Theme Builder feature that supports WooCommerce integration. Here’s how to build a single product page layout with it:
Go to Templates → Theme Builder in your WordPress dashboard.
Click Add New Template and choose Single Product.
Use dynamic widgets like:
Product Title
Product Price
Product Image Gallery
Add to Cart Button
Product Description, Meta, Reviews
Style each widget to match your brand.
Click Publish and set Display Conditions (e.g., all products, specific categories, or individual products).
Example Use Case: Highlight featured products with a hero-style layout or hide certain elements for digital downloads.
Using Divi Builder
If you’re using the Divi Theme, you can create a custom product page with its Theme Builder. Here’s how:
Navigate to Divi → Theme Builder.
Create a new template and assign it to Product Pages.
Add WooCommerce modules like:
Product Image
Product Description
Add to Cart
Product Rating and Reviews
Use Divi’s design options to style each element.
Divi also lets you apply conditional layouts for different product types, similar to Elementor.
Best For: Designers who want pixel-perfect control without coding.
Using page builders gives you creative flexibility and faster implementation for custom product layouts. While ideal for non-developers, they’re also powerful prototyping tools for developers who want to quickly visualize changes before implementing them in code.
Method 3: Using Plugins
If you want to ensure a great customer experience for your store and are comfortable working with code, WooCommerce offers a useful set of hooks and filters.
These allow you to add, remove, or rearrangeproduct page elements without modifying template files, making your changes update-safe and cleaner.
Useful WooCommerce Hooks
WooCommerce uses action hooks to output content at specific points on a single product page. Some of the most commonly used hooks are:
woocommerce_before_single_product: Runs before the entire product content.
woocommerce_single_product_summary: Controls key product elements (title, price, rating, excerpt, etc.).
woocommerce_after_single_product: Runs after all product content.
These hooks let you insert or reorder elements with just a few lines of code.
Common Code Customizations
Here’s an example of how you can remove the default product price and add a custom message below the product title using WooCommerce hooks:
// Remove the default product price

remove_action( 'woocommerce_single_product_summary', 'woocommerce_template_single_price', 10 );
// Add custom text after the product title
add_action( 'woocommerce_single_product_summary', 'custom_product_text', 6 );
function custom_product_text() {
    echo '<p class="custom-note">Limited Stock Available!</p>';
}
Explanation:
The remove_action() function disables the default price output.
The add_action() function injects a custom HTML note before the product excerpt.
You can reorder, replace, or extend any part of the product page using similar logic.
Where to Place the Code
To apply these customizations safely:
Add the code to your child theme’s functions.php file, or
Use a custom functionality plugin if you prefer to separate logic from theme files.
💡 Tip: Always use a staging environment to test your hook-based changes before applying them to your live store.
Hooks and filters give you precise control over your WooCommerce product pages without relying on visual builders or heavy templates. For those seeking maximum efficiency and flexibility, this method is best. For an easier process, you can also consult a custom WooCommerce development company.
Next, let’s look at how to enhance product pages with custom fields and dynamic data.
Add Custom Fields in Your WooCommerce Single Product Pages
Sometimes the default WooCommerce product fields aren’t enough, especially when you need to display additional information such as technical specifications, care instructions, or warranty details. This is where custom fields come in.
Tools like Advanced Custom Fields (ACF) or native meta boxes allow you to add and display custom product data seamlessly.
Add New Fields
Using the Advanced Custom Fields (ACF) plugin is one of the easiest ways to add extra fields to WooCommerce products. Here’s how to do it:
Install and activate the ACF plugin.
Go to Custom Fields → Add New in your WordPress dashboard.
Create a new Field Group (e.g., “Extra Product Info”).
Add the fields you need (e.g., Technical Specs, Ingredients, Warranty).
Under Location Rules, set it to: Post Type is equal to Product.
Once saved, these fields will appear in the product editor screen in the backend.
Display Custom Fields on the Frontend
To show these fields on the single product page, you can place the following code inside a template file (like content-single-product.php) or attach it to a relevant WooCommerce hook:
get_field() retrieves the value of the custom field.
The check ensures the field isn’t empty before displaying it.
The output is wrapped in custom markup for styling.
Always sanitize output using esc_html() or appropriate WordPress functions for safety.
Adding custom fields is a practical way to tailor product content to your store’s niche. Whether you’re selling electronics, books, or furniture, this method gives you the flexibility to enrich product detail pages without bloating your layout.
To make the most of these enhancements, it’s also important to understand how your Product Listing Pages (PLPs) and Product Detail Pages (PDPs) function together. A well-structured PLP and PDP in an eCommerce setup ensure a smoother shopping experience, from product discovery to final purchase, by organizing information where users expect to find it.
Next, we’ll explore how to achieve bigger structural changes through template overrides.
How to Override WooCommerce Template Files?
If you want complete control over the structure and markup of the product page, overriding WooCommerce templates is the most direct method. It allows you to customize the layout and HTML output without relying on hooks or builders. Also, you can further enhance functionality by learning how to create a custom user in WooCommerce to efficiently manage specific user roles and permissions.
How Does Template Overriding Work?
WooCommerce templates can be copied from the plugin to your theme and then safely modified. To override the single product layout:
Now, edit this copied file to change the layout. For example, you can rearrange HTML blocks, add custom divs, or integrate custom fields.
Example: Insert a custom product banner
<?php
echo '<div class="custom-banner">Free Shipping on Orders Over $50!</div>';
?>
You can place this snippet above or below any existing WooCommerce function within the template to control its display position.
Note: Always use a child theme for template overrides to prevent losing changes when your theme updates.
Use Cases:
You want to redesign the entire product layout.
You need to inject third-party components (e.g., ads and tracking codes).
You’re integrating advanced custom fields or metadata directly into the layout.
Overriding WooCommerce templates gives you full freedom to shape the product page exactly how you envision it. While this method requires familiarity with PHP and WooCommerce’s template structure, it is widely used in WordPress eCommerce development for advanced, deeper customizations.
Smart Considerations for an Effective Single Product Page
Learning how to create a single product page in WooCommerce goes beyond changing layouts or shifting elements. A well-built product page should help potential customers find information quickly, get engaged, and convert to a purchase decision. Consider these important elements while building a WooCommerce single product page:
Related product recommendations Increase average order value by keeping customers rotating through your catalog. This can be achieved by showcasing complementary products. Place them in a dedicated section or right at the shopping cart to influence purchase decisions.
Search-focused optimization Your WooCommerce product page must have a thoughtful page title, an optimized meta description, and product keywords placed naturally rather than forced. This On-page SEO approach improves your catalog’s visibility to online shoppers.
Real-time customer assistance Adding live chat functionality provides quick answers to your customers’ questions, resolving doubts about shipping, product details, specifications, and more. Closing the gap between browsing and purchasing.
Trust-building elements Minimize hesitation among your users by offering customer reviews and testimonials. Adding this option increases brand credibility and conversions.
Visible pricing and shipping details Customers appreciate end-to-end information, from complete pricing structure to exact shipping dates. This feature helps reduce confusion among your potential buyers.
The page layout is important, but a well-orchestrated customer experience around your products helps guarantee conversions.
Ready to Build a High-Converting WooCommerce Product Page?
Customizing the single product page in WooCommerce can significantly improve how your product is presented. Whether it’s enhancing the layout, adding custom fields, or using a page builder, small changes can lead to a better user experience and increased sales.
You don’t always need coding skills to achieve this. Tools like Elementor or Divi offer a no-code, easy customization pathway. And if you’re comfortable with code, WooCommerce hooks and template overrides offer full control over your website.
The conversion capability of your WooCommerce product page depends not only on its design, but also on how well it supports your customers in making confident purchase decisions.
FAQs on WooCommerce Single Product Pages
1. How to create a WooCommerce single product page?
You can design a WooCommerce single product page using the WordPress Site Editor, theme builders like Elementor or Divi, or custom templates and hooks. The choice depends on your needs (whether you want simple visual edits or advanced layout control) and coding skills.
2. How do I add a custom page to my WooCommerce account?
Go to Pages → Add New in WordPress, create your custom page, and then connect it to WooCommerce through settings, menus, account endpoints, or custom account tabs based on where you want it displayed.
3. How do I show a single product on my homepage in WooCommerce?
Use the Product block in the WordPress editor or insert a WooCommerce shortcode with the product ID to display a specific product directly on your homepage.
4. How to create a sales page on WooCommerce?
Create a new page, then use the [sale_products] shortcode to display all on-sale products. You can also use filters in the WooCommerce shop page to display only discounted items or create a custom query using a page builder.
5. How do I remove the sidebar from a single product page in WooCommerce?
Go to Appearance → Customize → WooCommerce → Product Page, then check the sidebar settings. If not available, create a child theme and override the single-product.php file to remove the sidebar code, or use CSS to hide it: .single-product .sidebar { display: none; }