
Quick Summary
- Identifies the main causes of slow Magento 2 stores, including hosting, caching, extensions, themes, images, and excessive requests.
- Covers technical improvements such as Redis, Varnish, OPcache, CDN, updated PHP, and production mode.
- Explains frontend optimization techniques, including image optimization, lazy loading, CSS/JS minification, and reducing third-party scripts.
- Highlights ongoing performance maintenance through Core Web Vitals monitoring, database cleanup, extension audits, updates, and regular speed testing.
A slow Magento 2 store can affect more than the customer experience. High server response times, inefficient code, large assets, and poor caching can increase page load times and make browsing and checkout less responsive. Google also uses Core Web Vitals as part of its page experience signals, making performance an important consideration for both users and search visibility.
A slow site undermines marketing investments and erodes a company’s competitive advantage. But don’t worry; there are a few sure-fire ways to improve the speed of a Magento 2 store. This blog focuses on that.
In this blog, we’ll check out the best Magento 2 speed optimization tips and tactics. By the end, your store will be responsive and user-friendly for the best conversion possible.
Why is the Magento Store Slow?
A slow Magento store is rarely affected by a single issue. Instead, performance lag is typically the result of several interconnected bottlenecks. Diagnosing the root cause is the first critical step toward a faster, more profitable store. So here are the potential reasons behind the Magento store slowing down.
- Underpowered Server: Shared hosting or entry-level VPS plans often lack the CPU, RAM, and I/O capacity required by Magento’s robust architecture.
- Misconfigured Software: Incorrect settings for PHP (e.g., incorrect version, low memory limit), MySQL, and web servers like Apache or Nginx can significantly impact the server’s response time.
- Lacking Caching Systems: The absence of a full-page cache (such as Varnish) or an Opcode cache (such as OPCache) forces the server to rebuild every page from scratch for each visitor, an incredibly inefficient process.
- Poorly Coded Extensions: Third-party extensions can introduce redundant database queries, inefficient code, and conflicts that slow down entire pages.
- Unoptimized Themes: Heavy, bloated themes with excessive JavaScript and unoptimized images are a major drag on front-end load times.
- Outdated Magento Version: Running an outdated version of Magento means missing out on critical performance enhancements and security patches released by Adobe.
- Unoptimized Images: Large, high-resolution images that haven’t been compressed or properly scaled are the most common cause of slow page rendering.
- Render-Blocking Resources: CSS and JavaScript files that are not optimized or deferred can prevent the page from displaying until they are fully loaded.
- Excessive HTTP Requests: A theme that requires dozens of individual CSS, JavaScript, and image files will be slow, as the browser must request each one separately.
After you have determined the cause behind the slow store, you can then work on the Magento 2 performance optimization.
Magento 2 Speed Optimization Checklist
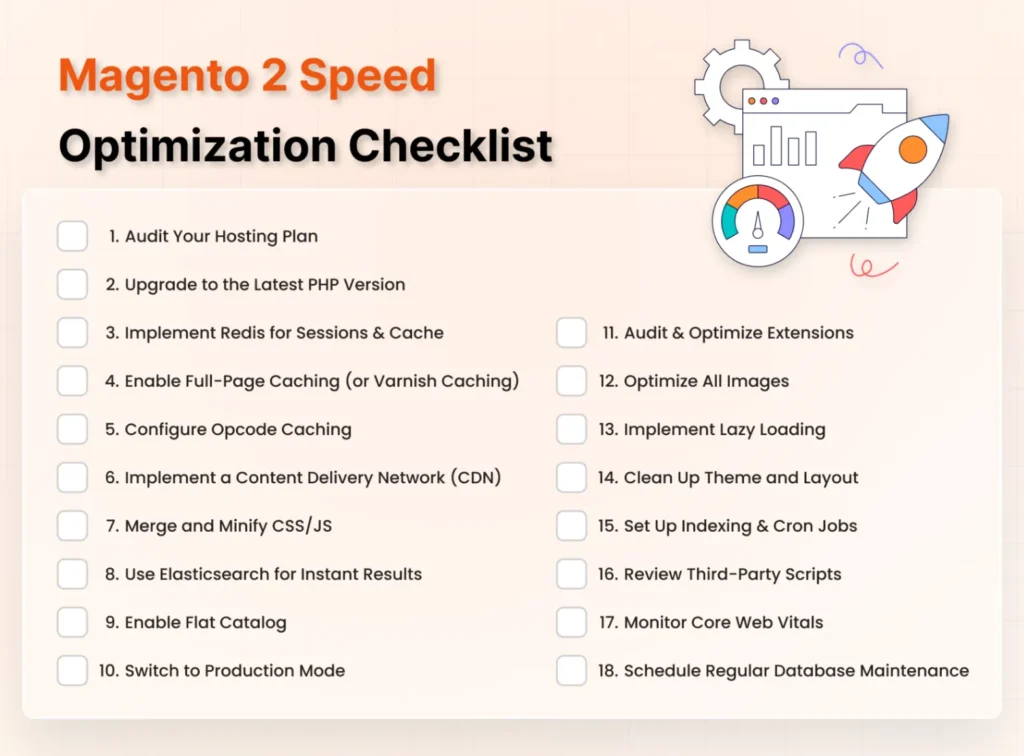
Use this actionable checklist to systematically improve your store’s performance. Tackle these items in sequence for the most significant impact. (You can alter the sequence according to the cause of slow performance.
Audit Your Hosting Plan
Magneto is an enterprise-level eCommerce platform and requires dedicated resources. Shared hosting, while cheaper, could mean other sites on the same server consuming your CPU and RAM.
Action
So what you can do is migrate to a Magento-optimized VPS (Virtual Private Server), dedicated server, or a cloud solution (like AWS, Google Cloud). Make sure the plan includes SSDs (Solid State Drives) for fast database and file access.
Upgrade to the Latest PHP Version
Newer PHP versions offer performance, security, and compatibility improvements, but support depends on your Magento or Adobe Commerce release. Adobe Commerce 2.4.9 supports PHP 8.5, while 2.4.8 releases support PHP 8.3 or 8.4. Always verify the PHP version supported by your exact Magento release before upgrading.
Action
Check your current PHP version from your hosting environment or command line, then compare it with Adobe’s system requirements for your Magento or Adobe Commerce version. Test all custom code and third-party extensions for compatibility before changing PHP versions.
Configure Redis or Valkey for Cache and Sessions
Redis and Valkey keep Magento’s cache and session data in memory instead of on disk. Reads get faster, and busy stores stop fighting over file locks. Which one you use depends on your version. On Adobe Commerce 2.4.9, Valkey is the supported cache service, and Redis cache is not.
By default, Magento writes cache data to files under var/cache/. That means disk reads on every request and slow cache handling across multiple web nodes.
Action
Check your version against Adobe’s system requirements first. Then use the service that matches your release:
| Adobe Commerce version | Cache service |
|---|---|
| 2.4.8 and earlier | Redis or Valkey, if your exact release supports it |
| 2.4.9 and later | Valkey |
For on-premises stores on Redis (2.4.8 and earlier), set cache and sessions from the CLI:
bin/magento setup:config:set –cache-backend=redis –cache-backend-redis-server=127.0.0.1 –cache-backend-redis-db=0
bin/magento setup:config:set –session-save=redis –session-save-redis-host=127.0.0.1 –session-save-redis-db=2
For Valkey, follow Adobe’s Valkey configuration guide. On Adobe Commerce on Cloud, you set VALKEY_BACKEND in .magento.env.yaml, and 2.4.9 uses symfony_l2.
Then apply these settings from Adobe’s best practices:
- Separate cache and sessions. Use two instances so each can be sized and tuned on its own, and cache pressure cannot slow down sessions.
- Enable L2 cache. It keeps a local copy on each web node and uses Redis or Valkey as the source of truth, which cuts network traffic.
- Turn off session locking (disable_locking: 1) for speed. Set it back to 0 only if you see race conditions under heavy concurrent session activity.
- Skip cache compression unless maxmemory is above 6 GB. It saves memory but costs CPU.
Note: Redis and Valkey do not replace Varnish or Fastly. Full-page caching is a separate layer and is configured on its own.
Enable Full-Page Caching (or Varnish Caching)
Varnish is a full-page HTTP caching layer that sits in front of the Magento application. It stores eligible generated responses and can serve cached storefront pages without sending every request through Magento, reducing application processing and server load. Adobe recommends Varnish for production environments, particularly for stores that need to handle higher traffic volumes.
Action
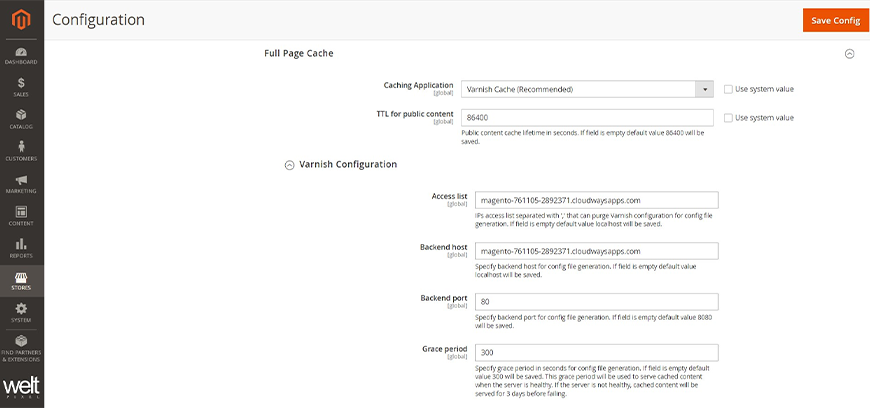
Full-page caching requires server-level configuration. For that, Varnish cache is a sure-fire way to improve the performance. Navigate to Store > Settings > Configuration > Advanced > System > Full Page Cache. Then click ‘Varnish Caching’ in the “Caching Application” list. After that, enter a value in the “TTL for the public content” field and expand “Varnish Configuration”.
However, there’s a chance that Varnish may not be feasible. Then, at a minimum, you need to ensure Magento’s built-in caching (under System > Cache Management) is enabled.
Configure Opcode Caching
Before executing PHP code, the server must compile it. OPcache stores this precompiled script bytecode in memory. That eliminates the need for a compilation step for subsequent requests.
Action
OPcache is typically enabled by default in modern PHP installations. Verify it’s active and configured with sufficient memory in your php.ini file.
Implement a Content Delivery Network (CDN)
A CDN stores static files (images, CSS, JavaScript) on a global network of servers. When a user visits your site, these files are delivered from the server closest to them, drastically reducing load times.
Action
One of the best ways to improve eCommerce store performance is by implementing a CDN. So make sure to sign up for a CDN service (e.g., Cloudflare, Fastly). Then configure your Magento store to point static media URLs to the CDN.
Optimize CSS and JavaScript Delivery
The goal is fewer render-blocking files and smaller ones. Minify your code, inline the CSS needed for the first screen, and let HTTP/2 handle parallel downloads. Adobe advises against merging JS and CSS files, and its built-in bundling is a fallback, not a best practice.
Merging was useful before HTTP/2. Today, a merged file must download in full before the browser can use any of it. Adobe also warns that merging can break RequireJS and bundling logic.
Action
1. Minify CSS, JavaScript, and HTML.
The Admin path (Stores > Configuration > Advanced > Developer) only shows in developer mode. On a production store, use the CLI:
bin/magento config:set dev/css/minify_files 1
bin/magento config:set dev/js/minify_files 1
bin/magento config:set dev/template/minify_html 1
bin/magento setup:static-content:deploy -f
bin/magento cache:flush
2. Leave merging off.
Keep dev/js/merge_files and dev/css/merge_css_files at 0.
3. Test built-in JS bundling before you keep it.
It packs your JavaScript into large shared files and often adds page weight. Keep it off unless a before-and-after test shows a gain. For fewer requests, use a page-type bundling extension or a lightweight front end such as Hyvä.
4. Inline critical CSS.
Enable “Use CSS critical path” (dev/css/use_css_critical_path) only if your theme has a critical CSS file. Generate one with a tool such as Critical or Penthouse. This removes the stylesheet request from the first render and helps LCP.
5. Move scripts out of the way.
“Move JS code to the bottom of the page” sits in the same Developer settings. Turn it on, then test checkout and any extension that expects scripts in the head.
6. Confirm HTTP/2 or HTTP/3 is active on your server or CDN.
Test after each change. Minification and script moves are the most common causes of broken checkout JavaScript. Check PageSpeed Insights for render-blocking resources afterward.
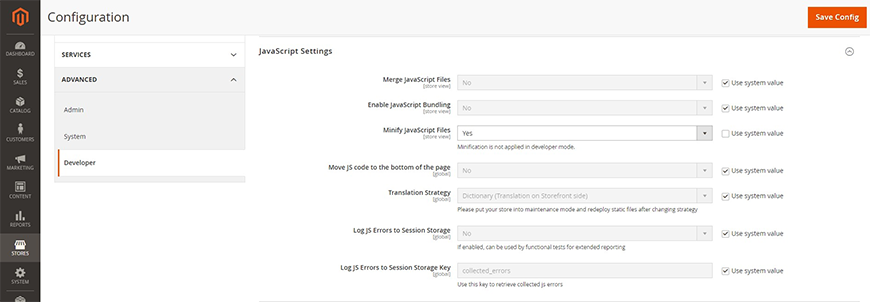
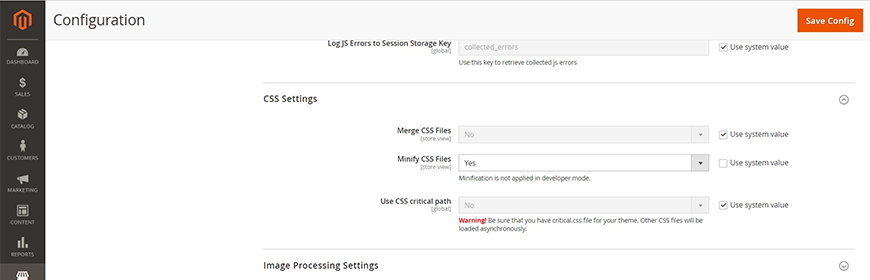
Understand this: Test thoroughly after enabling, as it can sometimes cause conflicts with poorly coded extensions.
Use Elasticsearch or OpenSearch for Catalog Search
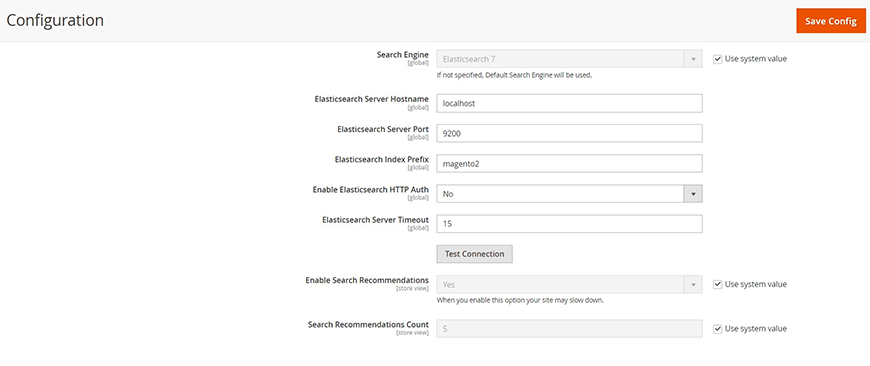
Magento 2.4 needs a dedicated search engine for catalog search and category listings. Adobe now recommends OpenSearch, and Elasticsearch is deprecated. The engine is mandatory, so the speed gain comes from running a supported version, indexing it correctly, and giving it enough memory.
Action
1. Pick a supported engine.
OpenSearch is the choice for new setups. Adobe Commerce 2.4.9 supports OpenSearch 3.x and stays compatible with 2.x. Elasticsearch 7.17 reached end of support on January 15, 2026, so plan a move if you still run it.
2. Set the engine.
Go to Stores > Settings > Configuration > Catalog > Catalog > Catalog Search. Select OpenSearch (or Elasticsearch) as the Search Engine, enter host and port, click Test Connection, then Save Config. The CLI equivalent is:
bin/magento config:set catalog/search/engine opensearch
3. Reindex search.
bin/magento indexer:reindex catalogsearch_fulltext
bin/magento cache:flush
4. Give it room.
Run it on its own server on large catalogs. Size the JVM heap to your catalog and keep it at or below half of the server’s RAM, which is standard OpenSearch guidance.
Disable Flat Catalog
Flat catalog copies product and category data into flat tables. It used to help. Adobe now lists enabled flat tables and indexers as a cause of heavy SQL load, slow cron jobs and stuck cron jobs. Keep both settings off.
This applies to Adobe Commerce and Magento Open Source 2.1.x and later, per Adobe’s knowledge base article.
Action
1. Turn it off in the Admin.
Go to Stores > Settings > Configuration > Catalog > Catalog > Storefront. Set Use Flat Catalog Category to No and Use Flat Catalog Product to No. Click Save Config and refresh the cache when prompted.
2. Flush the cache.
php bin/magento cache:flush
3. If the options are locked or unavailable, disable the flat indexers in the config file:
php bin/magento indexer:set-mode schedule
In app/etc/config.php, change flat_catalog_product and flat_catalog_category from 1 to 0. Then run:
php bin/magento app:config:import
php bin/magento indexer:status
php bin/magento cache:flush
4. Test the storefront.
Load category pages, search and filters. Some older extensions query flat tables directly, so check them before you push the change live.
Switch to Production Mode
Developer and Default modes generate extensive log files and do not optimize code for speed. Production mode minimizes these overheads and enables all caching mechanisms.
Action
Inherently, Magento 2 provides three operating modes: Default, Developer, and Production. Let’s stick with the latter. The “Production Mode” is optimized for excellent user experience and performance.
You can check the current mode with the CLI command:
php bin/magento deploy:mode:show
The following command can help enable the Production mode:
bin/magento deploy:mode:set production
Then you can switch to the developer mode with this CLI command:
php bin/magento deploy:mode:set developer
And if you, as the developer, want additional control over the process, break it down into multiple steps.
php bin/magento setup:di:compile

php bin/magento setup:static-content:deploy -f
Audit & Optimize Extensions
Poorly coded extensions can add massive overhead through redundant database queries. They also add heavy JavaScript libraries and inefficient code. That can slow down the Magento store speed quite significantly.
Action
What you need to do is regularly review your extensions. Disable any extension that isn’t in accordance with the regular features, functionalities, performance, and security. For necessary ones, check with the vendor for updates or more optimized versions.
If you don’t want to directly delete the extension, consult with the extension provider or developer. There’s a chance they can help with optimization.
Optimize All Images
Unoptimized images are the primary cause of slow page rendering. They consume excessive bandwidth, forcing visitors to wait for unnecessary data to download before the page becomes usable.
Action
Before uploading, you need to optimize the images in a few different ways:
- Reduce File Size: Use tools like ImageOptim, TinyPNG, etc. to reduce the file size without noticeable quality loss.
- Offer Next-gen Image Formats (WebP): WebP tends to provide superior compression compared to JPEG and PNG. That’s why it’s supported by most modern browsers. So convert images to WebP.
- Correctly Size Images: Make sure the image dimensions match their max display size on your eStore. DO NOT upload a 3000px-wide banner that is to be displayed at 1200px.
Well-optimized images can improve the site load times significantly. Plus, they directly boost the user experience and improve the Core Web Vitals scores like LCP (Largest Contentful Paint).
Implement Lazy Loading
Lazy loading images and other media is another premier strategy to improve the site speed and performance. This tactic defers the loading of images and videos that aren’t in the user’s immediate viewport.
Action
You can use the HTML loading=“lazy” attribute for img and iframe tags. Modern browsers support this simple yet efficient method. And for broader browser compatibility or complex implementations (like background images), you can use a dedicated Magento extension. A dedicated JavaScript library might also work.
This technique helps reduce the initial number of HTTP requests and page weight, which accelerates initial page load speed significantly. It leads to a faster perceived performance and a better LCP score.
Clean Up Theme and Layout
Over time, themes can gather unused code and redundant layout files from poorly integrated extensions or abandoned features. It bloats up the code and forces the browser to process unnecessary resources. That slows down the page rendering.
Action
Do the following to clean up the theme and layout:
- Remove Unused Modules: Deactivate and remove any 3rd-party theme modules or extensions that are redundant.
- Simplify Layouts: Next up, you need to audit XML layout files. It eliminates redundant containers, blocks, and template calls that tend to add complexity without value.
- Purge Unused CSS/JS: Use browser developer tools to identify CSS rules and JavaScript functions that are not being used on key pages, and remove them.
A leaner theme tends to reduce server processing time and minimize the amount of code transferred to the browser. It also streamlines rendering for a faster, more efficient store.
Set Up Indexing & Cron Jobs
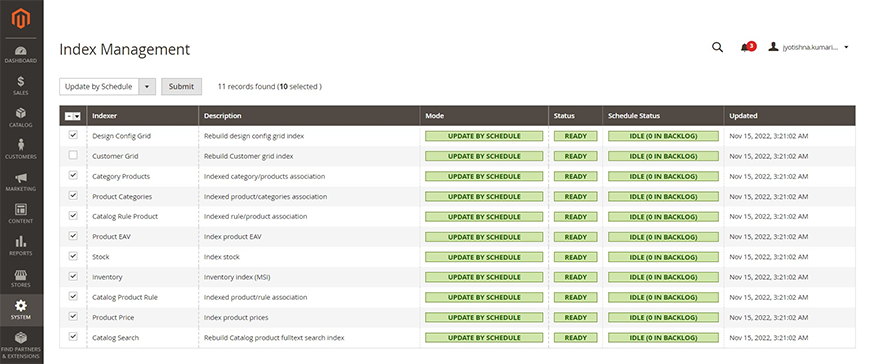
Magento uses indexers to transform complex data (like product attributes and categories) into optimized database tables for fast retrieval. If indexing isn’t automated, this data becomes outdated. That leads to incorrect prices, slow search results, and inventory errors.
Action
Make sure Magento’s cron jobs are running on your server; they trigger indexers automatically at scheduled intervals. This is essential for maintaining data accuracy.
You can set Magento indexers to two modes: “Update on Save” or “Update on Schedule”. The latter one would be more suitable as that lets you execute the cron job at a particular time set by you. You should, ideally, choose a time when your site has the lowest traffic.
Here’s the command for Magento 2 to be executed on the root directory using the SSH terminal.
php bin/magento indexer:reindex
Run this command to change the indexers’ mode to “Update on Schedule”.
php bin/magento indexer:set-mode schedule
Log in to Magento Admin and navigate to ‘System’ > ‘Index Management’. Select all indexers and then ‘Update on Schedule’ from the “Actions” dropdown menu. Then, to set the schedule, click ‘Submit’.
Properly configured cron jobs ensure your store’s data is consistently pre-processed and ready for instant access. That helps maintain site speed and data integrity without manual intervention.
Review Third-Party Scripts
There’s a chance you have installed third-party scripts for analytics, chat widgets, advertising, tracking, and more. They can significantly impact performance. These external resources often load synchronously. It blocks page rendering while waiting for responses from external servers.
Action
Here’s what you need to do as part of a 3rd-party scripts review.
- Audit All Scripts: Identify every third-party script using browser developer tools. Question the necessity and ROI of each one.
- Load Asynchronously or Defer: Configure essential scripts to load asynchronously (without blocking rendering) or defer them until after the main page content loads.
- Consolidate Services: Use tag managers responsibly and seek consolidated solutions (like a single platform for analytics and marketing). It helps reduce the number of separate script requests.
Minimizing and optimizing these scripts reduces render-blocking resources, a key aspect of Magento performance optimization. It leads to faster page displays and better CWVs, especially LCP and INP.
Monitor Core Web Vitals
Core Web Vitals are Google’s user-focused metrics for evaluating loading performance, responsiveness, and visual stability. They measure real-world performance, interactivity, and visual stability.
Action
Regularly check Google Search Console for field data (actual user experiences) and PageSpeed Insights. That offers you a lab-based analysis with specific recommendations to speed up Magento 2.
The key metrics to focus on are:
- Largest Contentful Paint (LCP) for leading performance
- Interaction to Next Paint (INP) for site responsiveness
- Cumulative Layout Shift (CLS) for visual stability
Set performance budgets and monitor trends over time to catch regressions from updates or new content.
Schedule Regular Database Maintenance
Now, to maintain the results to optimize your Magento 2 store, you need to schedule regular database maintenance. It accumulates overhead from log files, order history, and product revisions. This data fragmentation increases query times and storage usage. That gradually degrades the Magento performance.
Action
Here’s what you do within the database maintenance:
- Automate Log Cleaning: Use Magento’s built-in system to automatically clean logs. Go to System > Configuration > Advanced > System > Log Cleaning for the same.
- Optimize Database Tables: Regularly run optimization commands (like OPTIMIZE TABLE) on core tables to defragment storage and improve read efficiency.
- Archive Old Orders: For high-volume stores, archive older order data to keep primary tables lean and query-efficient.
Routine maintenance ensures your database operates efficiently. It prevents gradual performance decay and maintains fast server response times for critical operations like checkout and search.
So, want to improve the Magento site performance and user experience? Then consult with our Magento 2 development company.
Magento 2 Upgrade Service and Regular Maintenance
Regular maintenance and timely upgrades aren’t merely technical tasks; they are an investment in stability, security, and performance. Every new version of Magento includes security patches, performance upgrades, and compatibility patches. They protect your store and improve its efficiency.
The key Magento 2 upgrade and maintenance services include:
- Security Patch Implementation: Proactively apply security updates to protect against vulnerabilities and prevent data breaches.
- Version Upgrades: Plan and execute upgrades to the latest Magento 2 version to access new features, performance optimizations, and PHP version support.
- Extension Compatibility Checks: Verify all third-party extensions and custom code are compatible with new versions before upgrading.
- Performance Regression Testing: Conduct speed tests before and after upgrades to ensure optimizations remain effective and identify new bottlenecks.
A structured maintenance plan ensures your store remains secure, fast, and compatible with evolving technologies. It protects your revenue and provides a consistent customer experience.
You can, of course, get our eCommerce website maintenance services to maintain the security and performance of your Magento 2 store.
Let’s Summarize
Optimizing your Magento 2 store is not something you can do and then sit back and relax. It’s going to be an ongoing commitment to your customers and your bottom line. You make technical improvements that translate into tangible business advantages. Like, higher conversion rates, improved customer loyalty, and stronger search engine visibility.
From server configuration to front-end code, you need to methodically analyze and address the bottlenecks. Begin with an audit, prioritize the most impactful changes, and establish a routine for monitoring and maintenance.
Connect with our experts for professional assistance. Start your optimization journey today!
FAQs on Magento 2 Speed Optimization
1. What is the single most important factor for Magento performance?

Your hosting infrastructure is the foundation. Without adequate server resources (CPU, RAM, SSD), even the best code-level optimizations will have limited impact.
2. What is Varnish Cache, and do I need it?
Varnish is a full-page caching solution that serves pages instantly without processing PHP requests. It’s essential for high-traffic stores and provides the most dramatic speed improvement.
3. Can too many extensions slow down my store?
Yes. Poorly coded extensions add overhead through redundant database queries and heavy JavaScript. Regularly audit and remove any non-essential extensions.
4. How often should I clean the Magento database?
Schedule regular monthly maintenance to clean log files and optimize database tables. For high-volume stores, consider weekly cleanups to prevent performance degradation.